Extending the Metamodel with Type Definitions
Tailor CrossModel's metamodel to your own standards
Out of the box, CrossModel knows about entities, attributes, relationships, identifiers and data models. Type definitions let you extend that metamodel with your own types - so you can attach extra properties to model objects, capture house standards, and reuse them across every model in your workspace.
A typical use case: your organisation wants every entity to record a data owner and a data classification, or you model in a fixed pattern such as Data Vault (Hubs, Links, Satellites) and want each pattern to carry its own default attributes and metadata. Type definitions make those rules first-class parts of the model instead of conventions you have to remember.
This tutorial covers:
- The kinds of type definition CrossModel supports
- Creating a custom property definition
- Building a type hierarchy with
extends - Using a type by assigning it to a model object
- How CrossModel resolves and overrides inherited property values
What you can define
A type definition describes a kind of model object. CrossModel has six definition kinds - one for each core metamodel concept, plus a generic one for custom properties. Each has its own button on the New Definition toolbar:
| Icon | Definition kind | Extends which object |
|---|---|---|
 |
Entity Definition | Logical entities |
 |
Attribute Definition | Entity attributes |
 |
Relationship Definition | Relationships |
 |
Identifier Definition | Identifiers |
 |
DataModel Definition | Data models |
 |
Custom Property Definition | Custom properties |
Every definition you create implicitly builds on a built-in root for its
domain (Entity, Attribute, Relationship, Identifier, DataModel,
CustomProperty). You never have to declare that root - it is always there as
the base of the chain.
Step 1 - Create a custom property definition
The most common starting point is a custom property definition: a reusable, typed property you can attach to object definitions.
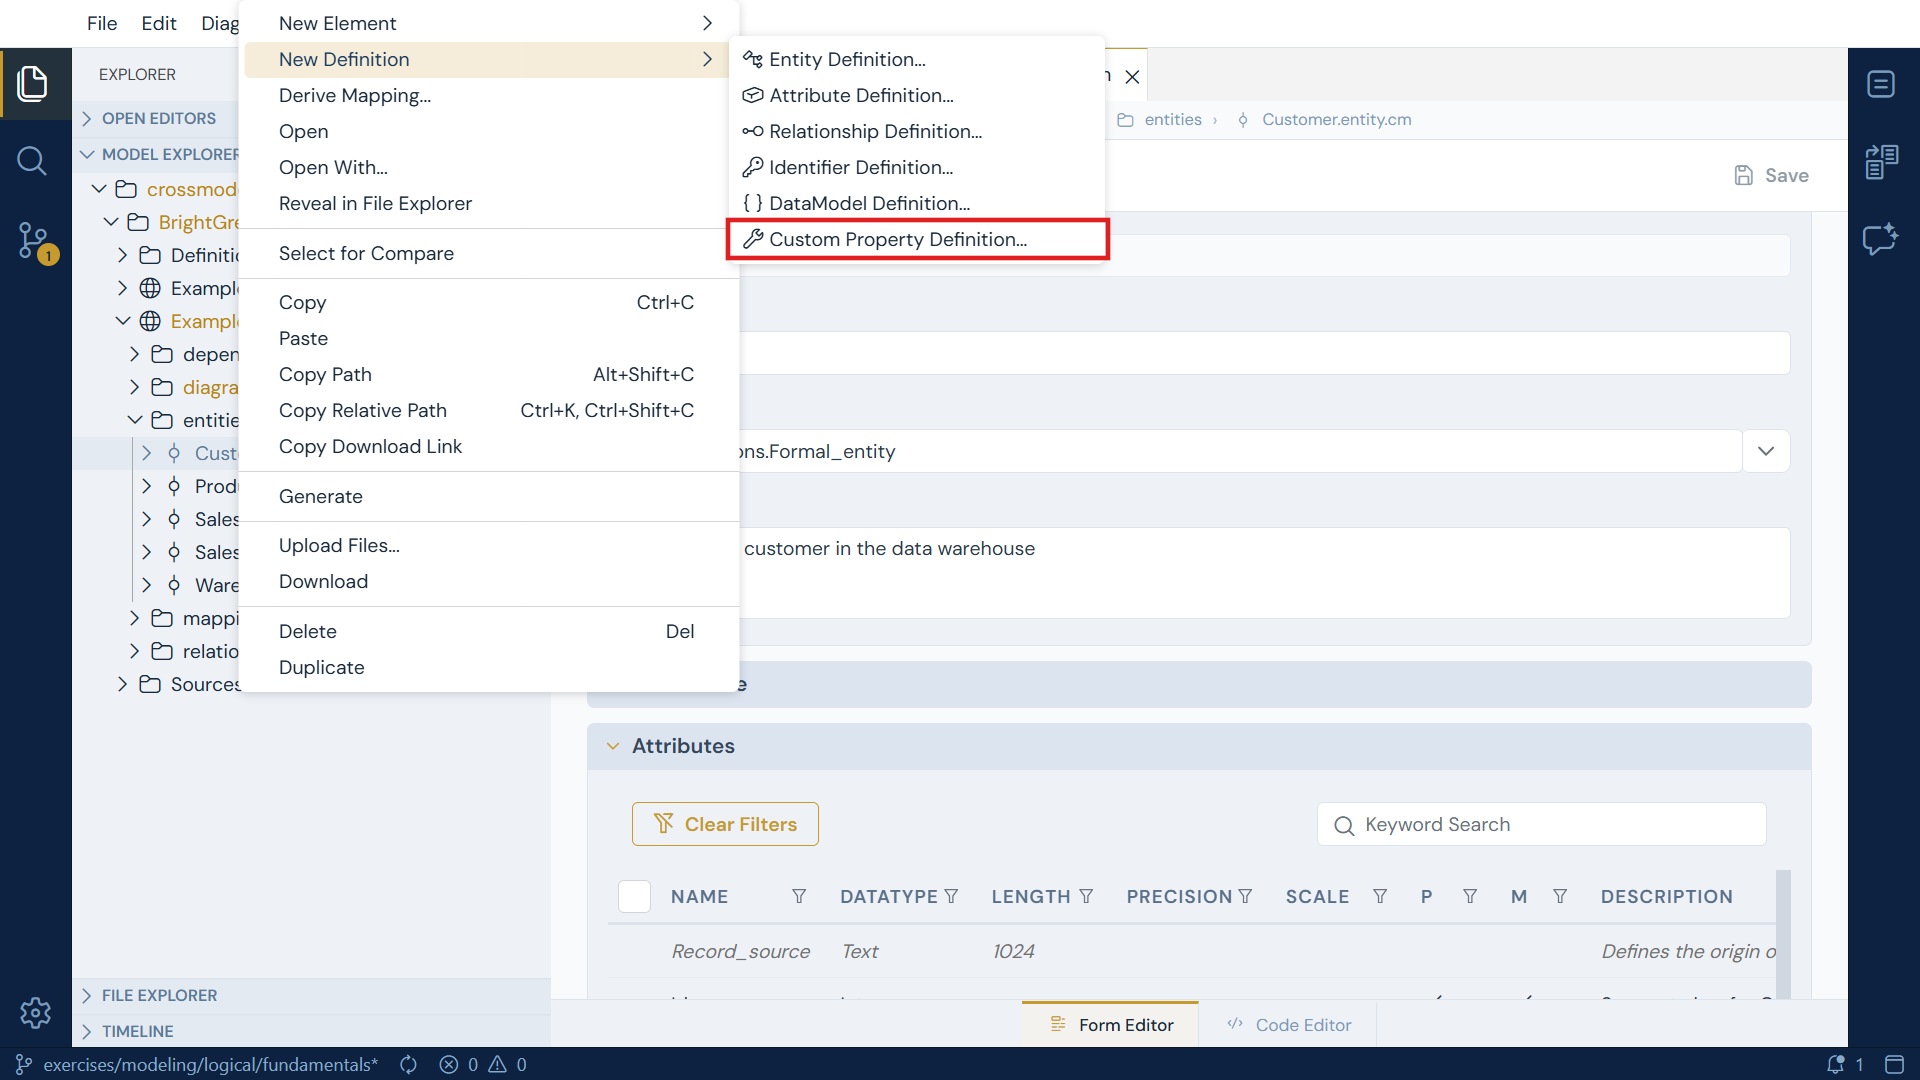
In the Model Explorer, right-click your data model and choose New Definition → Custom Property Definition, or click the custom property definition button in the toolbar. CrossModel creates the file and opens it in the form editor with the cursor already in the Name field.
Now fill in the form. Suppose BrightGreen wants a governance property that records who owns the data in an entity - give it a name, description and data type, and optionally mark it mandatory.
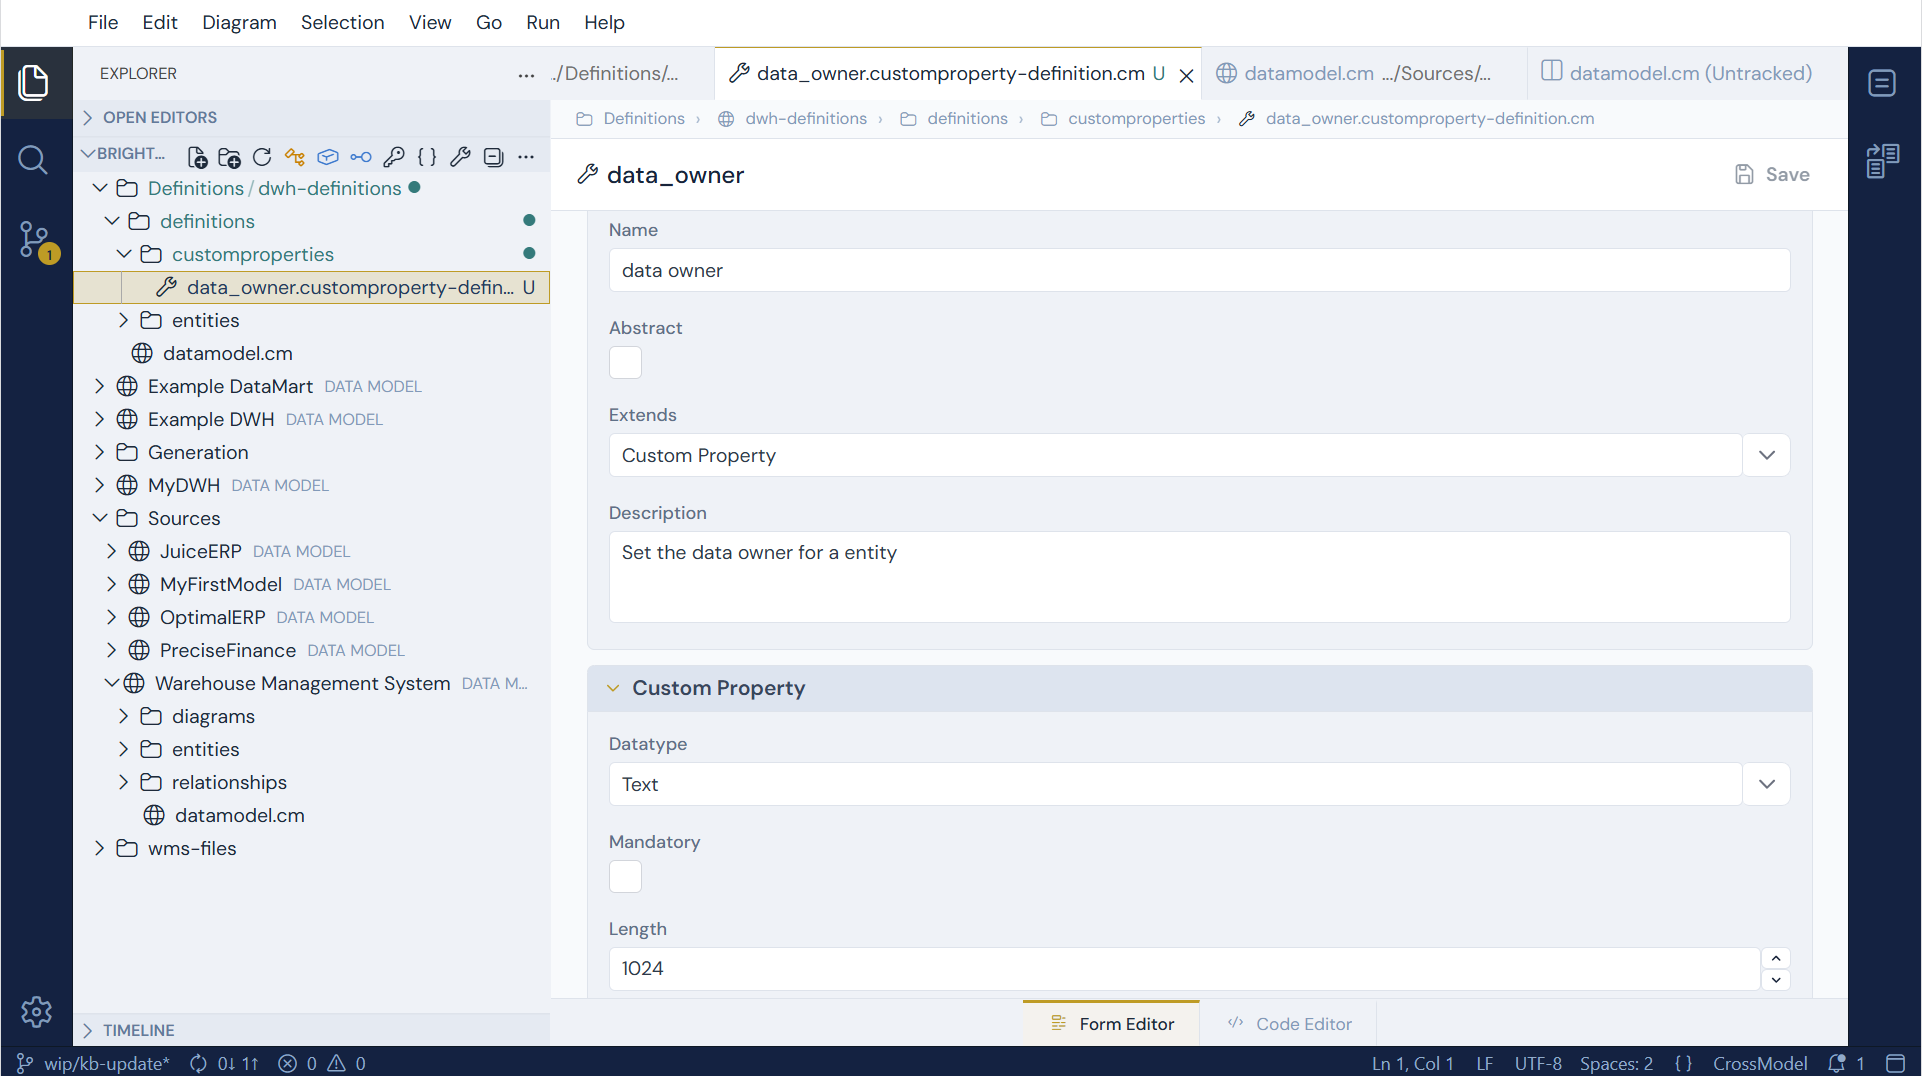
A custom property definition can carry the following metadata, which describes the shape and constraints of the value its instances will hold:
| Field | Purpose |
|---|---|
| Data type | The value's data type (see below) |
| Length | Maximum length |
| Precision | Total digits |
| Scale | Fractional digits |
| Unit | The unit a Duration is counted in |
| Mandatory | Whether instances must provide a value |
| Value | A default value supplied to instances |
| Allowed Values | A fixed list of values instances may choose from (see below) |
| Abstract | Marks the definition as a building block only - not meant to be used directly |
Supported data types are: Text, Binary, Integer, Decimal, Float,
Duration, Date, Time, DateTime, Boolean, UUID, Geometry and
Geography.
Which fields apply to which data type
Length, Precision, Scale and Unit only describe some data types, and the form knows which. Pick a data type and the fields that do not apply to it are greyed out rather than hidden, so you can see at a glance what that type can be constrained by:
| Data type | Length | Precision | Scale | Unit |
|---|---|---|---|---|
Text, Binary |
● | |||
Decimal |
● | ● | ||
Float |
● | |||
Time, DateTime |
● | |||
Duration |
● | |||
Integer, Date, Boolean, UUID, Geometry, Geography |
Unit is new in v1.11.0. It turns a bare number into a stated quantity: a
retention period of 7 means nothing until the definition also says years.
The units are milliseconds, seconds, minutes, hours, days, months
and years, and the value itself stays a plain whole number, so nothing has to
parse 7 years back apart.
Setting Unit on anything but a Duration is an error - "Unit is only
applicable to Duration datatype." - which is mostly a concern when you edit the
.cm file by hand, since the form disables the field for you. In the file it is
written without quotes, and it belongs after scale and before mandatory:
customPropertyDefinition:
    id: RetentionPeriod
    name: "RetentionPeriod"
    datatype: "Duration"
    unit: years
    value: "7"
Values are checked against the data type
A value that cannot be the data type it claims to be is reported in the
Problems panel, on the definition's own default value and on every instance
that supplies one. As of v1.11.0 the checked types are Text (length only),
Integer, Decimal, Float, Boolean, Date, Time, DateTime, UUID
and Duration.
UUID and Duration are the two v1.11.0 added:
UUIDwants the canonical 8-4-4-4-12 hexadecimal form.not-a-uuidgives "Value 'not-a-uuid' is not a valid UUID. Expected format: 8-4-4-4-12 hexadecimal digits.", while3f2504e0-4f89-11d3-9a0c-0305e82c3301passes.Durationwants a whole number, because the unit is carried separately.1.5gives "Value '1.5' is not a valid Duration. Expected a whole number." To say an hour and a half, use90withunit: minutes.
Binary, Geometry and Geography are not format-checked: there is no single
string convention for them to check against.
Changing the data type re-checks the value you already had
The value is validated against whichever data type the field currently says,
not the one it had when you typed it. Switch a property from Duration to
UUID and a perfectly good 3 immediately reports as an invalid UUID. That
is the model telling you the truth, but it does surprise people who expect
the error to be about the field they just touched.
Step 1b - Constrain a property to a list of allowed values
A free-text governance property is only as good as the discipline of the people
filling it in. Owner, owner, Data Owner and dataowner are four different
strings as far as any downstream consumer is concerned. Allowed values turn
such a property into a controlled vocabulary.
Scroll to the Allowed Values section at the bottom of the custom property
definition form and press Add Allowed Value once per permitted value. Type the
value and press Enter - the row is committed and a new empty row opens, so you can
enter the whole list without reaching for the mouse. For a Data Classification
property, BrightGreen might allow exactly Public, Internal, Confidential and
Restricted.
The effect is immediate: the definition's own Value field turns into a dropdown offering exactly those four values.
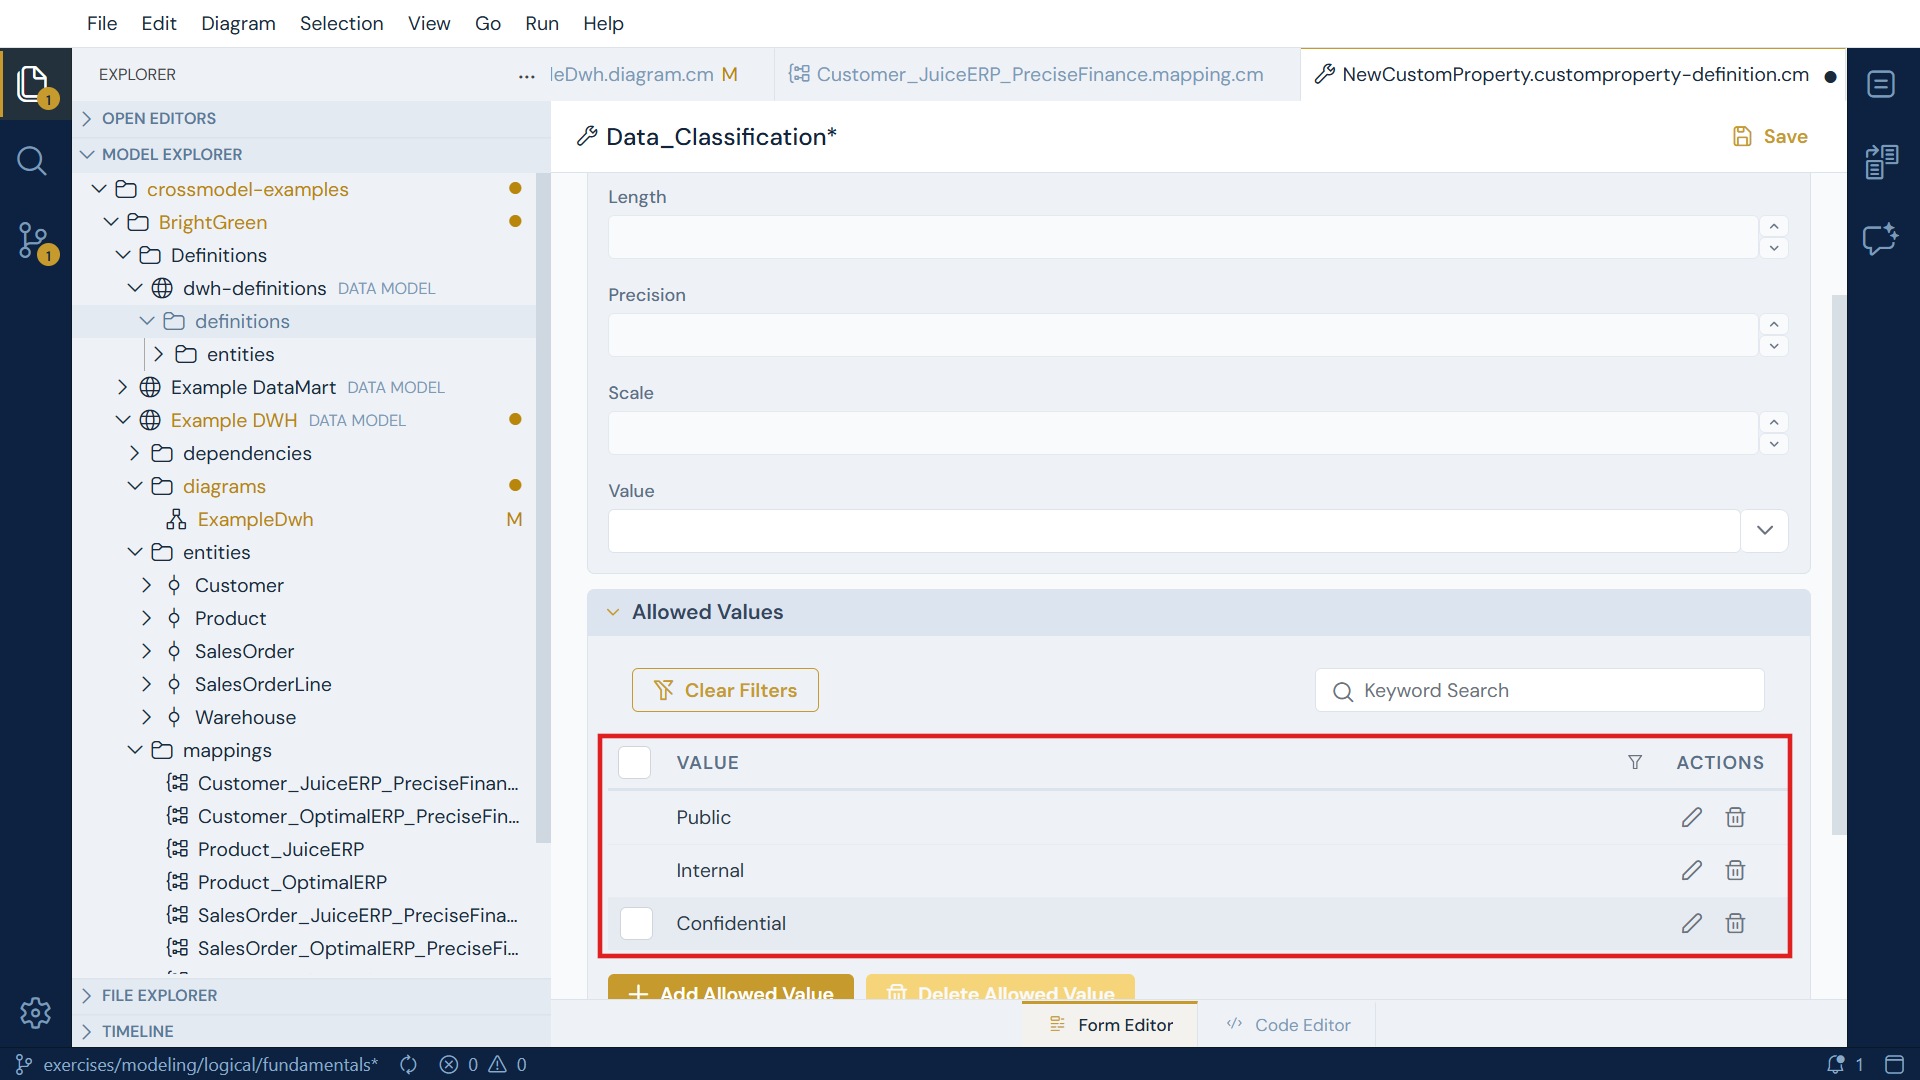
Once the list is non-empty, the behaviour of every instance of that property changes:
- The Value field turns into a dropdown restricted to the list - free text is only accepted while the list is empty.
- The definition's own default Value is validated against the list too, so a typo in the default is caught at the source rather than on every object that inherits it.
- A value outside the list produces the warning "Value '…' is not in the allowed values: …" in the Problems panel.
Allowed values are inherited, and the nearest list wins
Like everything else on a definition, the list travels down the extends
chain - but it is replaced, not merged. CrossModel walks the chain and
uses the first definition that declares a non-empty list. A child that
declares its own allowedValues therefore fully overrides its parent's
vocabulary; a child that declares none simply inherits the parent's.
Allowed values also reach your templates
Code generation sees both halves of a custom property. In a template,
entity.customProperties.DataClassification renders the value, while
entity.customProperties.$allowedValues.DataClassification gives you the full
permitted list - useful for generating CHECK constraints or enum types
straight from the model. See Code Generation.
Mandatory values are a warning, not an error
A missing value on a mandatory custom property is reported as a warning rather than an error. Modelling is iterative - an incomplete governance property should show up in the Problems panel without making the model invalid and blocking diagrams, generation, or a commit. The same applies to a value that falls outside the allowed list.
Step 2 - Build a type hierarchy with extends
Type definitions can inherit from one another through the Extends setting. A child definition inherits everything from its parent and may add to or override it. Each definition has a single parent, forming an inheritance chain.
Hierarchies shine when you model in a repeatable pattern. As an example, we define a governed entity to be something that should always have a data owner and a reference to an external enterprise data catalog. The we distinghuis between historical and nonhistorical entities as subtypes to classify whether or not data is needed historically.
Create the base entity definition first, mark it Abstract, and add its shared attributes:
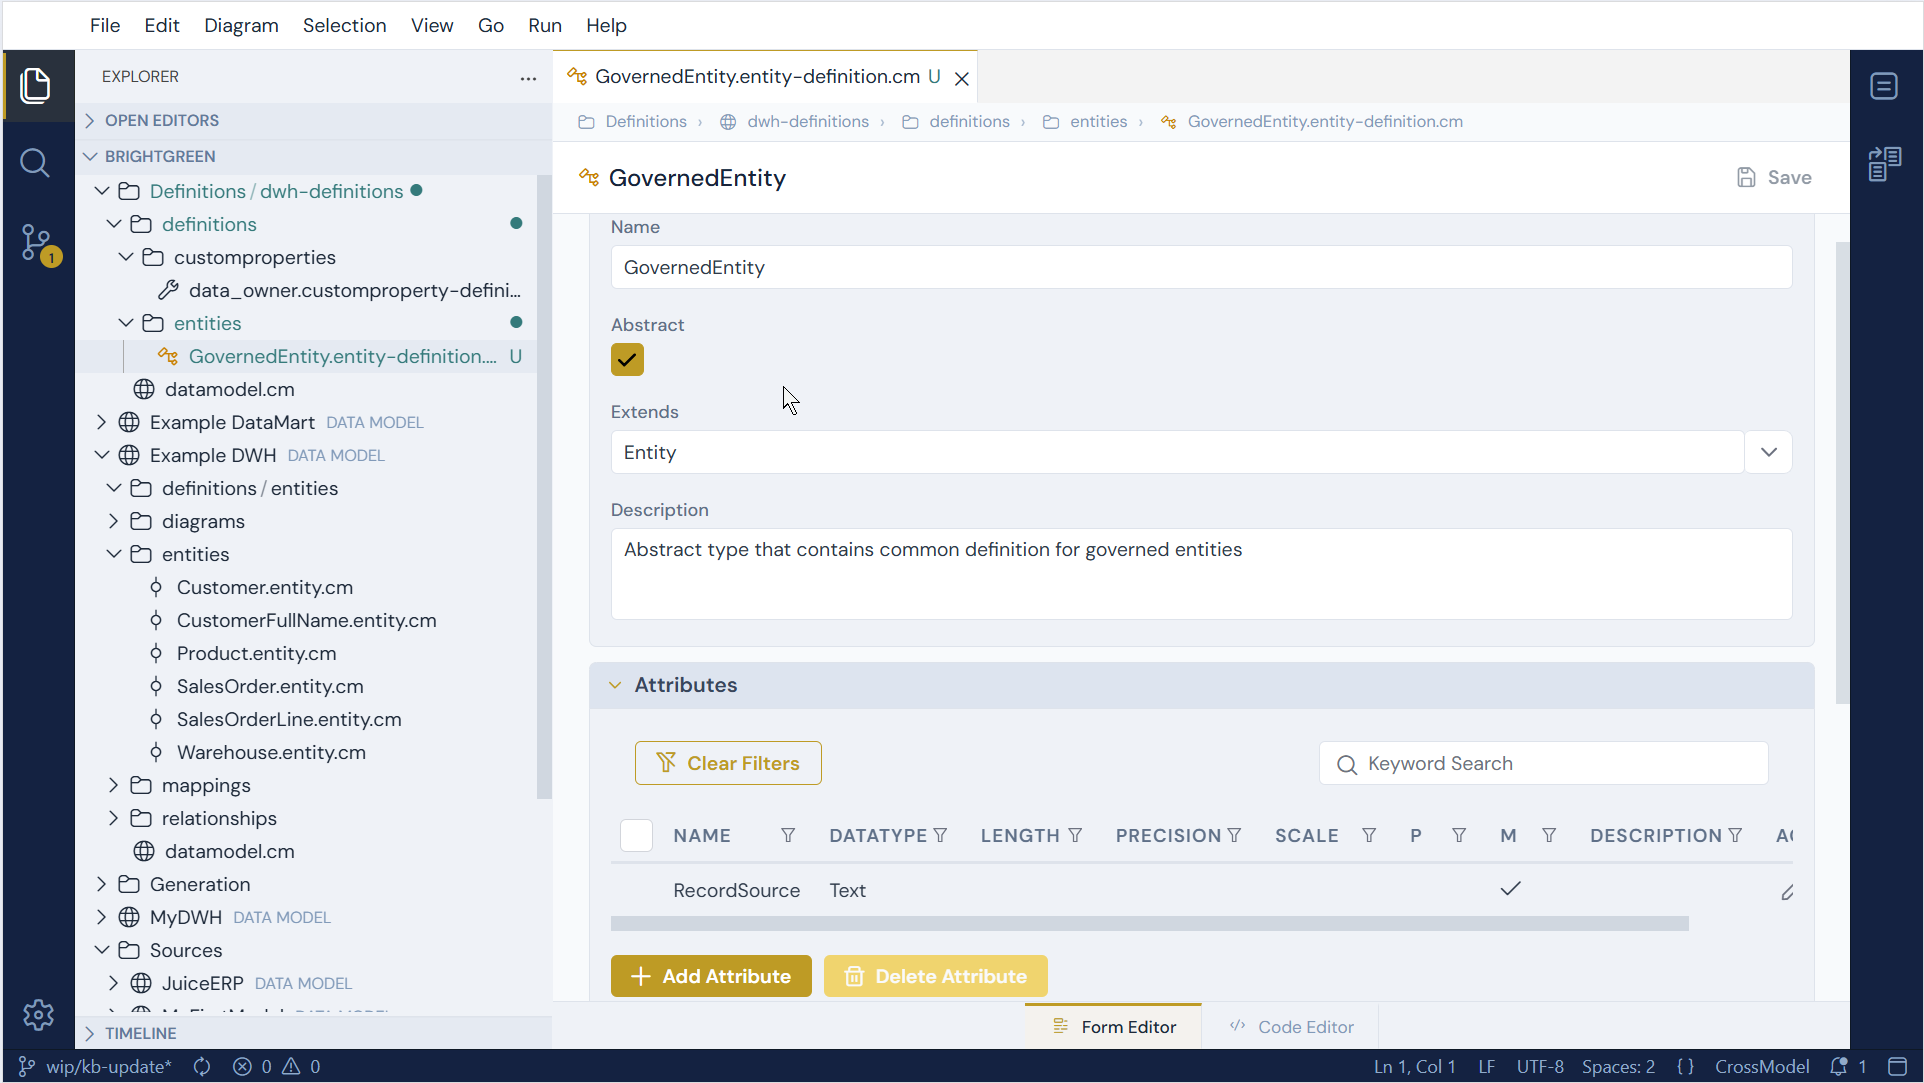
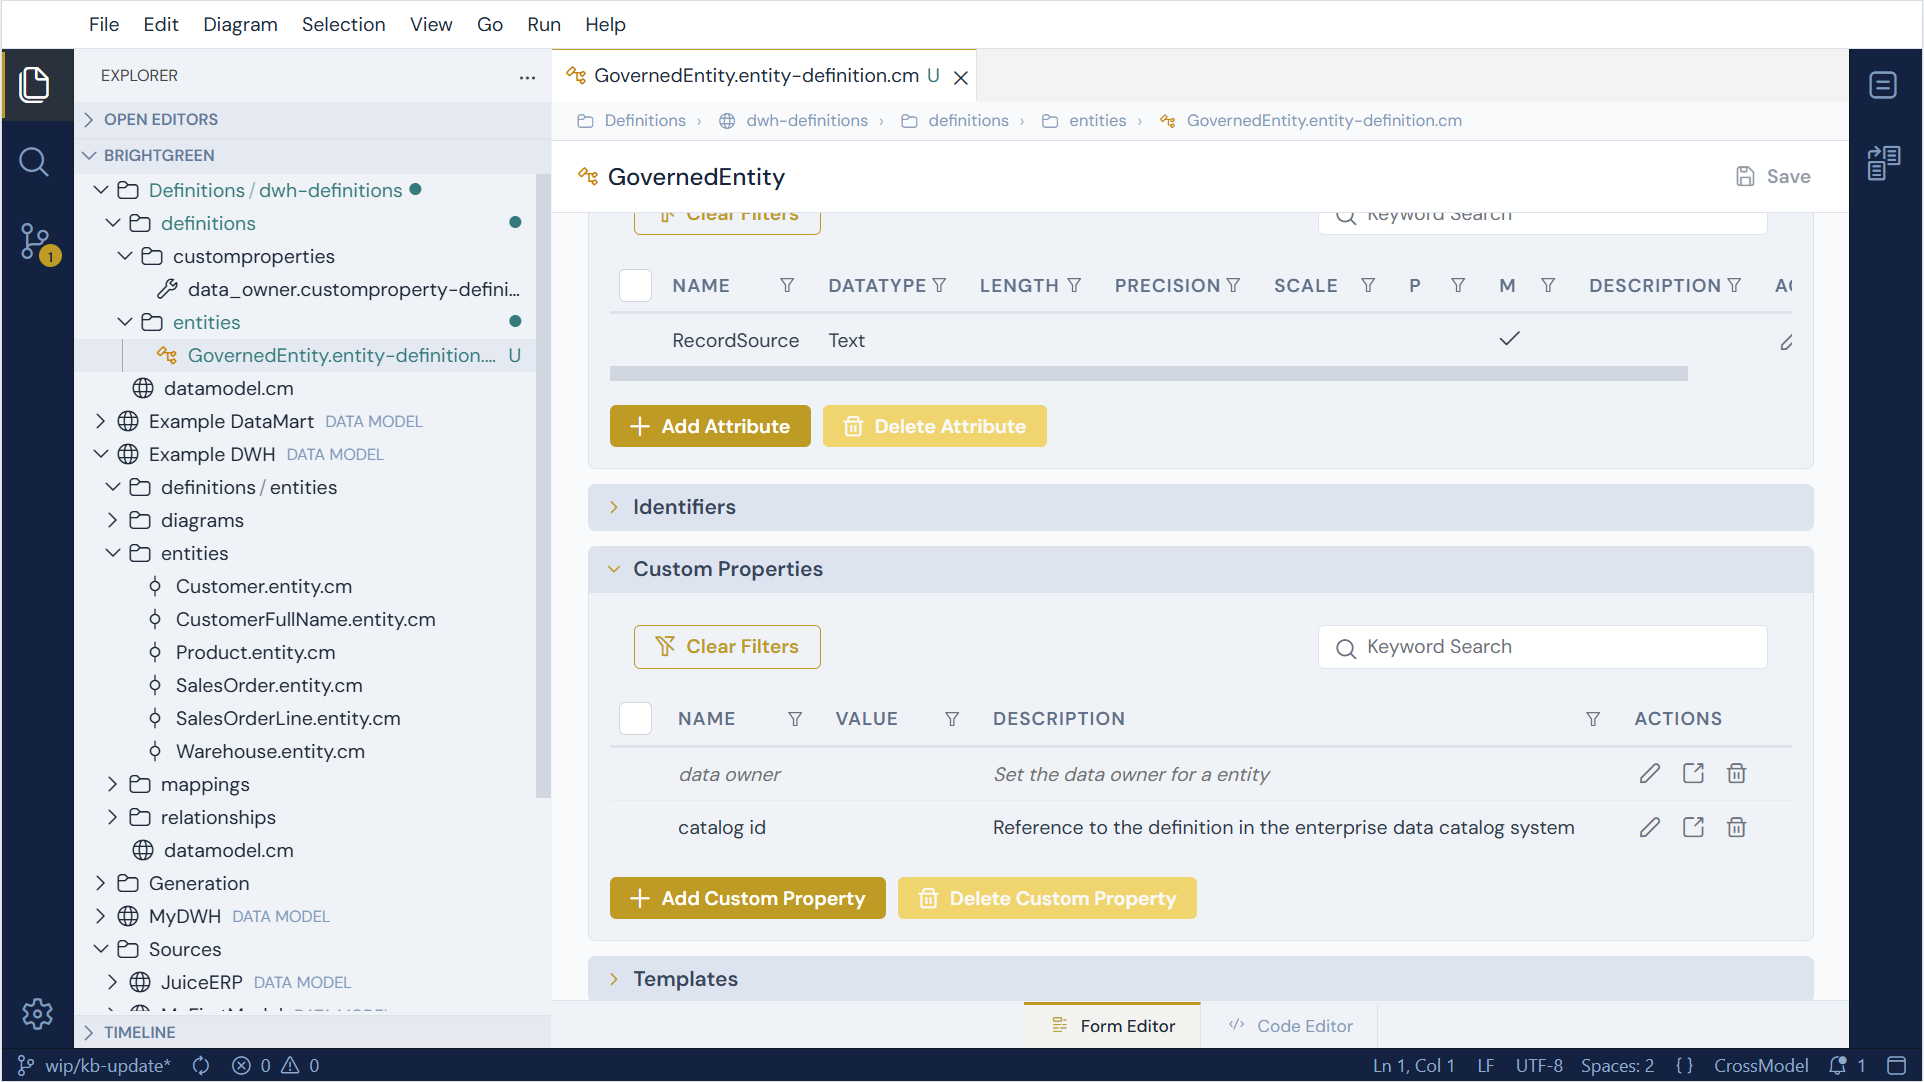
Now also add custom properties, use the custom property type data owner created in the previous step:
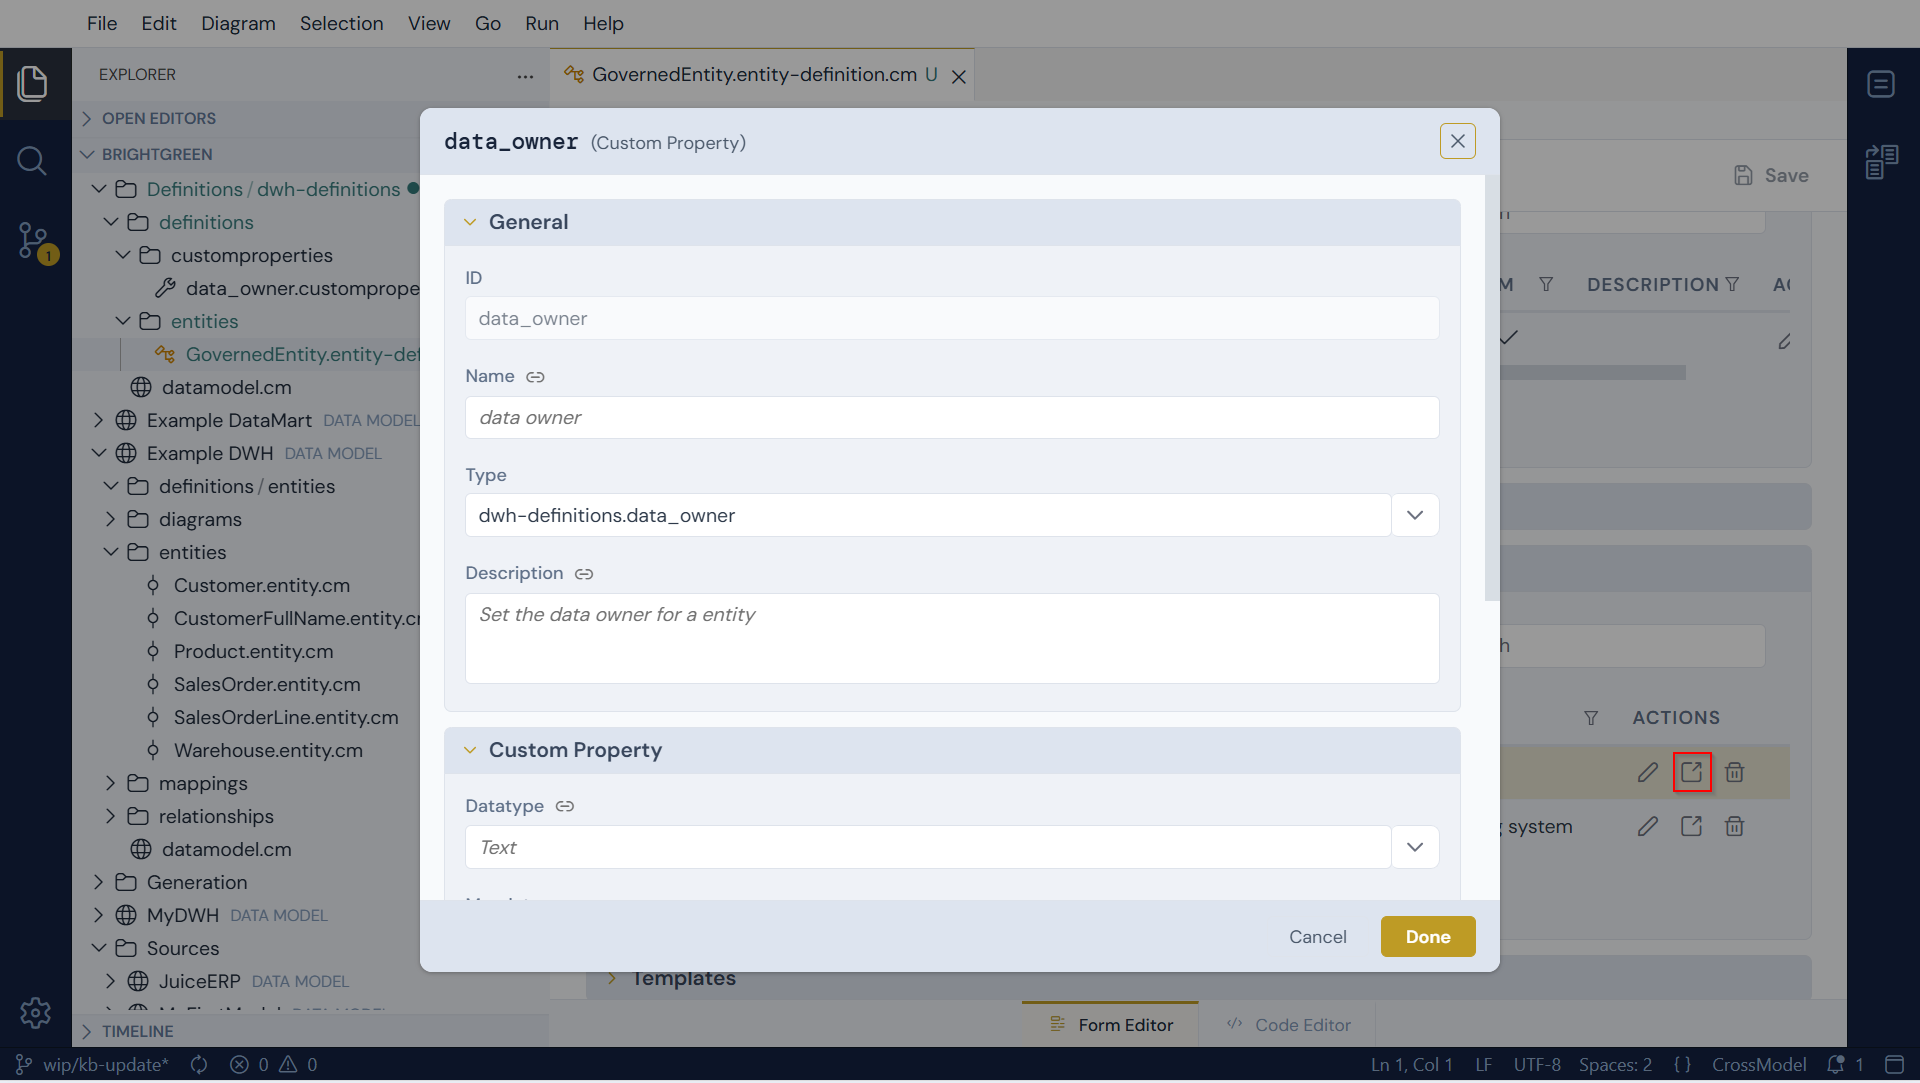
You need to use the popup to set the custom property type:
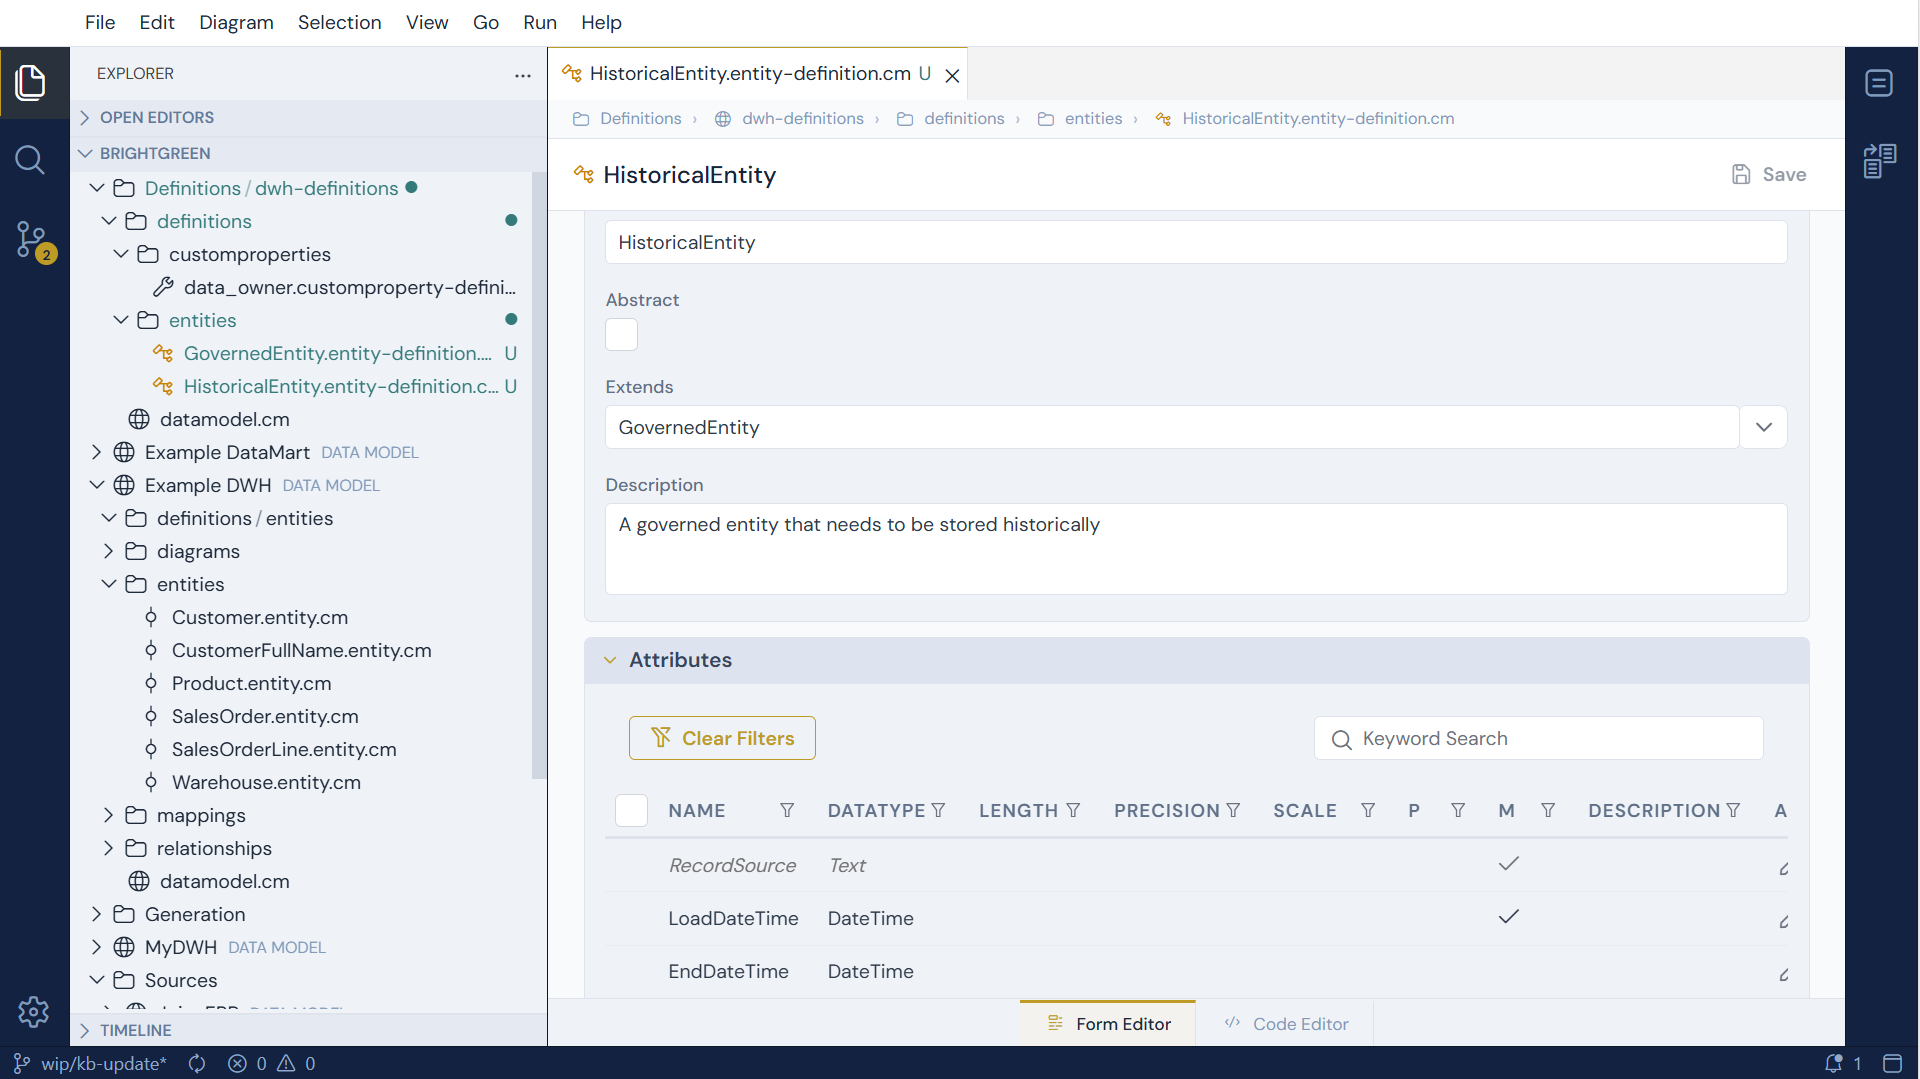
Then create the concrete HistoricalEntity and set its Extends to
GovernedEntity. It inherits the base attributes and custom property
automatically, and you add only the attributes specific to a HistoricalEntity:
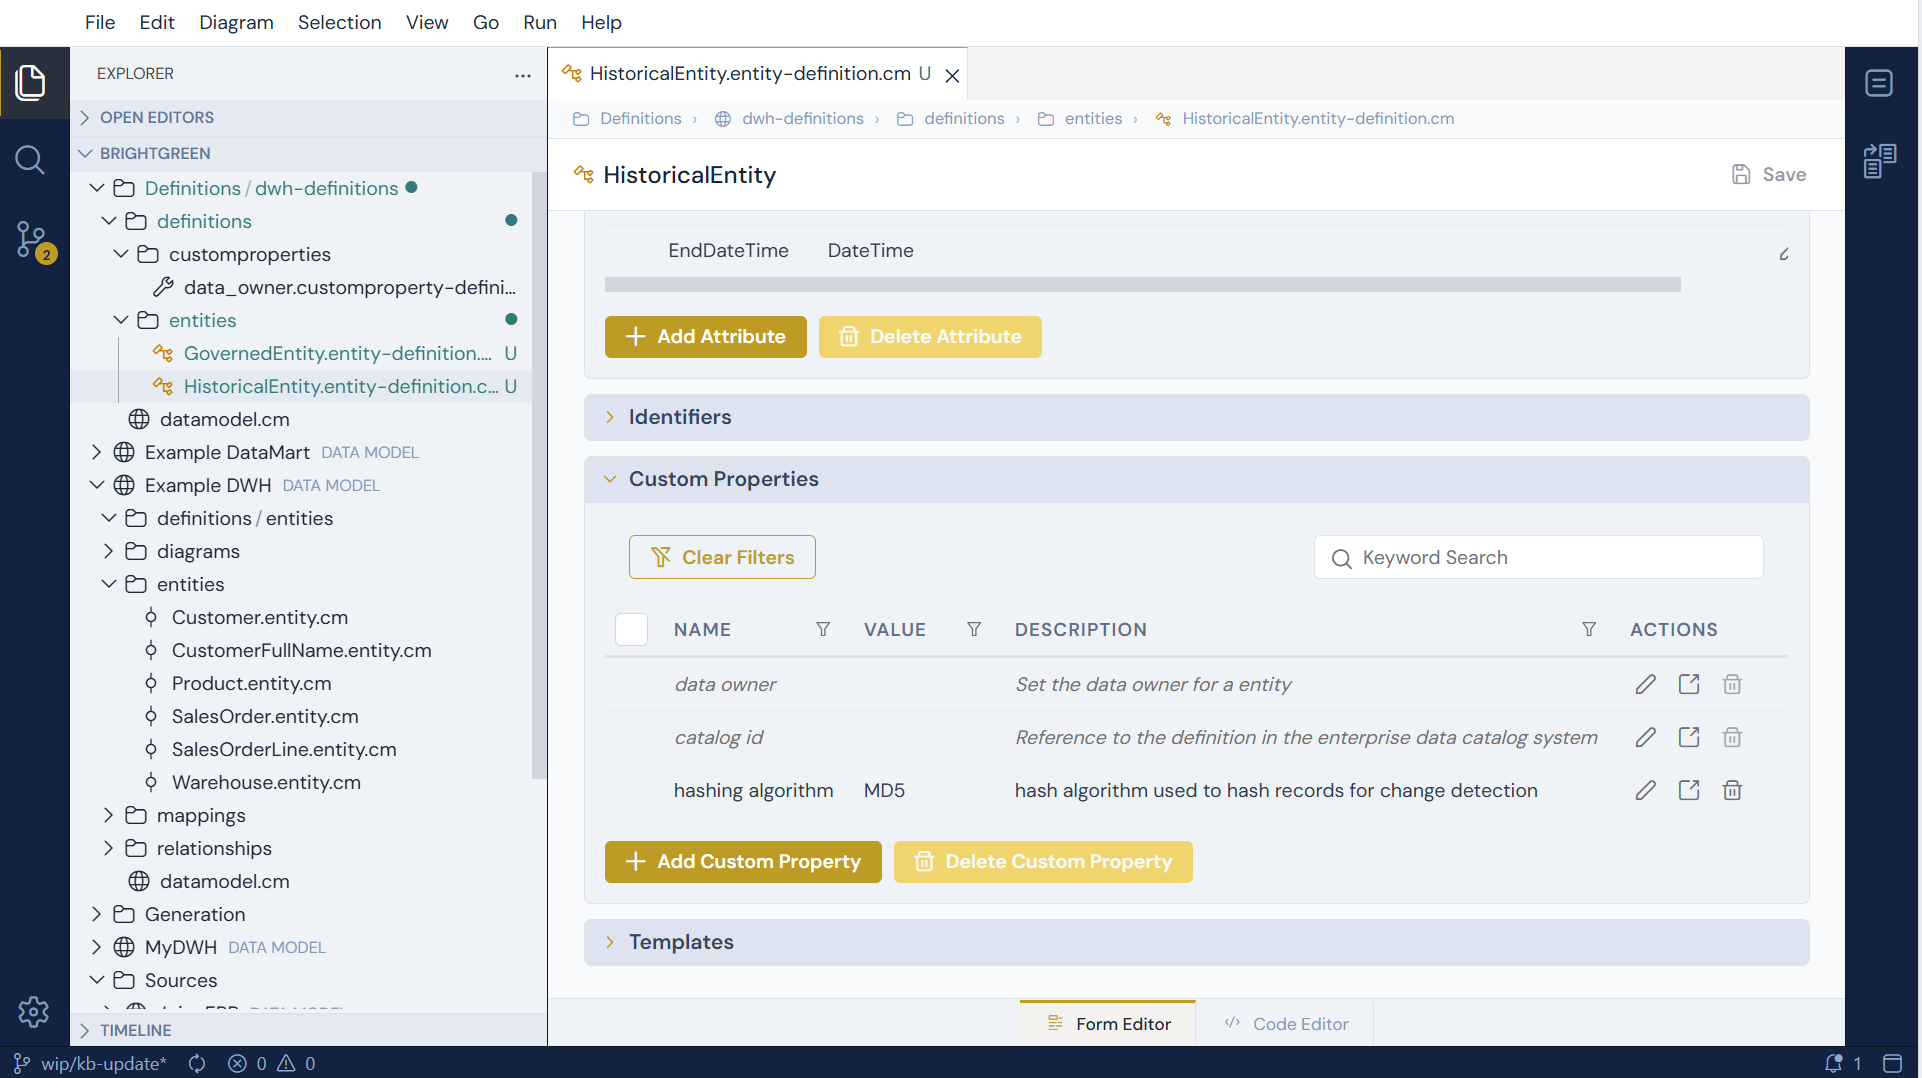
Notice that the custom properties also show as inherited:
We can also add a NonHistoricalEntity - this would also extend GovernedEntity
and contributes its own attributes. The result is a clean hierarchy:
GovernedEntity (abstract)
├── HistoricalEntity
├── NonHistoricalEntity
You can go deeper than one level - a definition may extend another definition that itself extends a third, and so on. Resolution always walks the full chain.
Attributes and custom properties can be typed too
A type reference works the same way everywhere, not just on entities. An attribute can point at an Attribute Definition and a custom property at a Custom Property Definition - pulling in that definition's shape and defaults. This is exactly how you use a type, which is the next step.
Step 3 - Use a type by assigning it
A definition only does something once an object references it. Every object has a Type setting that points at the definition to apply:
| Object | References a |
|---|---|
| Logical entity | Entity Definition |
| Attribute | Attribute Definition |
| Relationship | Relationship Definition |
| Identifier | Identifier Definition |
| Data model | DataModel Definition |
| Custom property | Custom Property Definition |
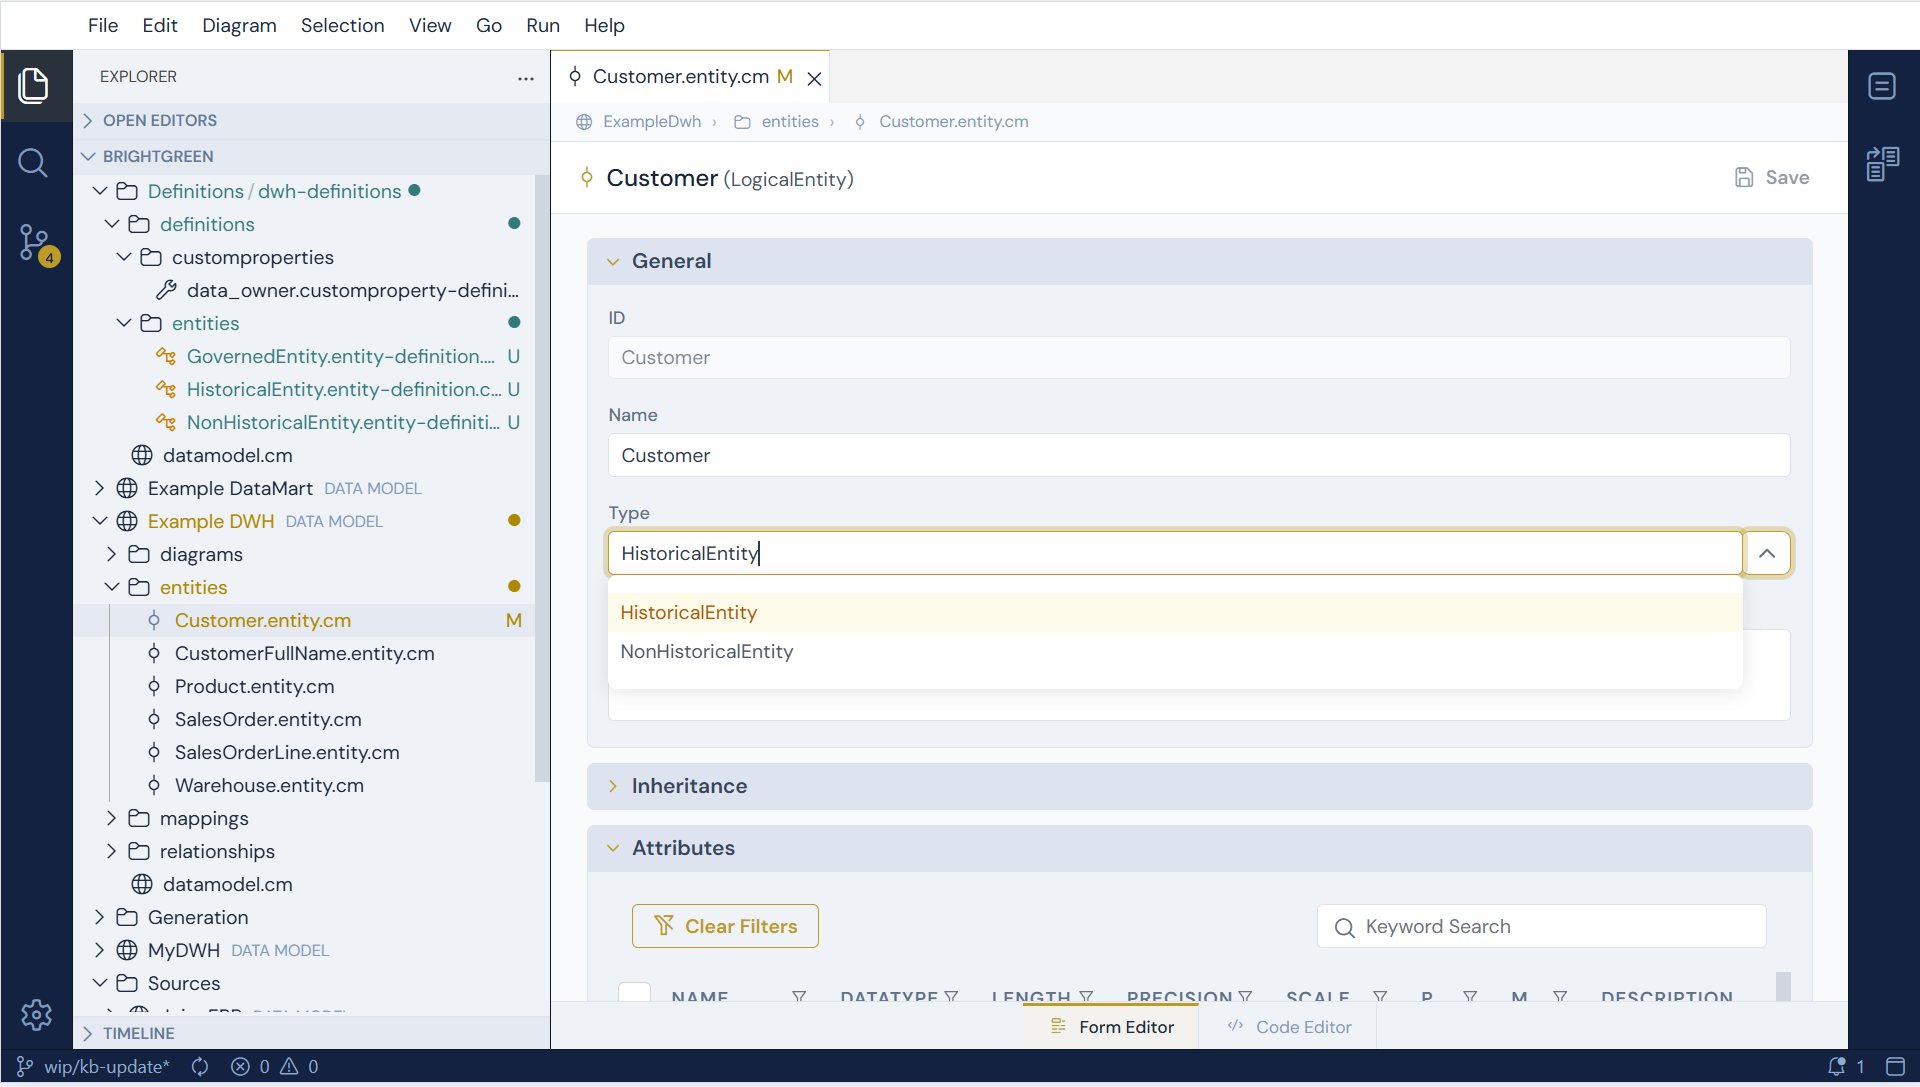
To type an entity, open it in the form editor and pick the type from the
Type dropdown in its properties - for example, making the Customer entity in the DWH model a
HistoricalEntity by selecting HistoricalEntity.
Using type definitions
In order to use a type definition, it should be defined in the model where you want to use it, or the model should have a dependency to the model where the type definitions are defined.
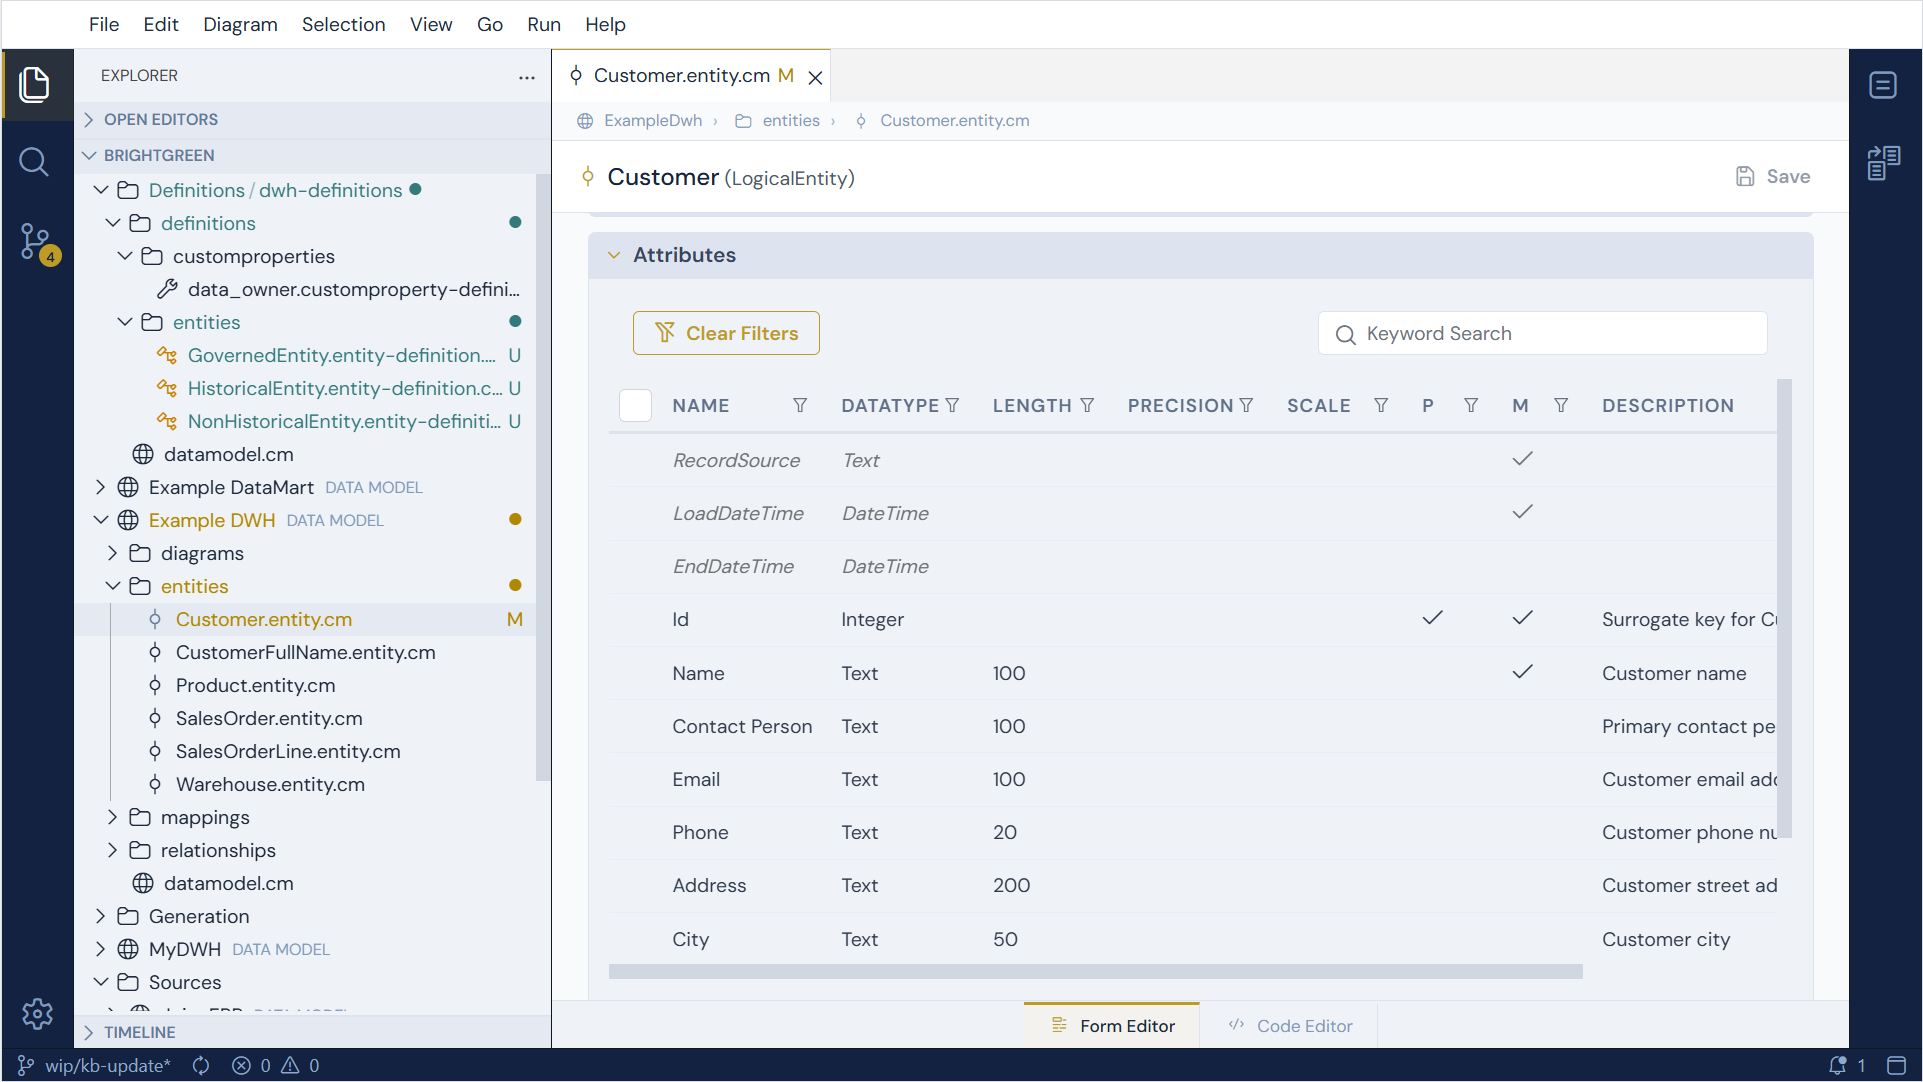
That single setting pulls in everything HistoricalEntity resolves to - the attributes and custom properties from the abstract base, the HistoricalEntity's own attributes, and the
hashing custom property - without you re-declaring any of it. In the form editor
these inherited members appear alongside the entity's own, rendered in a muted
style with an Inherited from … tooltip so you can always see where each value
originates.
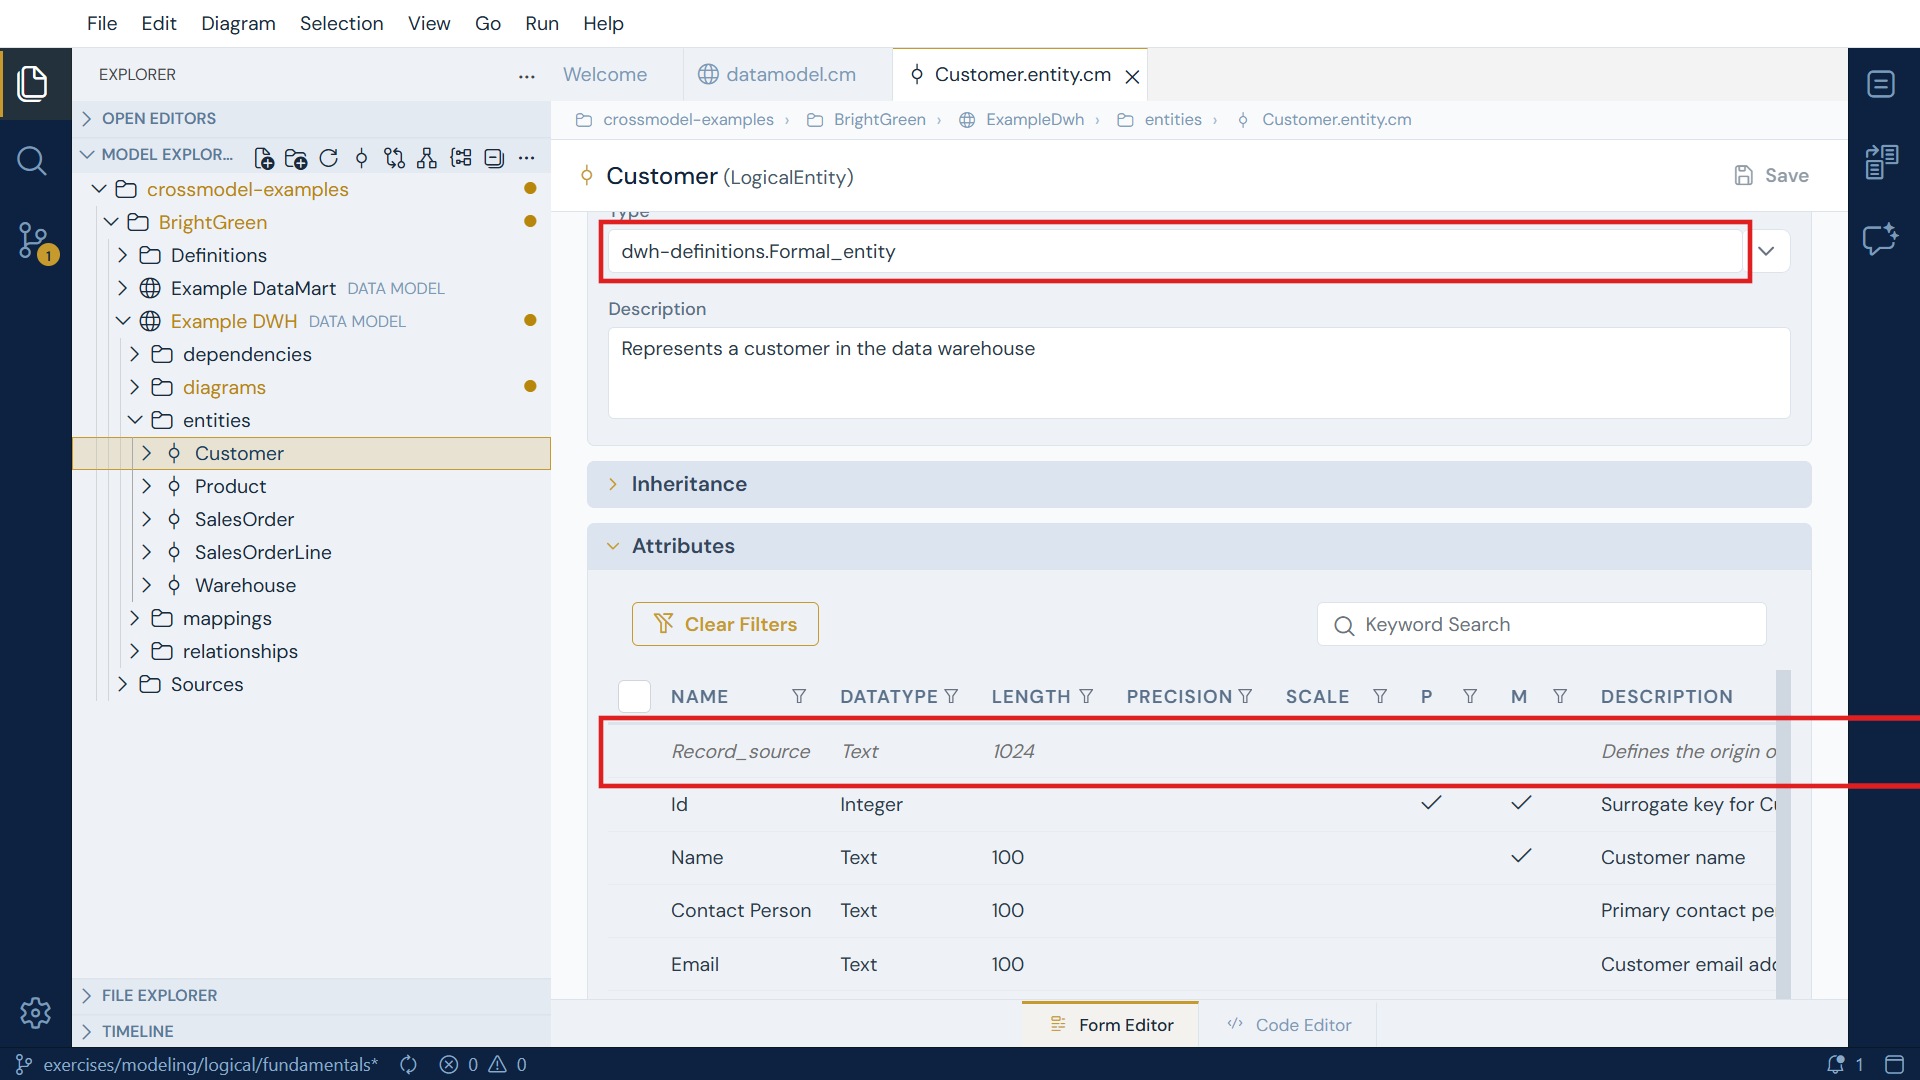
The entity below is typed Formal_entity. Its Type field carries that reference, and
the first attribute in the grid - Record_source, shown in a muted italic - comes from the
type definition rather than from the entity itself:
The Type dropdown only offers compatible definitions
The Type dropdown is scoped to the matching kind of definition - an entity only lists Entity Definitions, an attribute only lists Attribute Definitions, and so on. Definitions marked Abstract are left out, since they are building blocks rather than types you assign directly.
Step 4 - Overriding inherited values
The point of inheritance is sensible defaults you can override where needed. CrossModel resolves the effective value of every field from three tiers, in priority order:
- The item's own value - set on the object itself, or inherited through its
extendschain. The most specific (lowest) explicitly-set value wins. - The type definition's value - supplied by the referenced type and that
definition's own
extendschain. - The built-in default - used only when nothing above sets the field.
In short: the lowest explicitly-set value wins, and any field you don't set falls back to the nearest ancestor (or the type definition) that does.
Clearing an override re-inherits
An override you set stays local until you clear it - CrossModel won't silently drop it just because it happens to match a parent's value. The one gesture that removes an override is emptying the field in the form: clearing it drops the local value and the field re-inherits from the parent (or type) again. This gives you a predictable way to "reset to inherited".
Collections merge by name
Inherited and locally-added items live in the same collection. Items are matched across levels by their identifier: the same identifier means the child refines the inherited item, while a new identifier means a new item added at this level. Inherited items are listed first (deepest ancestor first), followed by the items you add locally.
Step 5 - Derive names and descriptions with property templates
Inheritance copies a value down. A property template goes further: it computes a value from the object the type is applied to.
The use case is house naming standards. If every data vault key attribute should be called
"
Open a definition in the form editor and find the Property Templates section. Each row has two fields:
| Field | Purpose |
|---|---|
| Property | Which field to derive. Only name and description can be templated. |
| Template | The text to produce, with {{...}} placeholders filled in from the object. |
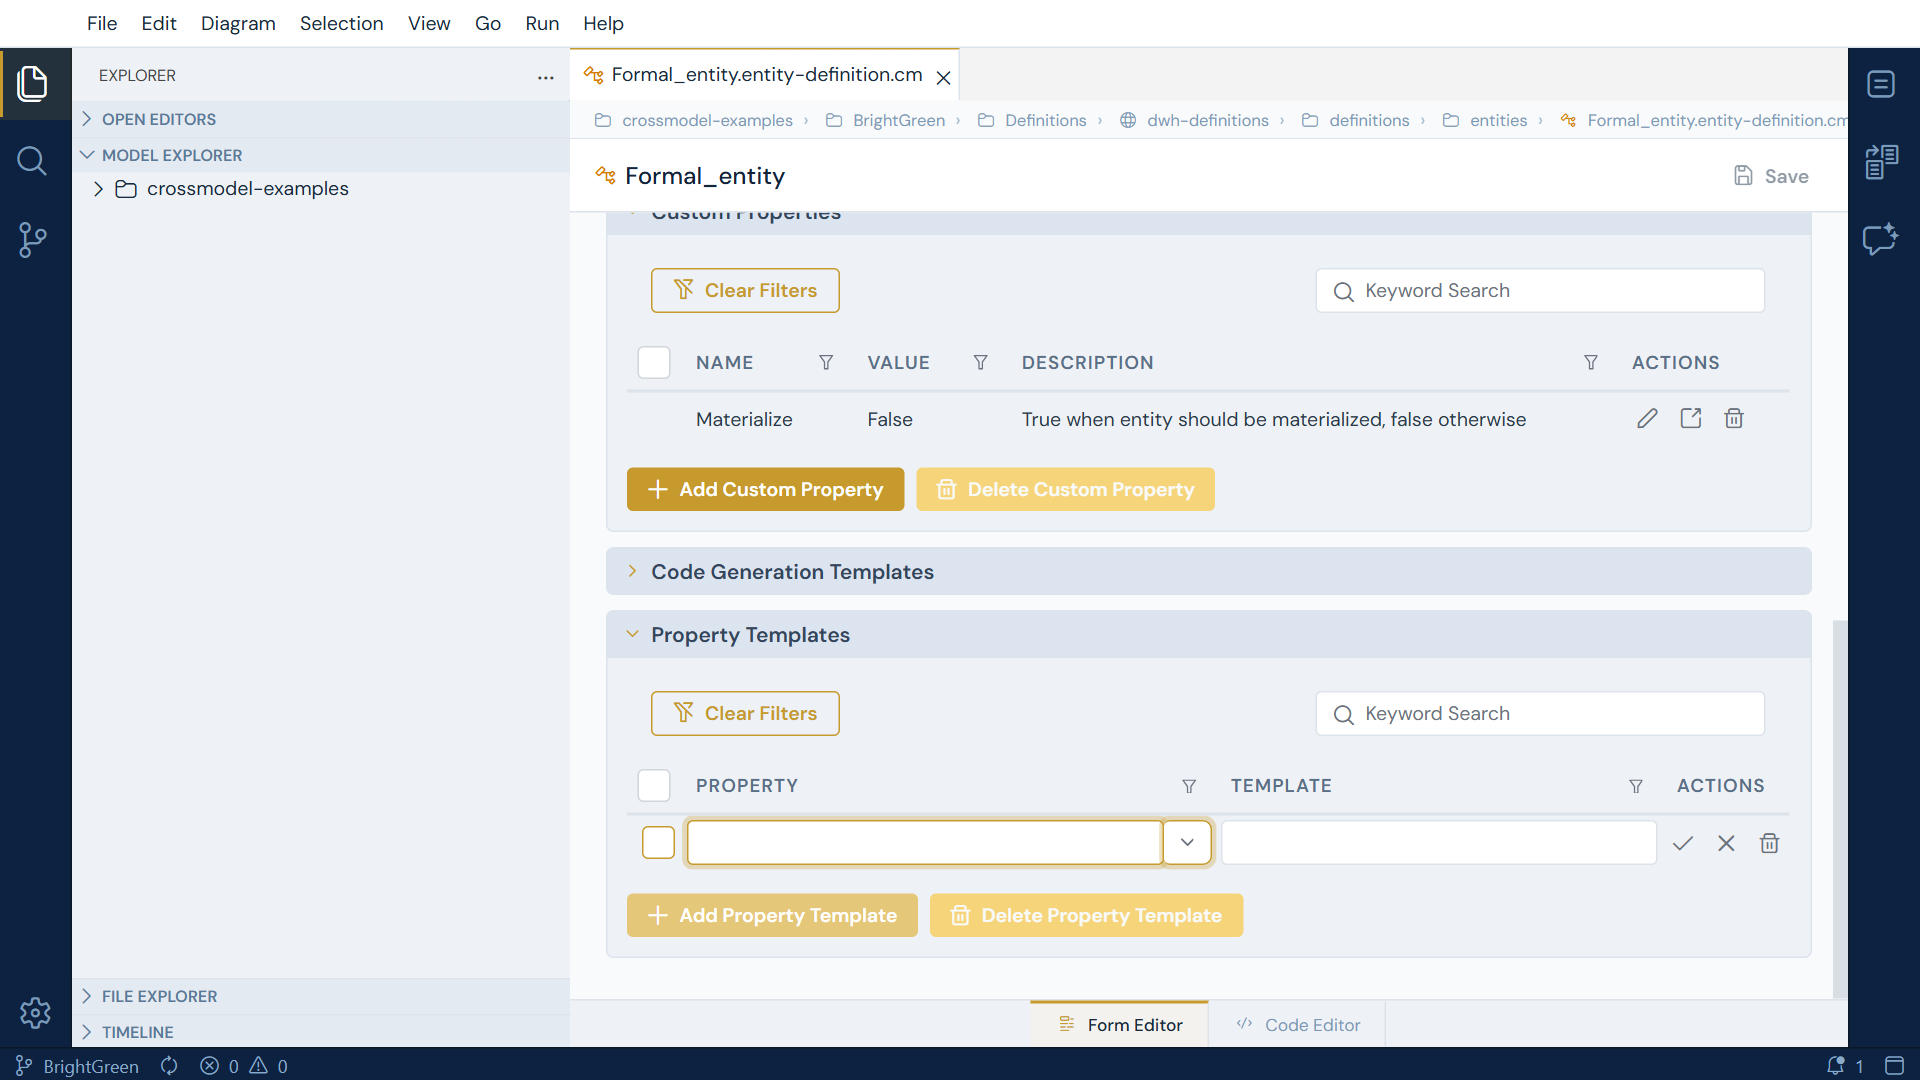
In the code editor the same thing looks like this:
attributeDefinition:
    id: DataVaultKey
    name: "Data Vault Key"
    propertyTemplates:
      - property: name
        template: "{{entity.name}} Key"
      - property: description
        template: "Key attribute for {{entity.name}}"
You then apply DataVaultKey as the Type of an attribute, and the template fills that
attribute's name in from the entity around it.
An attribute's Type is in its row detail, not the grid
The Attributes grid on an entity shows Name, Datatype, Length, Precision, Scale, the identifier and mandatory flags, and Description - but no Type column. Open the row's detail with the external-link button beside it; Type is the third field, under General. It is the same popup route you used to set a custom property's type earlier.
What you can put in a template
A placeholder is a path, resolved against the object the template is being evaluated for. The
context exposes entity, mapping, relationship, datamodel and self, depending on what
kind of object you are on. A path segment may be $first to take the first element of a
collection.
Templates inherit, and can be overridden
propertyTemplates merge along the extends chain like every other collection in this
tutorial, keyed by the property being templated. A child definition that templates name
replaces its parent's name template and leaves the parent's description template alone.
A derived value behaves like an inherited one
Give an attribute nothing but an id and this type, and it arrives named:
      - id: VaultKey
        type: dwh-definitions.DataVaultKey
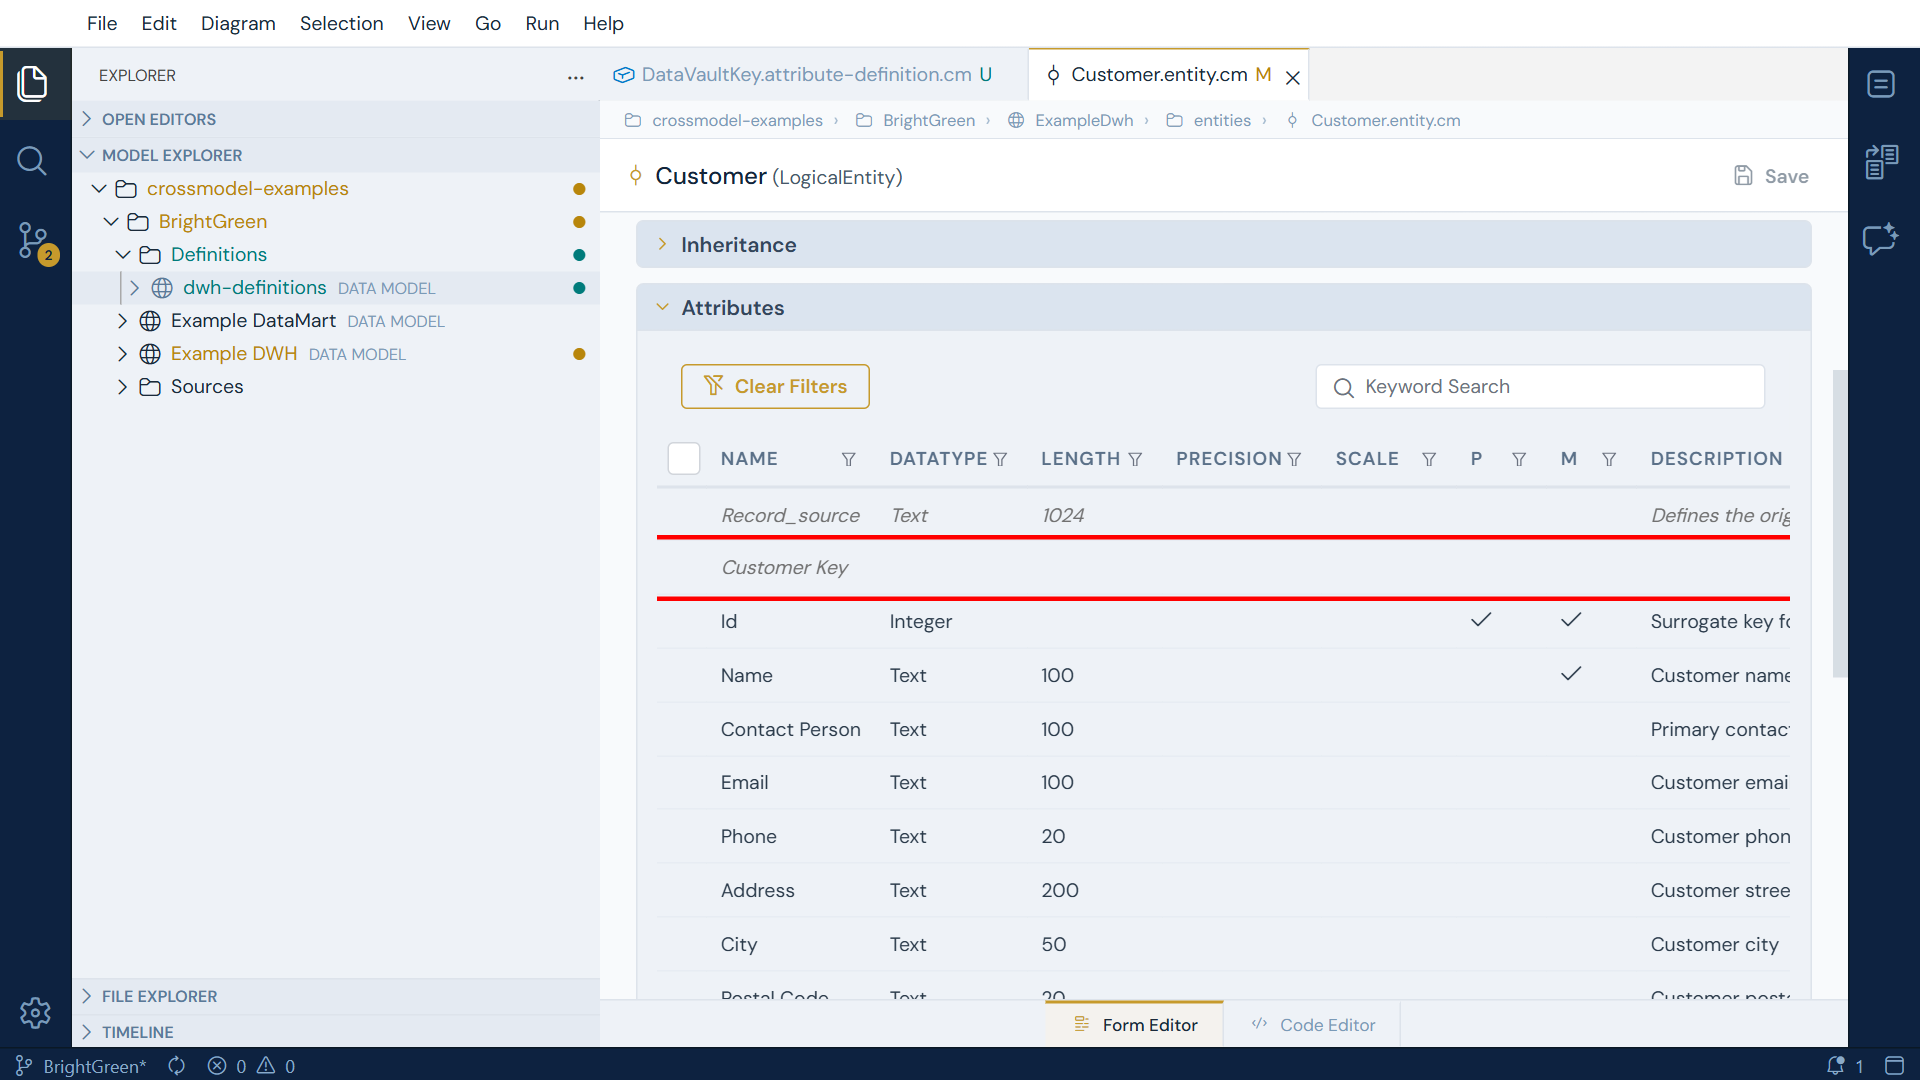
Customer Key appears in the grid in the same italics as any other inherited value, and it is not written into the file - the attribute there still holds only its id and its type. The value is recomputed, so renaming the entity renames everything derived from it.
Typing over it makes it yours, like any other override, and it is then stored on the object.
A template fills a field only when nothing else has
That is the whole rule, and it is what makes templates useful rather than surprising: they never overwrite a value you set.
It has a practical consequence for name templates. Name is validated as non-empty, so
the form will not let you create a nameless attribute for the template to fill, and
clearing an existing name reports "The name cannot be empty" instead of falling back to
the template. Write the attribute in the Code Editor with only its id and type, as
above, and the name is derived when you save.
An unresolvable path is reported, not ignored
If a placeholder cannot be resolved against the object the template is applied to, the instance gets a validation error naming the problem - "Property template for 'name' cannot be evaluated on this instance". A template that quietly produced a blank name would be much worse.
Two different things are called templates
Property templates derive a field value on the object - a name or a description.
Code templates, the subject of the next step, generate files. They live in separate
sections of the form and never interact. If you are trying to name something, you want
this step; if you are trying to produce a .sql file, you want the next one.
Step 6 - Attach code templates to a type definition
A type definition can also carry code generation templates. Any model object that references the type then knows exactly how to generate itself - so you can, for example, make every entity that is typed HistoricalEntity produce a table script from one shared template, without configuring generation object by object.
Open the definition in the form editor and scroll to the Code Generation Templates section. Add a template row - the row opens in a popup where you fill in three fields:
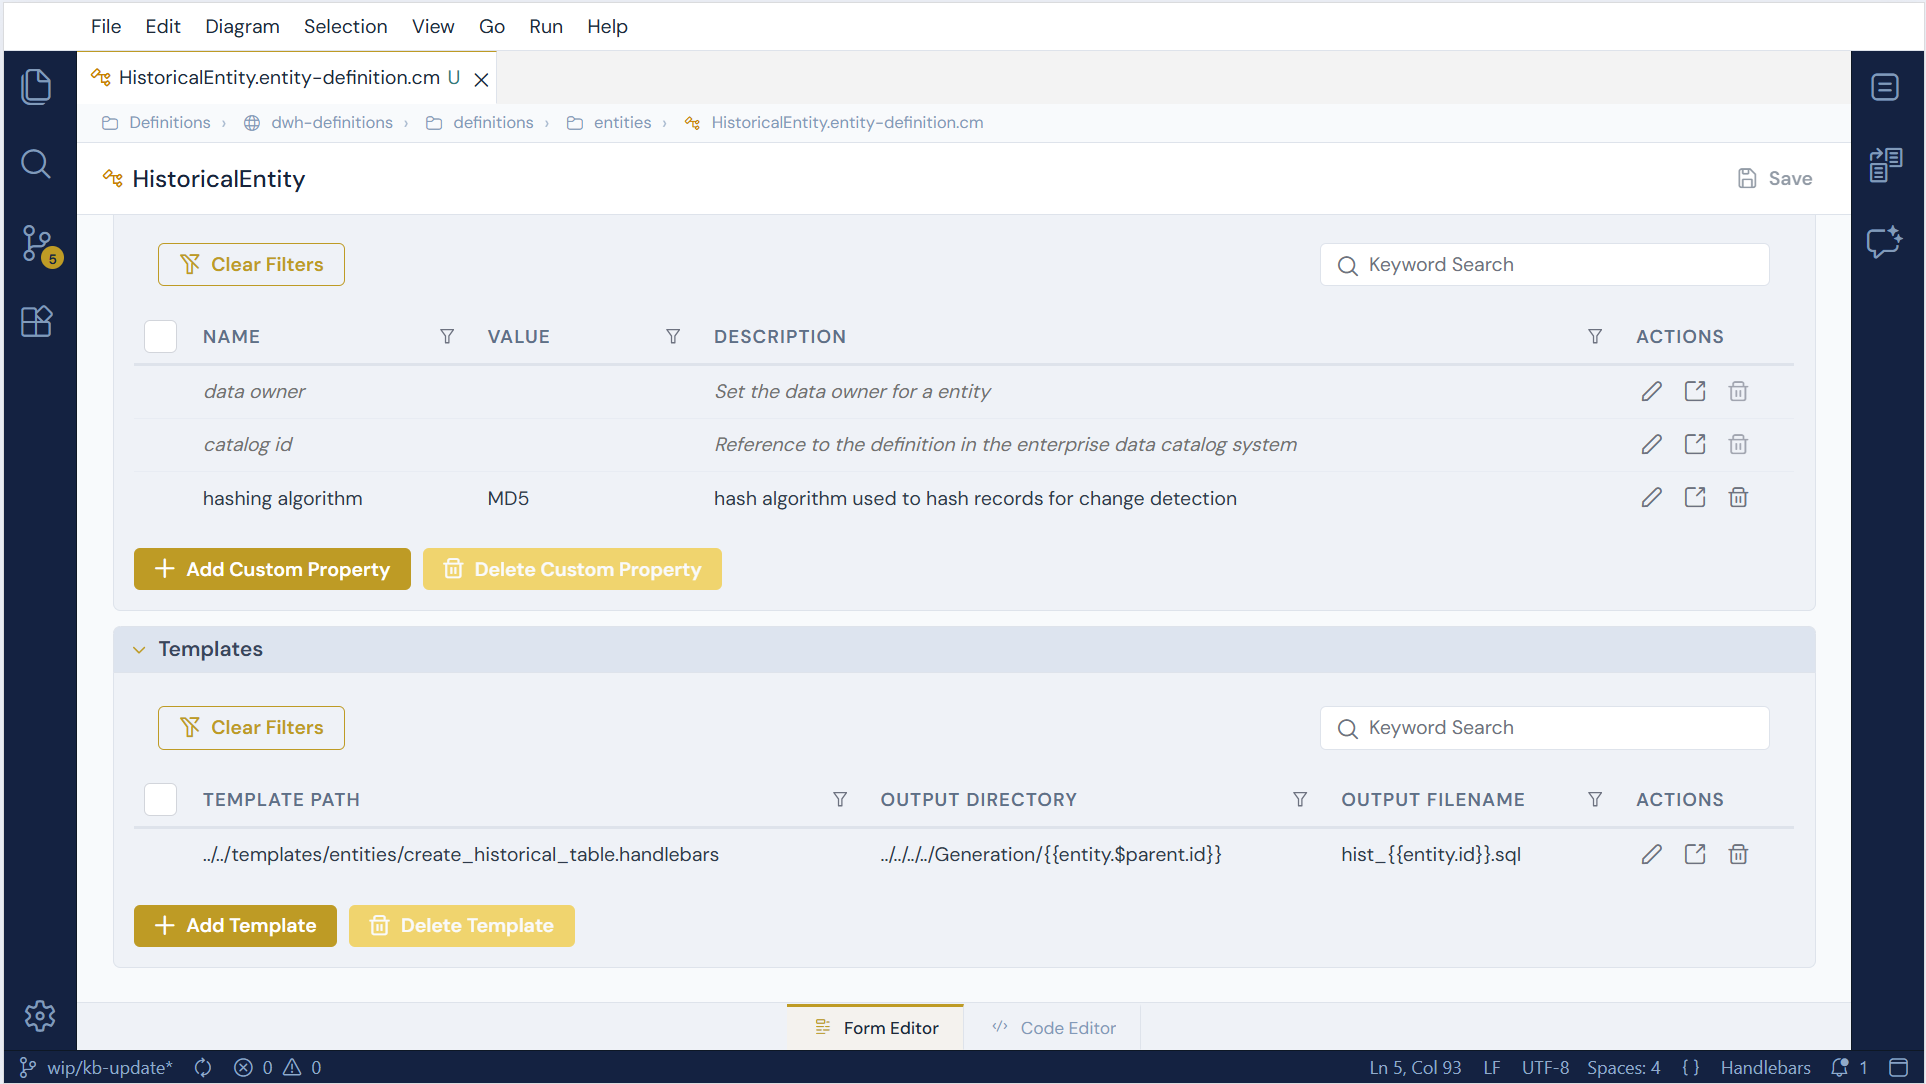
| Field | Purpose |
|---|---|
| Path | The template file to render. Pick a .handlebars / .hbs or .njk / .nunjucks file. |
| Output Directory | The folder the generated file is written to. |
| Output Filename | The name of the generated file. May contain template expressions. |
A few things to know about how these fields behave:
- Paths are relative to the definition file.
PathandOutput Directoryare resolved from the location of the definition that declares them, so a path like../../templates/entity/HubTable.handlebarspoints relative to the definition's own folder. - The output filename is rendered per object. Expressions in
Output Filename(andOutput Directory) are evaluated against each object that is generated. An entity template withHUB_{{entity.id}}.sqlproducesHUB_Customer.sql,HUB_Product.sql, and so on - a distinct file per entity. - The engine is inferred from the file extension -
.handlebars/.hbsuse Handlebars,.njk/.nunjucksuse Nunjucks. There is no separate engine setting.
Templates are inherited too
Templates follow the same inheritance rules as everything else. A definition
inherits its parent's templates (matched by their Path), and a child can
override individual fields - for example keep the inherited Output Directory
but set its own Output Filename. Putting shared templates on an abstract
base definition is a clean way to apply them across a whole family of types.
Generating the files
Once a type carries templates, generate from the model objects that use it:
- Right-click one or more objects in the explorer and choose Generate to generate just those objects.
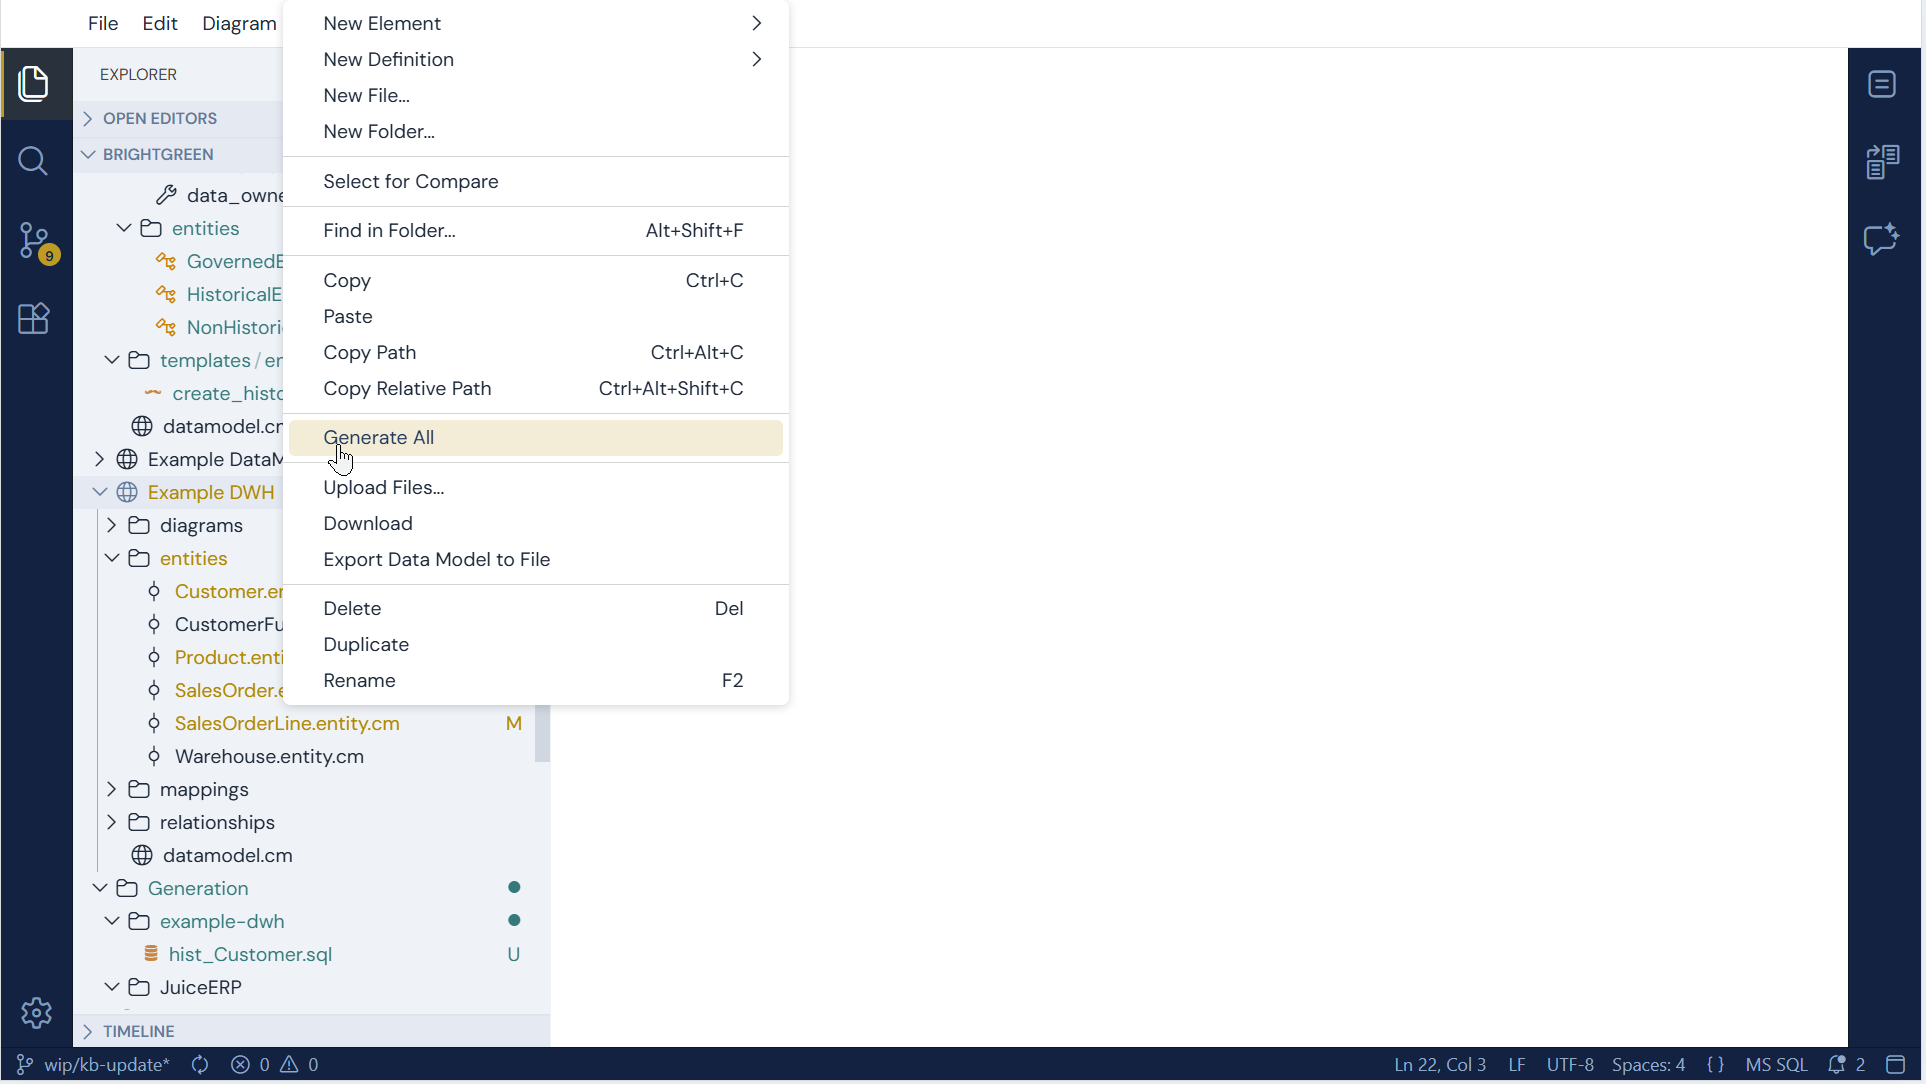
- Right-click a data model and choose Generate All to generate every object in the model that has a type with templates.
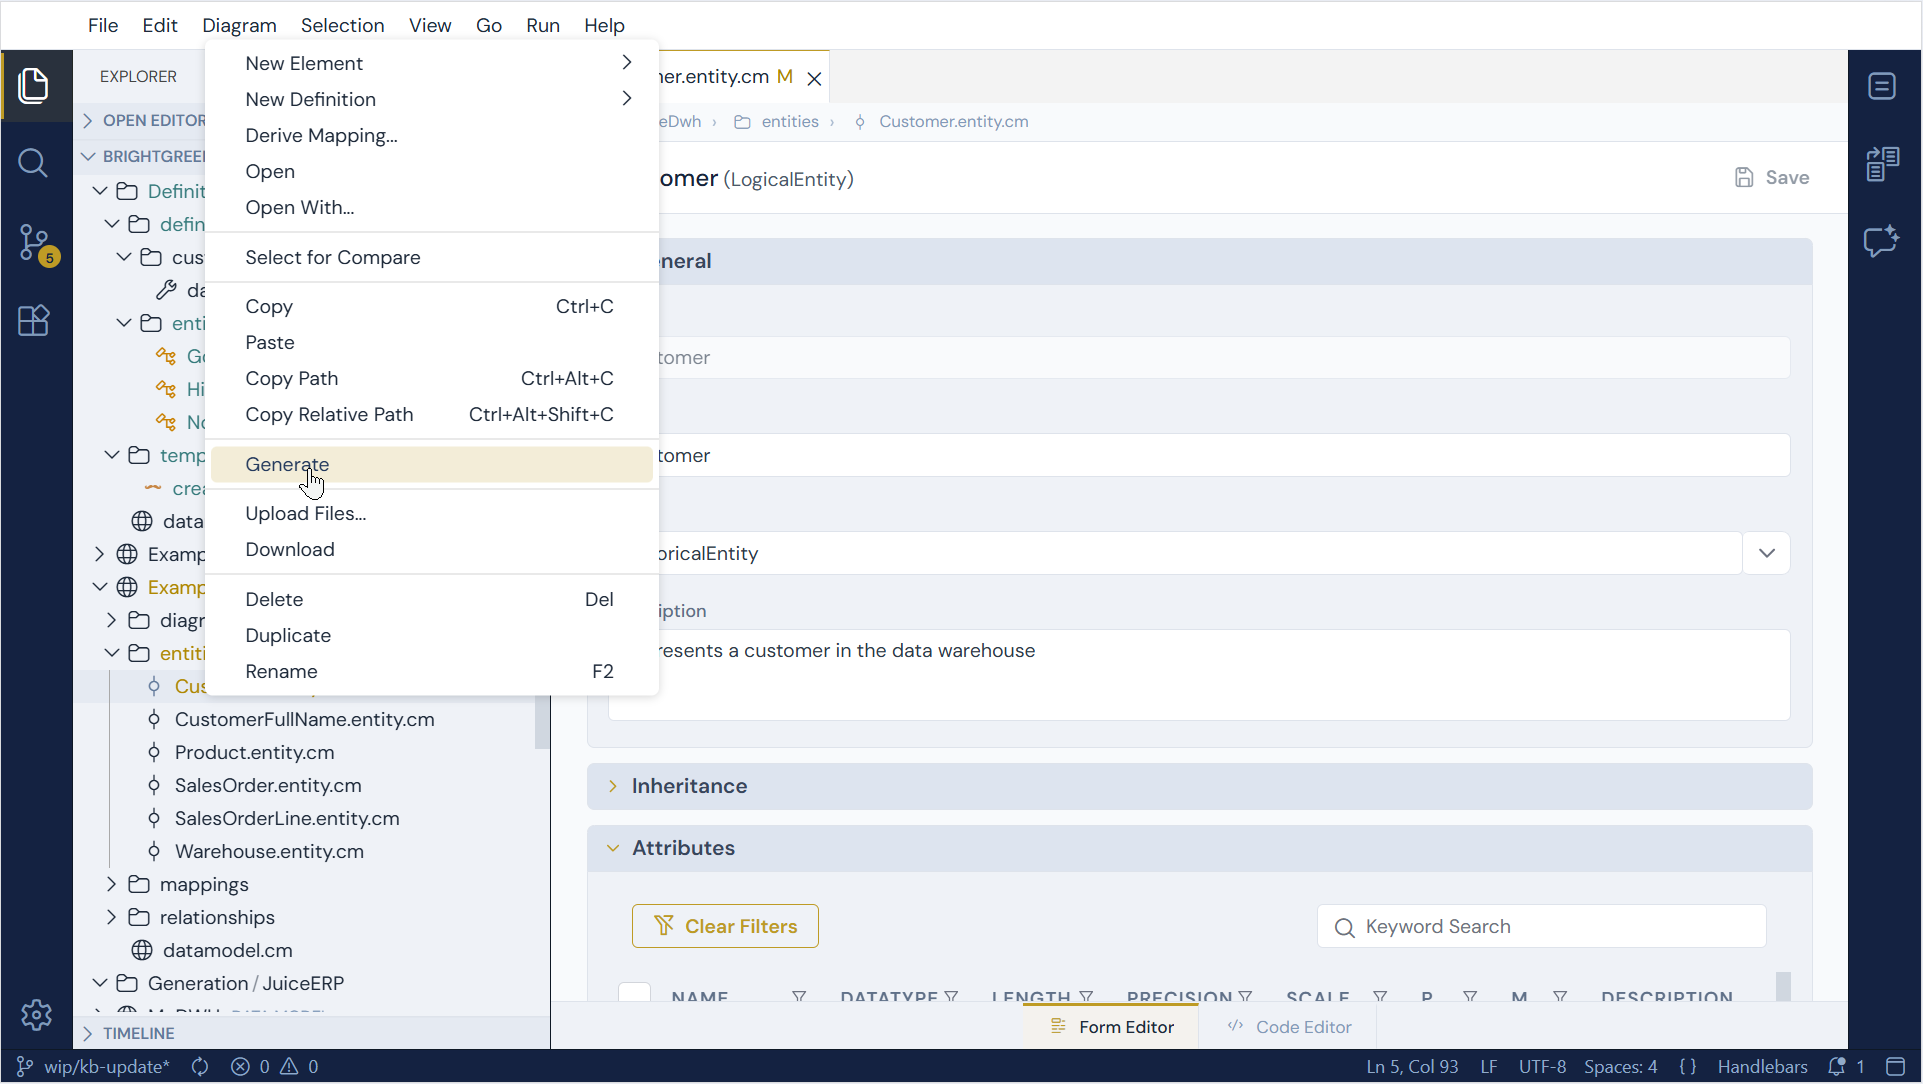
CrossModel resolves each object's effective templates (its own plus any inherited), renders them against the object, and writes the results to the configured output paths. A summary reports how many files were written; if an object's type has no templates, it is simply skipped.
Which objects can be generated
Code generation runs for entity, relationship and data model objects. Templates can also be added to attribute, identifier and custom property definitions, but those are not generated directly - keep generation templates on the definition kinds above.
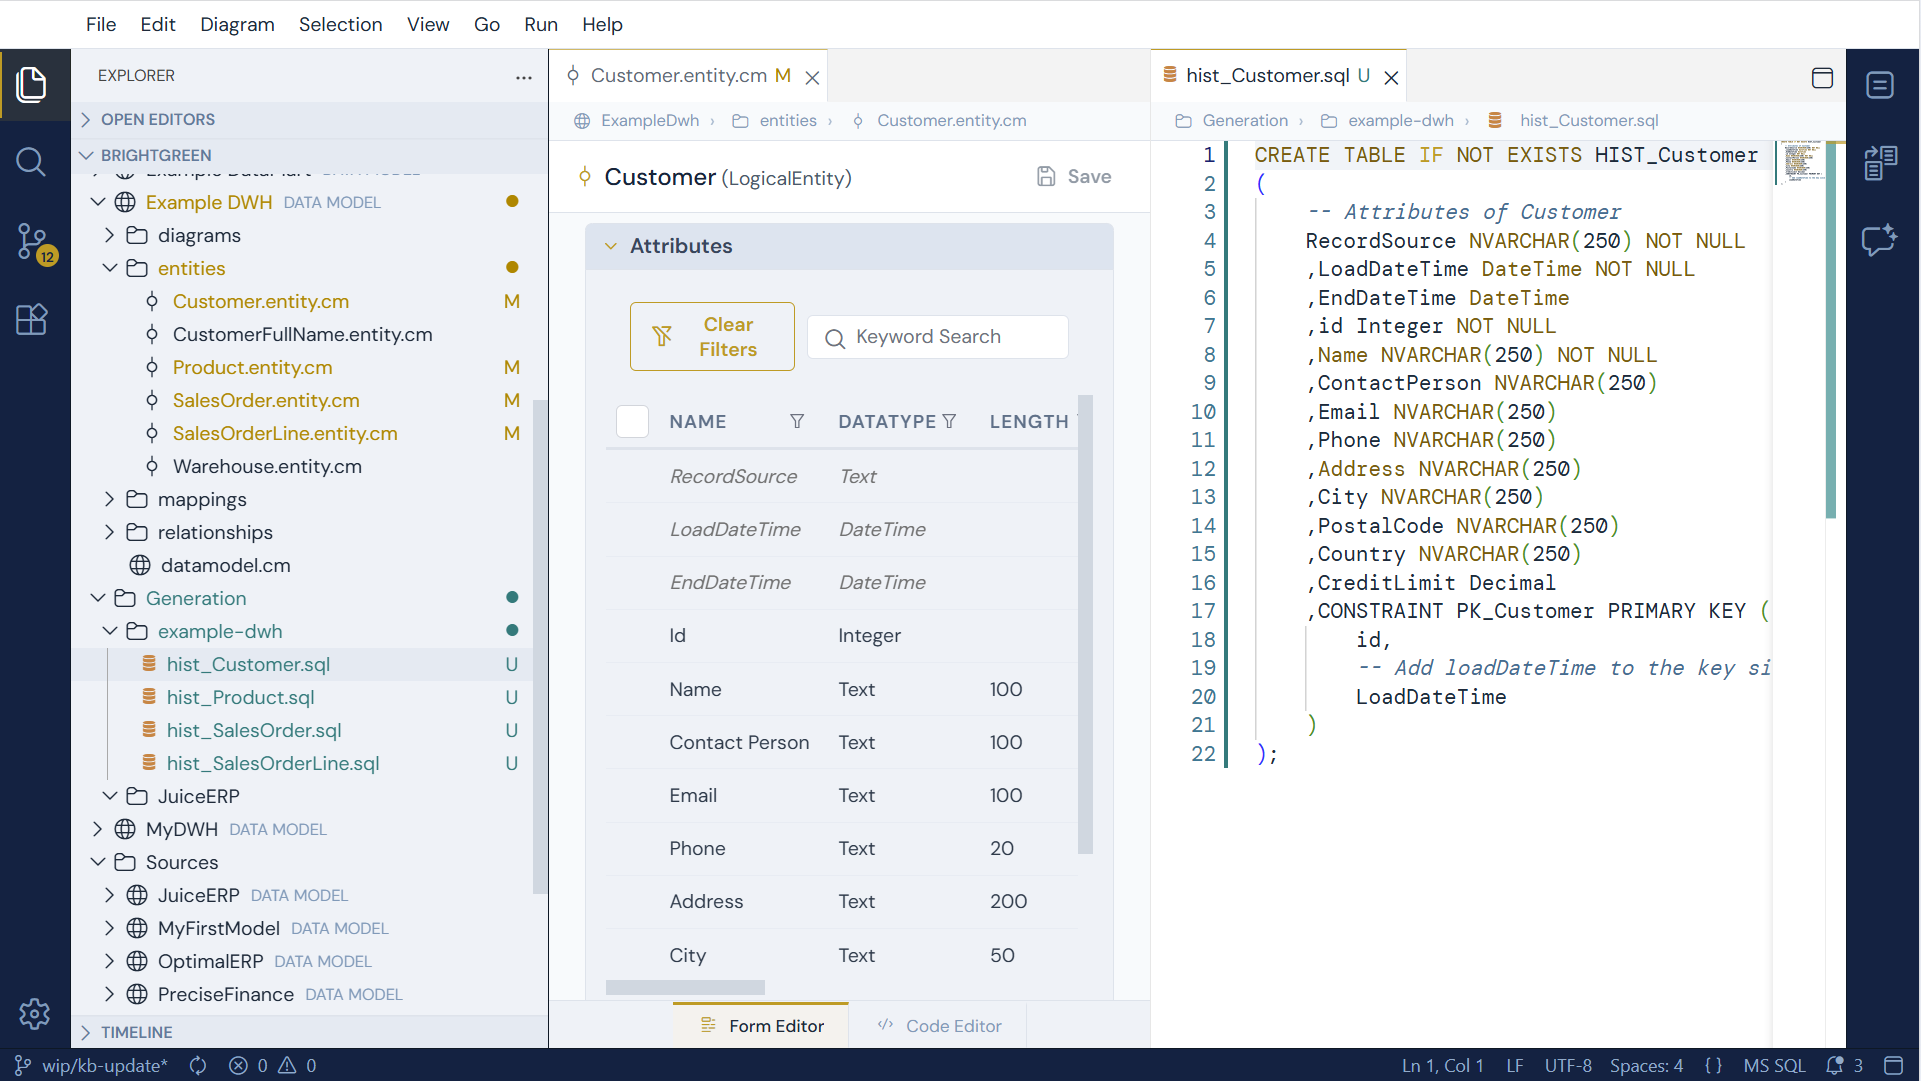
For writing the template bodies themselves - the available model properties, custom properties, Handlebars and Nunjucks syntax, and previewing output - see the Code Generation tutorial.
Using typed values downstream
Everything resolved here is the same effective model that
code generation sees. Templates read inherited attributes
and custom properties transparently - inherited attributes appear in the
entity's attribute list, and a custom property is available by its identifier. If
you ever need only the values declared locally on an object, the raw view is
reachable through _local.
This is what makes type definitions powerful end to end: define a pattern once, apply it with a single type reference, and have it flow consistently into every perspective - form, diagram, and generated code.
Where definitions are stored
Type definitions are plain files in your workspace, so they are versioned in Git
alongside the rest of your models. They live in a definitions/ folder inside a
data model, with a sub-folder per kind:
YourDataModel/
├── datamodel.cm
├── definitions/
│   ├── entities/          *.entity-definition.cm
│   ├── attributes/        *.attribute-definition.cm
│   ├── relationships/     *.relationship-definition.cm
│   ├── identifiers/       *.identifier-definition.cm
│   ├── datamodels/        *.datamodel-definition.cm
│   └── customproperties/  *.customproperty-definition.cm
You normally create and edit definitions through the form editor, but you can also open any of these files in the code view to edit them as text.
Wrapup
In this tutorial you extended CrossModel's metamodel with your own types. You
created a custom property definition, organised definitions into a hierarchy with
extends, applied a type to a model object, and saw how CrossModel resolves and
overrides inherited values across the definition chain and the instance. From
here, combine type definitions with code generation to turn
your house standards into generated SQL, configuration, and documentation.