Code Generation
Generate code and SQL from your data models
CrossModel includes CrossGenerate - a template-based generation engine that turns your data models into any text-based output: SQL DDL scripts, configuration files, documentation, and more.
This tutorial walks you through the CrossGenerate panel: selecting a model object, choosing a template engine, writing a template, previewing the rendered output, and writing the result to disk.
Ready-made generation examples
You do not have to write every template from scratch. The Examples section covers finished generation workspaces you can clone from the welcome page - from a single staging table template up to complete dbt and Snowflake pipelines.
How it works
When you run a generation, CrossGenerate:
- Loads the selected model document from the workspace and builds it (resolving links and validation).
- Wraps the model in a navigable model so cross-references - related entities, data types, identifiers - resolve transparently as you read them in the template.
- Renders your template against that model.
- Shows the result as a preview, or writes it to a file.
The model is exposed to the template as a plain object you navigate with the template engine's normal syntax. The top-level variable matches the kind of object you selected:
| Selected object | Top-level variable |
|---|---|
| Logical Entity | entity |
| Relationship | relationship |
| Mapping | mapping |
| System Diagram | systemDiagram |
| Data Model | datamodel |
Supported template engines
| Engine | File extensions | Notes |
|---|---|---|
| Handlebars | .handlebars, .hbs |
Logic-less; ships with the handlebars-helpers-v2 helper bundle (string, comparison, math, array, date helpers, etc.) |
| Nunjucks | .njk, .nunjucks |
Jinja2-inspired; built-in filters, conditionals, and loops |
Opening the CrossGenerate panel
Open the CrossGenerate panel from the View menu, via the icon in the right bar or via the command palette (Ctrl+Shift+P).
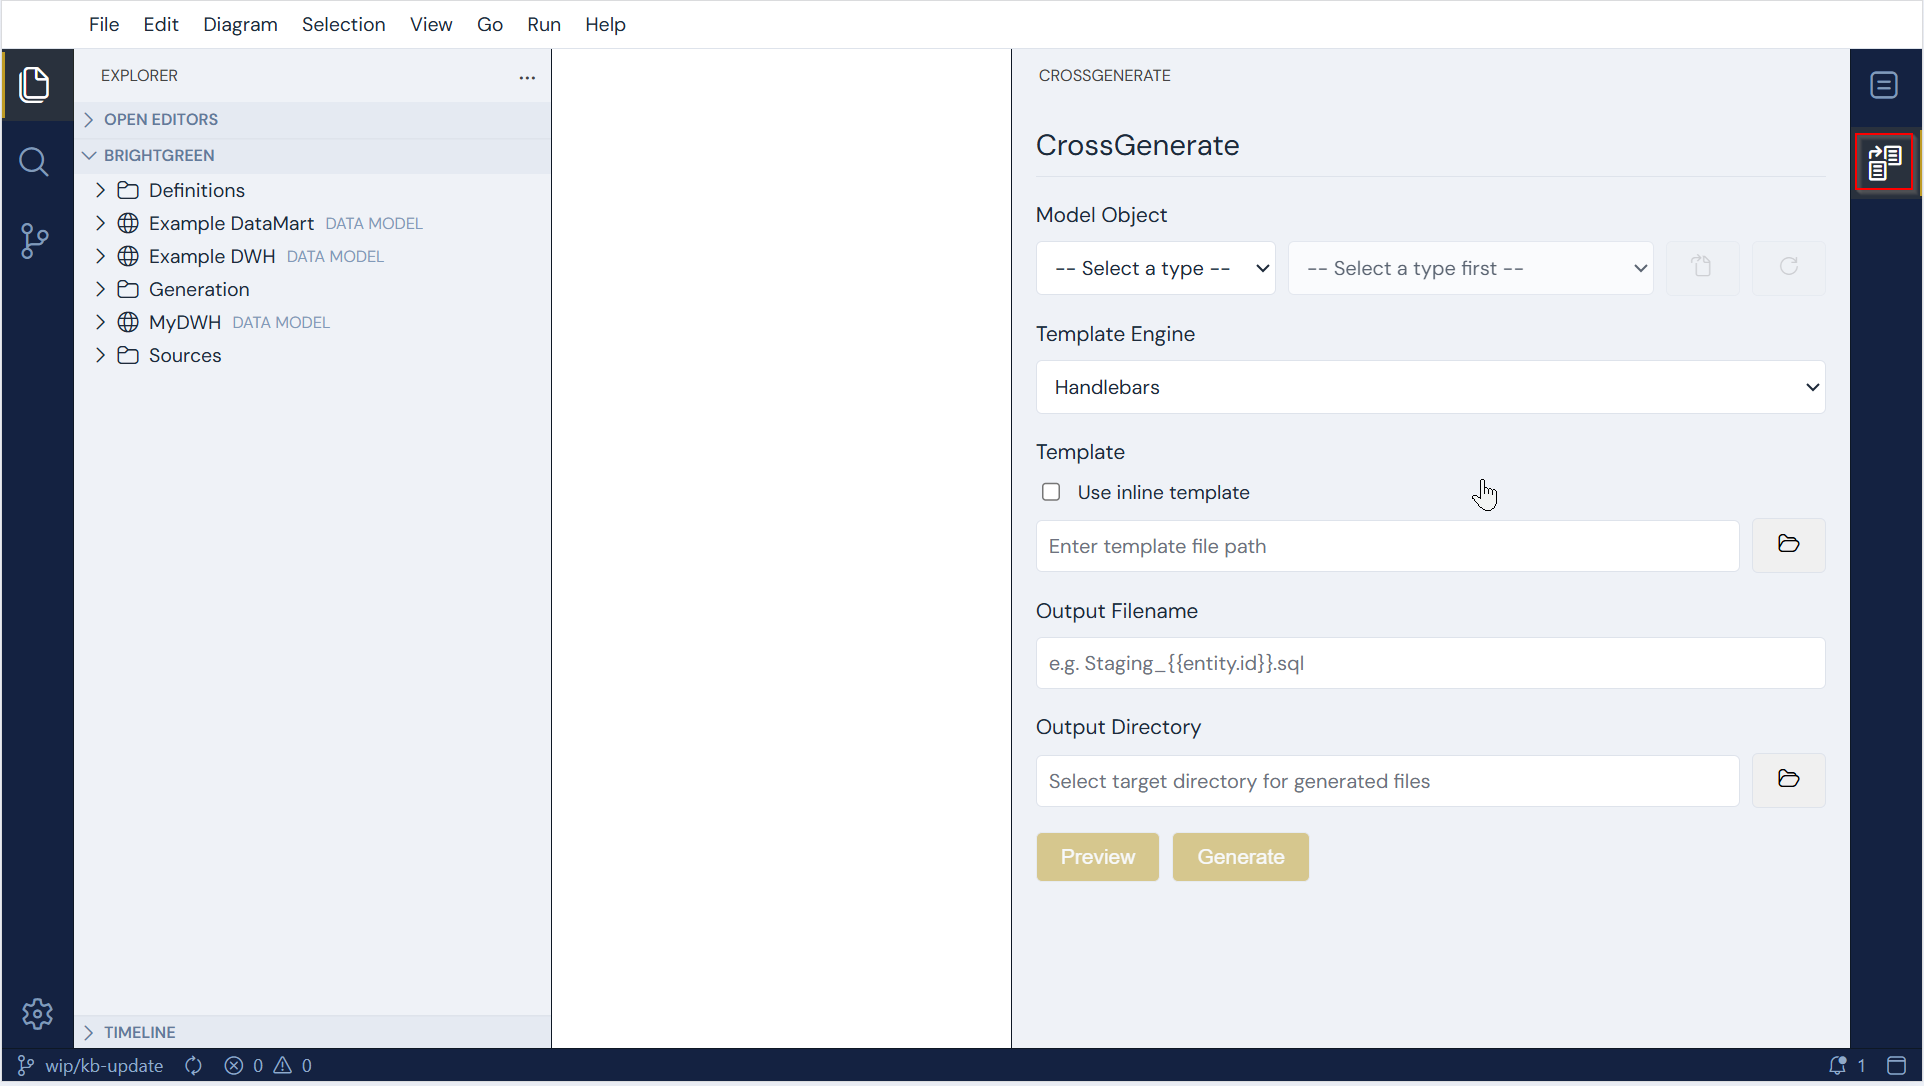
The panel has five sections:
- Model Object - pick what to generate from
- Template Engine - choose Handlebars or Nunjucks
- Template - point to a template file or write one inline
- Output Filename - a filename, which may itself contain template expressions
- Output Directory - where generated files are written
Step 1 - Select a model object
Use the dropdowns in the Model Object section:
- Type - select the kind of model element, e.g. Logical Entity. The list is populated from the model element types available in your workspace.
- Object - select the specific instance, e.g.
Customer.
When the objects of the selected type live in more than one data model, an extra data model dropdown appears between Type and Object so you can narrow the list to a single data model. When objects span multiple data models, each object is labelled Data Model / Object so the name is unambiguous.
When the selected type has more than one object, the Object dropdown also offers an All <Type>s (n) entry (restricted to the chosen data model, if you've filtered by one). Selecting it runs the template against every object of that type - see the notes on Preview and Generate below for how each handles it.
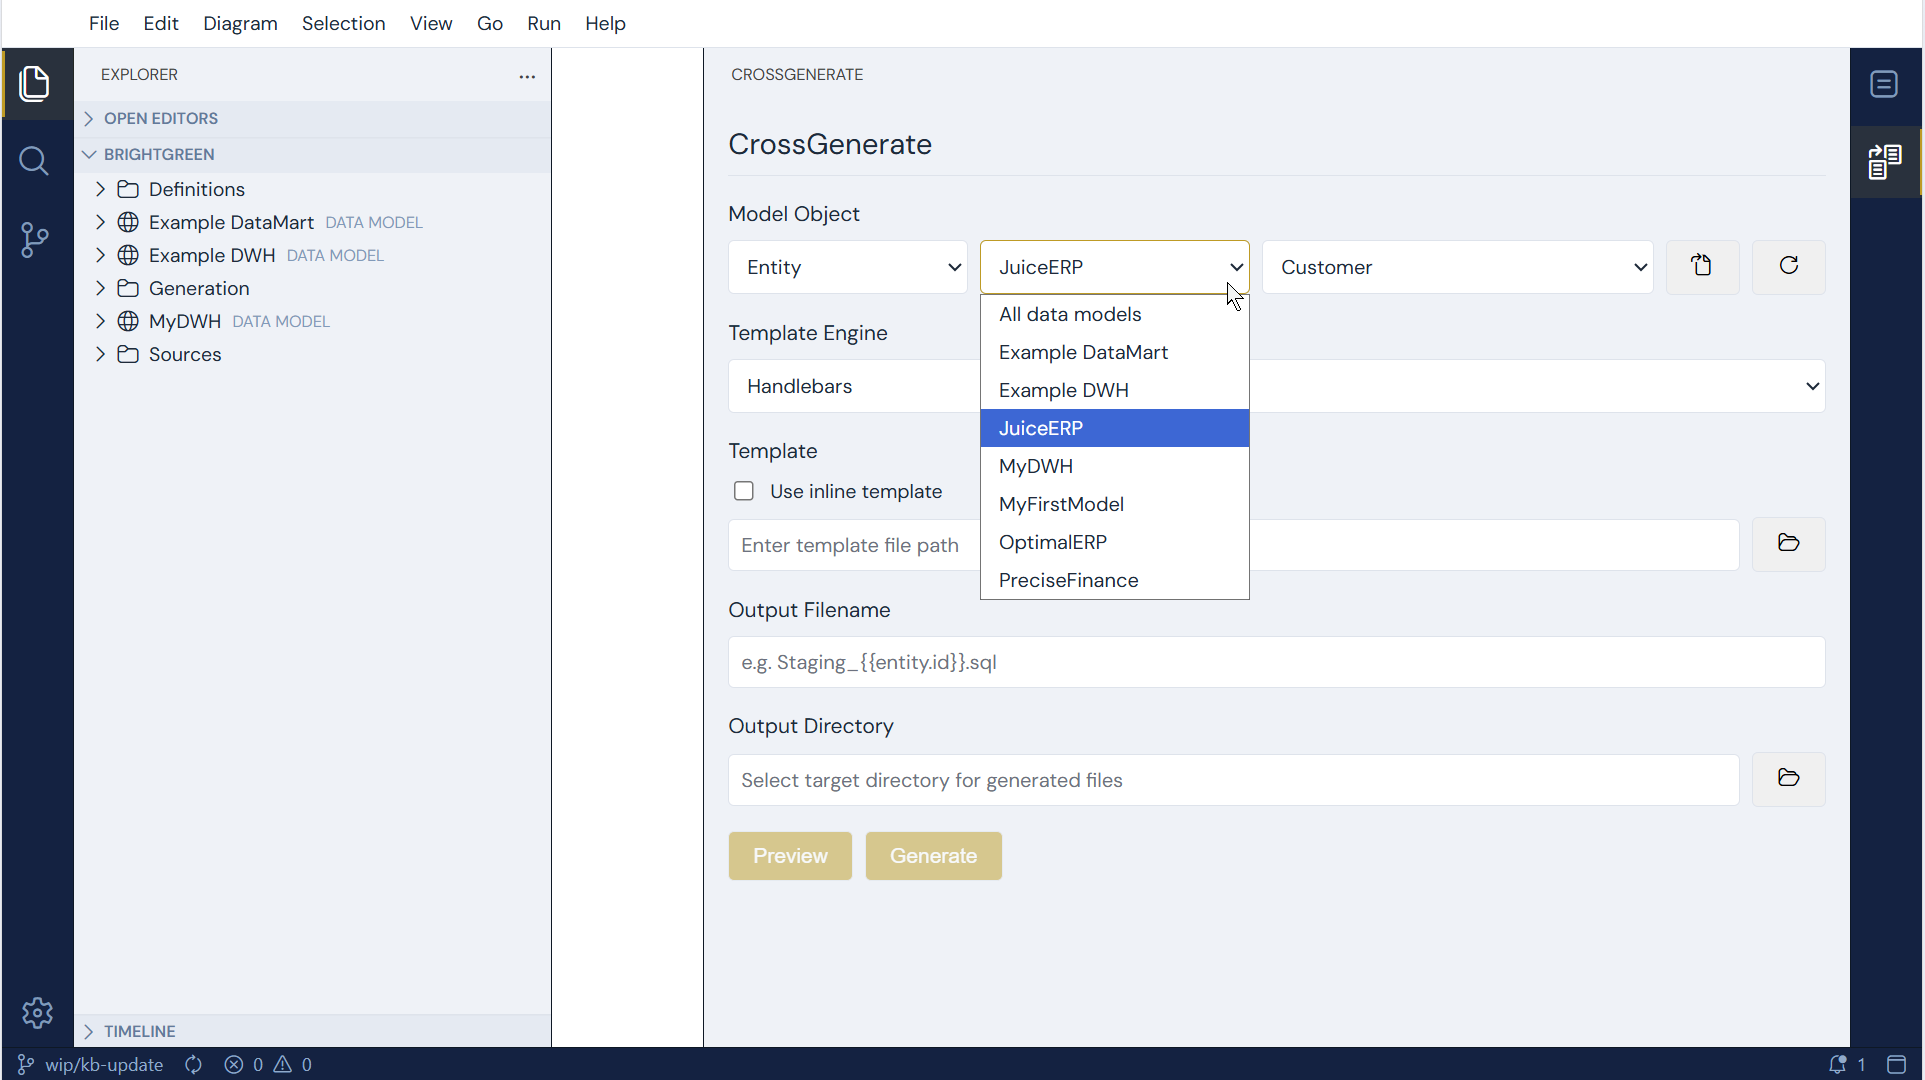
Use the open button (the go to file icon) to open the selected model entity in it's form editor when modifications are needed. Use the refresh button to reload the object after you've changed your models and you don't see the changes applied when generating code.
Step 2 - Choose a template engine
Select Handlebars or Nunjucks from the dropdown. The choice determines which syntax you use in your template.
Step 3 - Write or select a template
You have two options:
Option A - Template file
Leave Use inline template unchecked, then enter the path to a template file or click the folder icon to browse. Template files can live anywhere in your workspace.
File-based templates support includes/partials relative to the template file:
- Handlebars: every
.hbs/.handlebarsfile in the same directory as your template is registered as a partial, named after the file without its extension - soSqlColumnDefinition.handlebarsbecomes{{> SqlColumnDefinition}}. - Nunjucks:
{% include %},{% extends %}, and{% import %}resolve relative to the template's directory.
Option B - Inline template
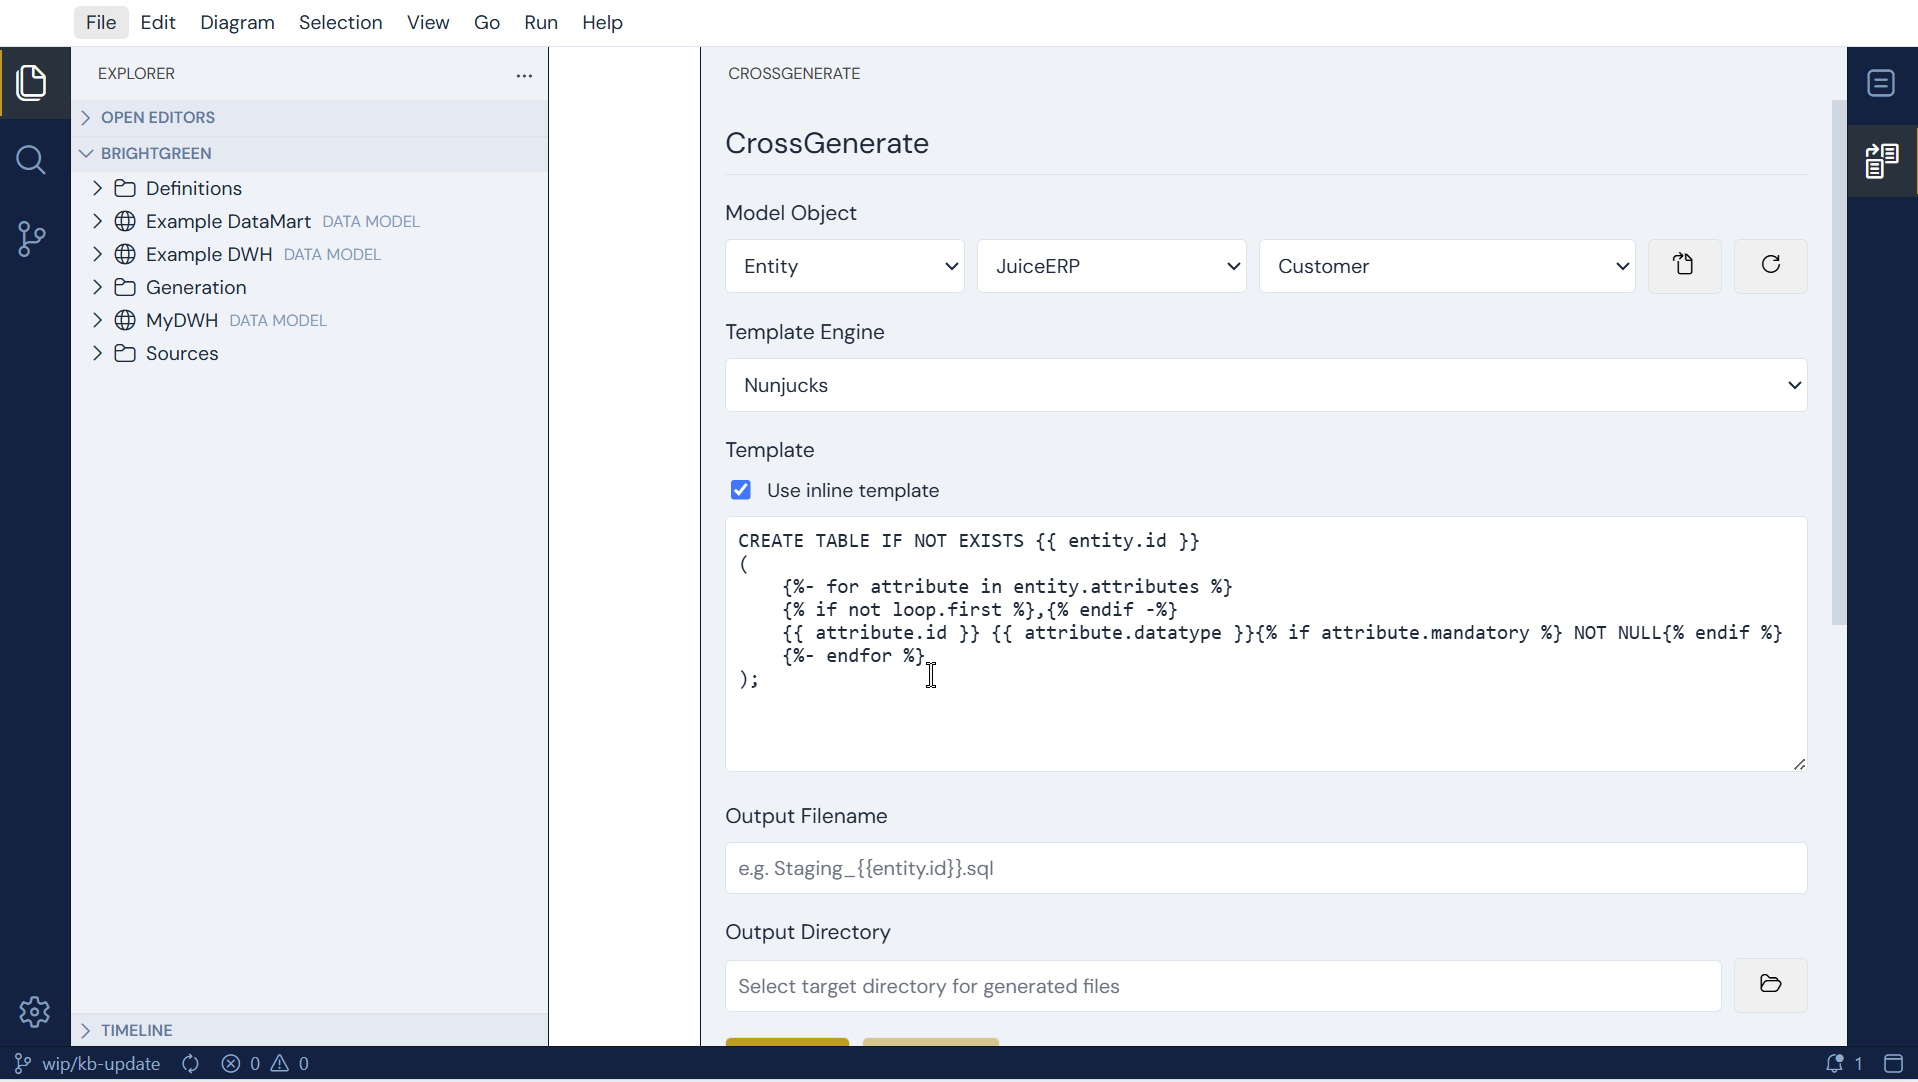
Check Use inline template and type the template directly in the text area. Inline templates are self-contained: partials (Handlebars) and includes (Nunjucks) are not available for inline templates, because there is no template file directory to resolve them against.
Example: Handlebars template for a SQL staging table
CREATE TABLE IF NOT EXISTS {{entity.id}}
(
    {{#each entity.attributes}}
    {{#if @first}} {{else}},{{/if}}{{id}} {{datatype}}{{#if mandatory}} NOT NULL{{/if}}
    {{/each}}
    {{#each entity.identifiers}}
    {{#if primary}}
    ,CONSTRAINT PK_{{../entity.id}} PRIMARY KEY (
        {{#each attributes}}
        {{id}}{{#if @last}}{{else}},{{/if}}
        {{/each}}
    )
    {{/if}}
    {{/each}}
);
Example: Nunjucks template for the same table
CREATE TABLE IF NOT EXISTS {{ entity.id }}
(
    {%- for attribute in entity.attributes %}
    {% if not loop.first %},{% endif -%}
    {{ attribute.id }} {{ attribute.datatype }}{% if attribute.mandatory %} NOT NULL{% endif %}
    {%- endfor %}
);
Available model properties
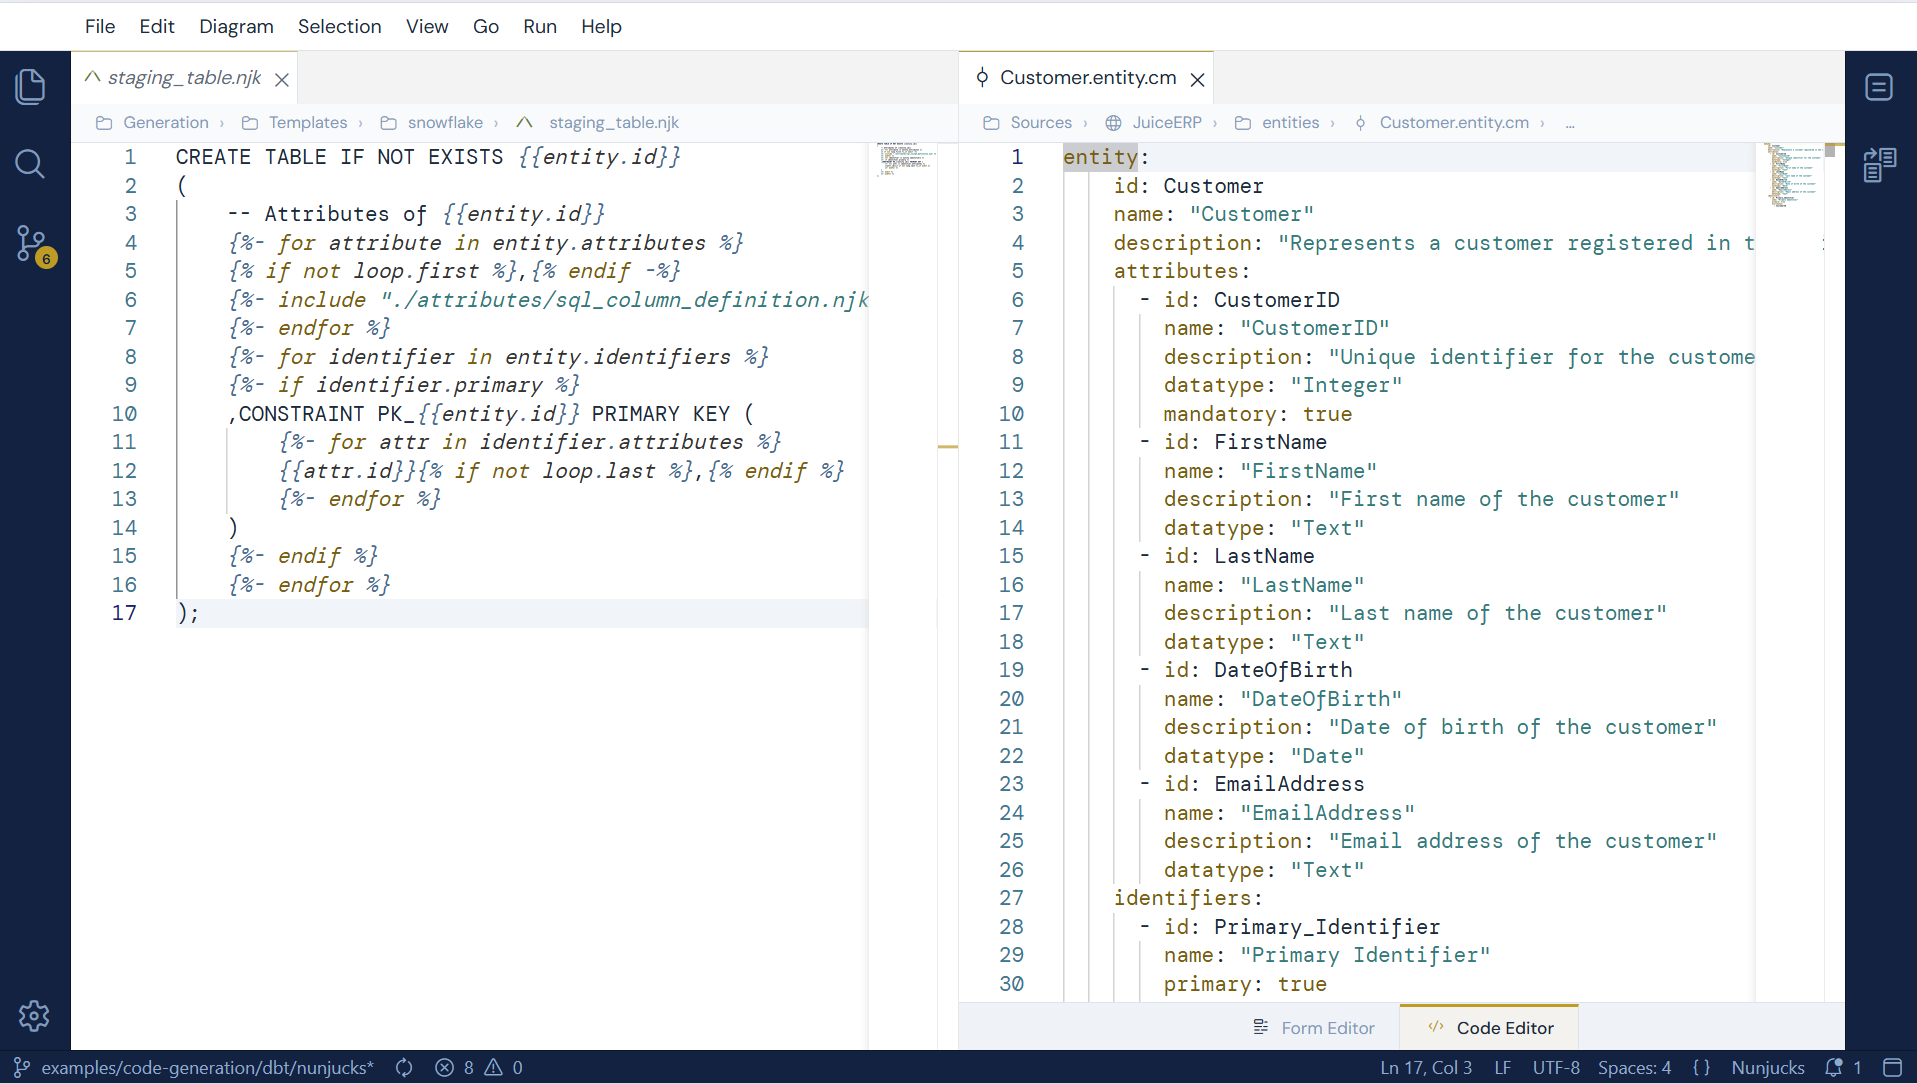
A template can read any property of the selected model object - there is no fixed or limited set. Whatever an entity, relationship, mapping, system diagram, or data model contains is available to navigate.
The easiest way to discover what's available is to open the object in its code view - the underlying .cm source of the object. Every field, nested object, and collection you see there can be referenced in a template, following the same nesting. Cross-references (such as a data type defined elsewhere, or a relationship's parent/child entity) resolve automatically - you read them directly and never dereference a .ref.
Referencing custom properties
Custom properties are exposed as a dictionary keyed by their id, so you access a value directly by its id - there is no need to loop over a collection or read a .value field.
For a custom property with id owner:
-- Owner: {{entity.customProperties.owner}}
-- Owner: {{ entity.customProperties.owner }}
The dictionary maps each id straight to the property's raw value, not to a wrapper object, so truthiness checks, comparisons and typeof behave exactly like the underlying value:
{% if entity.customProperties.isDeprecated %}
-- deprecated
{% endif %}
Reading a custom property's allowed values
When a custom property is constrained by a definition that declares allowed values, that list is available too - on a separate $allowedValues map, keyed the same way as customProperties. The list is the effective one, resolved through the definition's extends chain.
{% if entity.customProperties.$allowedValues.DataClassification | length > 0 %}
-- Allowed: {{ entity.customProperties.$allowedValues.DataClassification | join(", ") }}
{% endif %}
This is handy for generating constraints straight from the model, for example a CHECK clause or an enum type that stays in sync with the vocabulary defined on the custom property definition.
Built-in template identifiers
Beyond the model's own fields, every node exposes a small set of built-in identifiers you can use in templates:
| Identifier | Available on | Description |
|---|---|---|
$type |
any node | The model element type, e.g. LogicalEntity |
$parent |
any node | The node you navigated from. Arrays are transparent, so entity.attributes[0].$parent is the entity. Following a cross-reference returns the data model that owns the target, so mapping.sources[0].entity.$parent is the owning data model |
$documentUri |
any node | The URI of the source document the node came from |
$refText |
a cross-reference | The textual id the reference points to - readable without loading the target document |
$refType |
a cross-reference | The element type the reference targets |
$refDocumentUri |
a cross-reference | The URI of the document the reference resolves into |
_local |
any node | The raw, locally declared view of a node. Field reads are otherwise effective (own + inherited merged); entity._local.attributes returns only the attributes declared on this entity, not inherited ones |
_globalId |
any node | The fully qualified id, e.g. DataModelId.EntityId |
References resolve transparently
Because cross-references resolve as you read them, you write relationship.parent.attributes[0].datatype directly. Use $refText when you only need the referenced id and want to avoid loading the target document.
Step 4 - Set an output filename
The Output Filename field is itself rendered with the engine you selected, so you can embed model properties:
| Example | Result for entity Customer |
|---|---|
Staging_{{entity.id}}.sql |
Staging_Customer.sql |
{{entity.id}}_ddl.sql |
Customer_ddl.sql |
staging_table.sql |
staging_table.sql (static) |
The filename's extension also drives the syntax highlighting used in the preview.
Step 5 - Preview before generating
Click Preview to render the template without writing any files. Preview only needs a selected model object and a template - the output filename and directory are optional at this stage.
The rendered output appears in an inline, read-only code editor with syntax highlighting based on the resolved output filename.
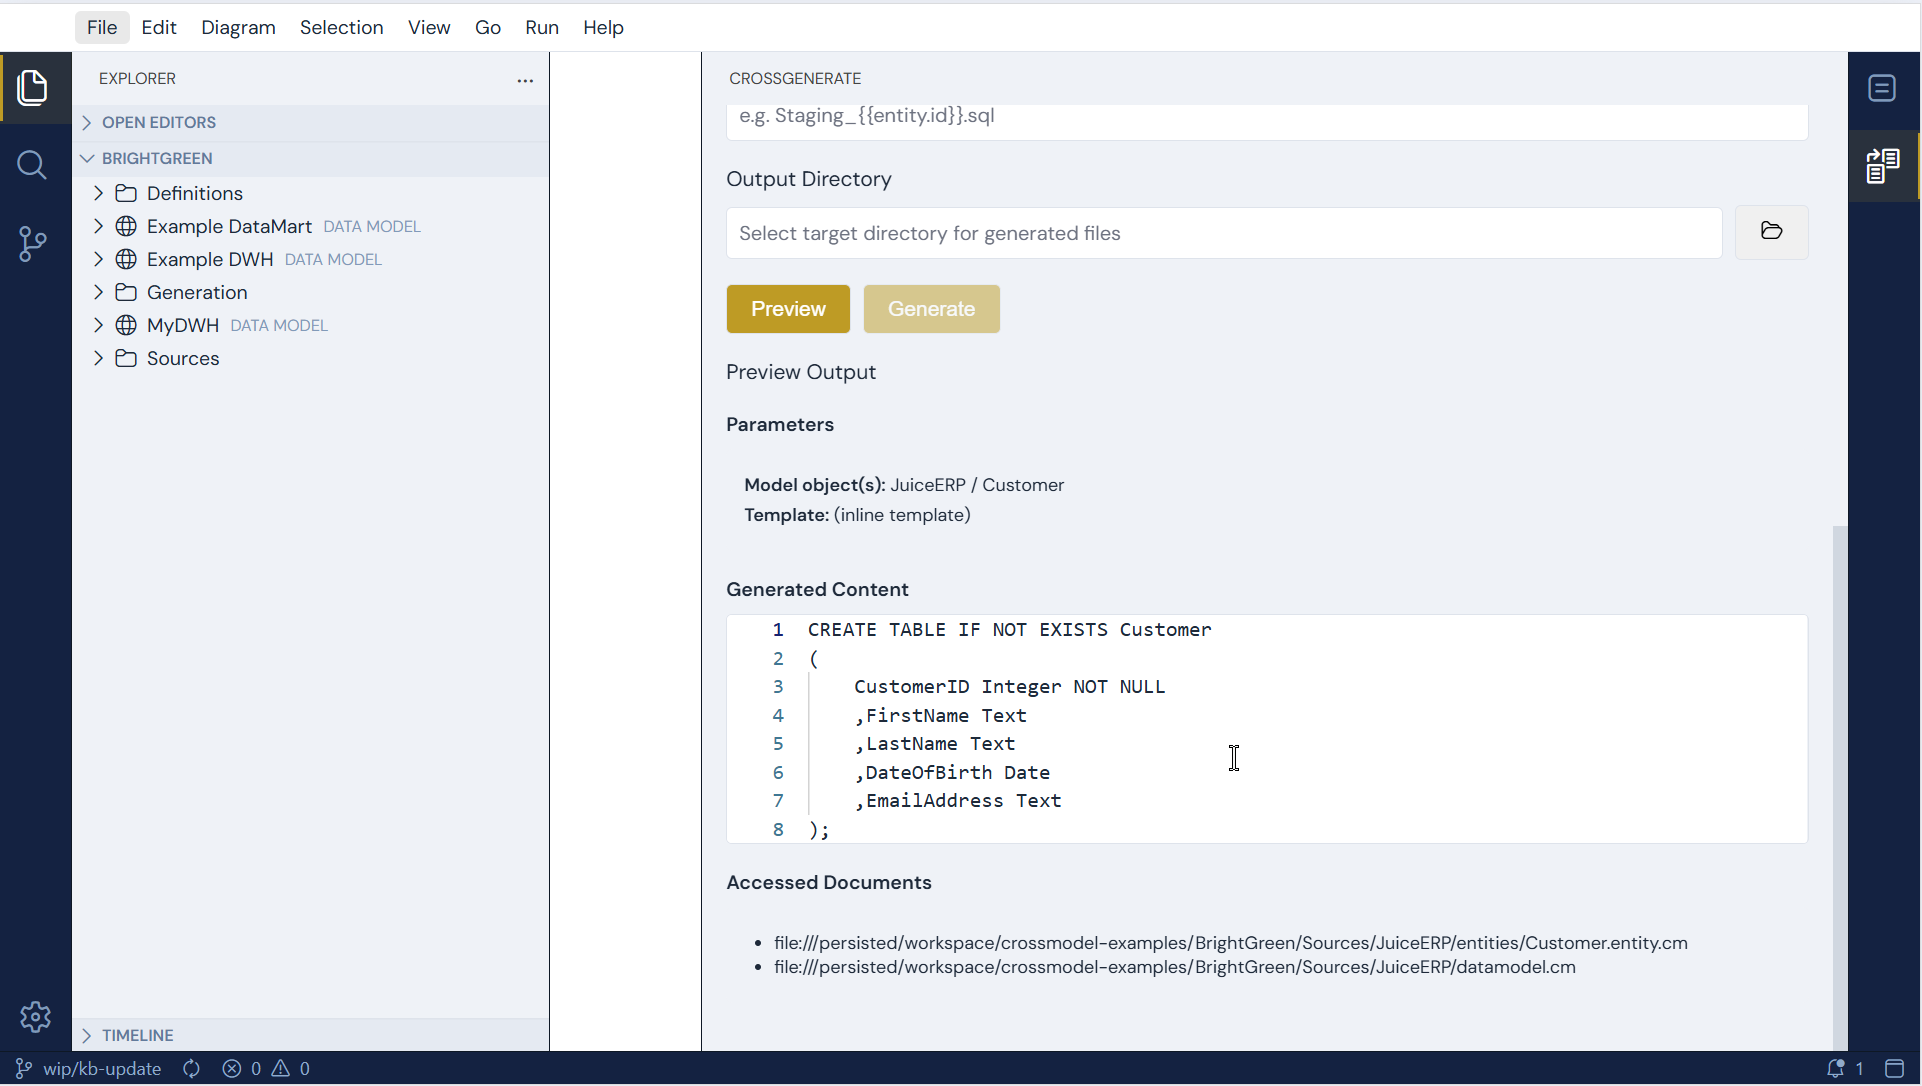
The preview result shows:
- Parameters - the model object(s) and template used for the run
- Generated Content - the rendered output (headed with the resolved output filename, when set)
- Accessed Documents - every model file read while rendering (useful for understanding cross-model dependencies)
- Warnings - any unresolved or circular references encountered during rendering
When you preview with All <Type>s selected, the output of every object is combined into a single view, each section introduced by a separator header of the form ===== Object => filename =====:
===== Customer => Staging_Customer.sql =====
CREATE TABLE IF NOT EXISTS Customer ...

===== Order => Staging_Order.sql =====
CREATE TABLE IF NOT EXISTS Order ...
This concatenation is a preview convenience only - generating (Step 6) writes a separate file per object rather than one combined file.
Step 6 - Generate files
Once you're happy with the preview:
- Select an Output Directory using the folder icon.
- Click Generate.
CrossGenerate renders the template and writes the result to Output Directory / Output Filename. Missing directories in the path are created automatically.
When All <Type>s is selected, Generate writes one file per object - the output filename is re-resolved for each object (use a template expression such as Staging_{{entity.id}}.sql so each object gets a distinct file). Unlike Preview, the outputs are not concatenated.
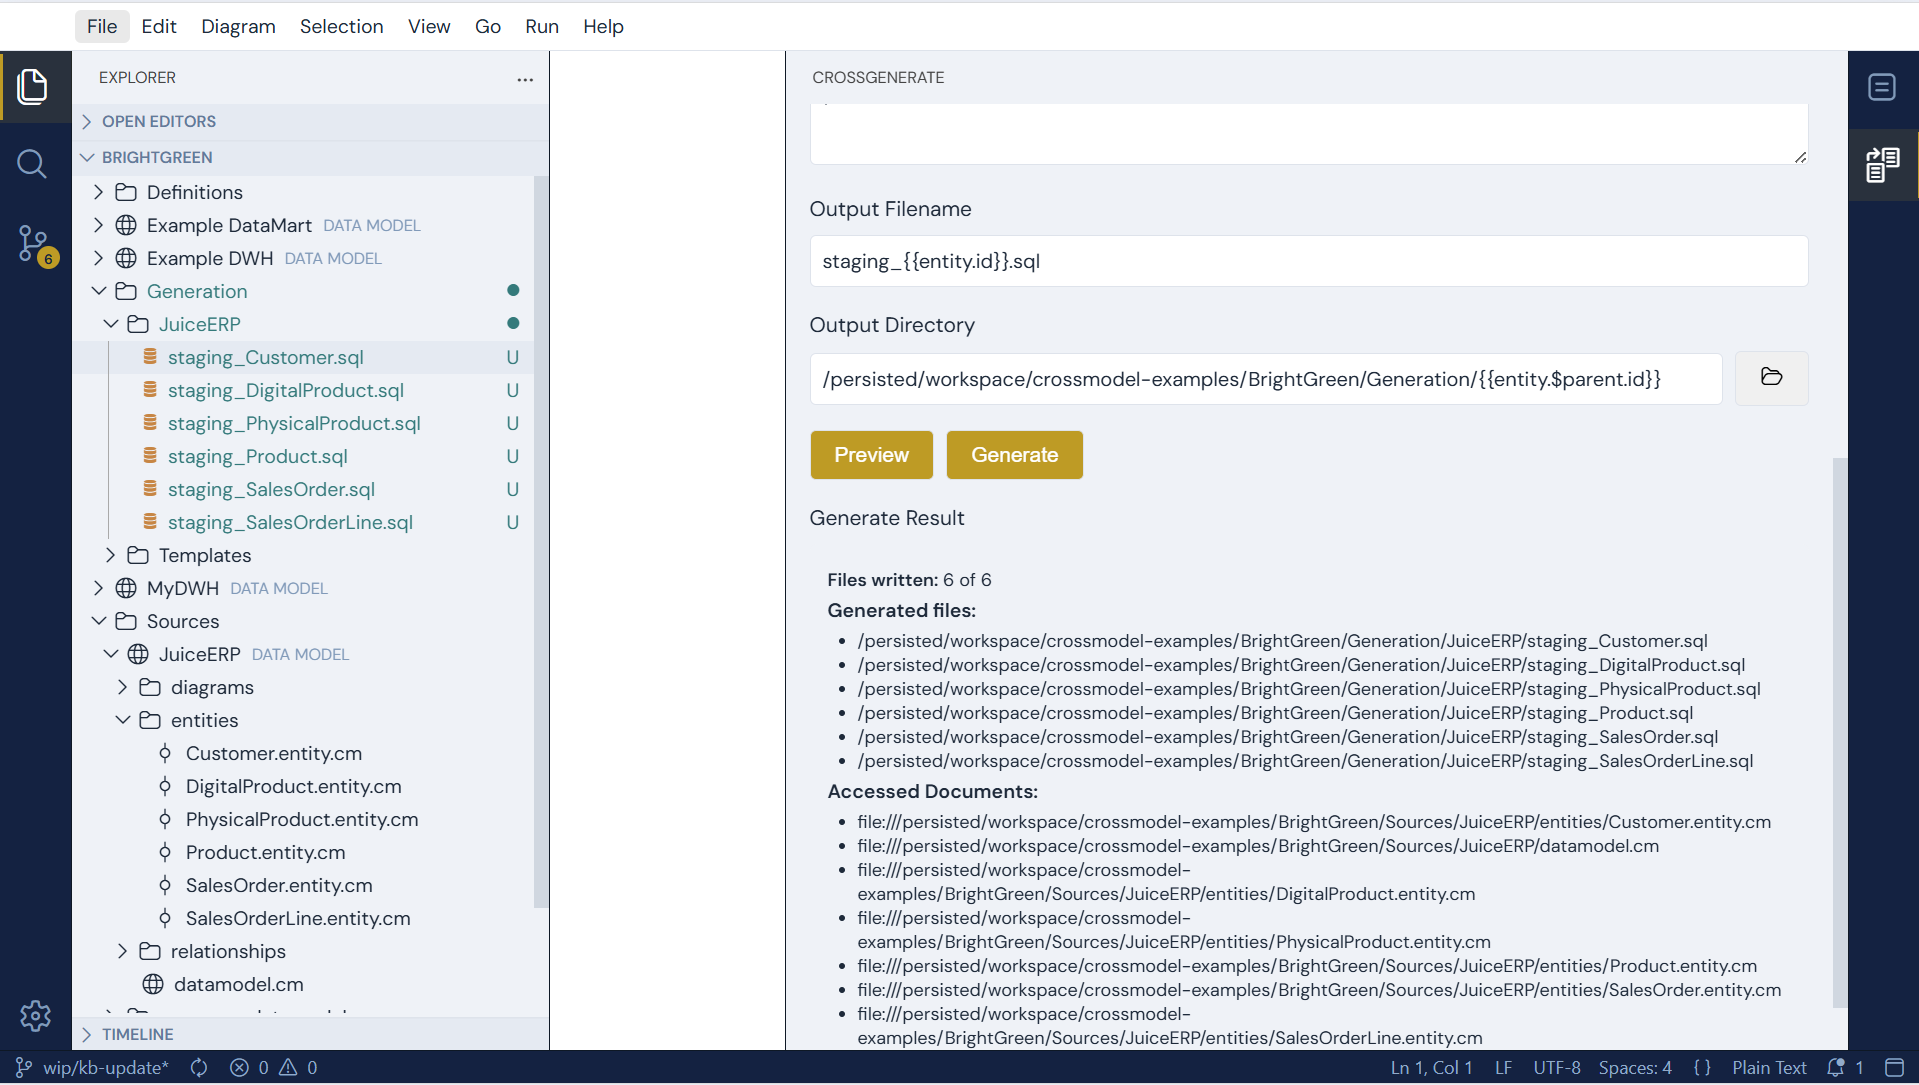
The Generate result shows how many files were written, the generated file path(s), the accessed documents, and any warnings.
Note
Generate is enabled only when you have selected a model object, provided a template (file or inline), and filled in both the output filename and output directory. Preview has no such requirement - only a model object and a template.
Organising templates in your workspace
A common convention is to keep templates close to the models they generate from, for example:
BrightGreen/
├── Generate/
│   └── templates/
│       ├── handlebars/
│       │   └── entities/
│       │       ├── StagingTable.handlebars
│       │       └── SqlColumnDefinition.handlebars
│       └── nunjucks/
│           └── entities/
│               └── StagingTable.njk
├── ...
Keeping templates in the workspace makes the project self-contained and easy to version alongside the models in Git. For Handlebars, placing partials next to the template that uses them is what makes {{> SqlColumnDefinition}} resolve.
Tips and troubleshooting
Unresolved references : If a property comes back empty, check that the referenced document exists and is valid. The Warnings section lists unresolved references, and Accessed Documents shows exactly which files were loaded.
Template syntax errors : Handlebars and Nunjucks surface syntax errors in the Error section below the action buttons. Fix the template and click Preview again.
Generation seems stuck : Generation builds the model to a validated state first. If a model file has parse or reference errors, the build can't settle - check the Problems view and resolve the errors, then try again.
Output filename not resolving
: The filename is rendered with the same engine as the main template. A Handlebars-style {{entity.id}}.sql pattern won't resolve if you've selected Nunjucks (though in this case the two share the same {{ }} syntax for simple variable output).
Partials/includes not found : Includes only work for file-based templates and resolve relative to the template's directory. They are not available for inline templates.