Version Control with Git
Keeping the history of your models, and sharing them with your team
CrossModel keeps every model in a Git repository. If you have never used Git, that sentence sounds like something for software developers, and the vocabulary that comes with it (commit, push, branch, merge) does not help. This article explains what those words mean for a modeler, what the Source Control view shows you, and the handful of actions you will use from one day to the next.
You do not need to know Git to model. You need to know Git to keep your work safe, to see what changed, and to work on the same models as your colleagues without overwriting each other. That is what this article is for.
Why your models live in Git
A CrossModel workspace is a folder of text files: one per data model, entity, relationship, mapping and diagram. That is what the Model Explorer is showing you, by name instead of by file. Because they are text files, Git can do for a whole model what Track Changes does for a document:
- Every change is recorded. Who changed what, when, and why, for as long as the repository exists. Nothing is ever overwritten; an older version can always be looked at or brought back.
- You choose when a version is "done". Git does not record every keystroke. You save your work as you go, and when a coherent piece of work is complete you record it as a commit with a short description. The history reads like a changelog you wrote yourself.
- Several people can work at once. Each person works in their own workspace and shares finished commits through a central copy. Git combines the work, and tells you when two people changed the same thing.
- Your work survives the workspace. A workspace can be deleted; the repository on GitHub or Azure DevOps is a second copy that a new workspace can fetch in a minute.
The words you will meet
| Term | What it means | Where you see it |
|---|---|---|
| Repository | The folder that Git is tracking, together with its whole history. In CrossModel this is the folder you cloned into your workspace, such as crossmodel-examples. |
The root folder in the File Explorer |
| Clone | Fetching a complete copy of a repository from a Git provider into your workspace. You do this once per workspace. | Tutorials & Examples and Clone Repository on the welcome page |
| Change | A file that differs from the last commit: modified, added or deleted. | Model Changes in the Source Control view, by object and attribute, and File Changes, by file, each with an M, A or D |
| Stage | Choosing which changes go into the next commit. You can commit some of your changes and leave the rest for later. Model Changes does it for you; you only stage by hand to pick files. | The + on a file in File Changes; the Staged Changes list |
| Commit | A recorded snapshot of the staged changes, with a message saying what and why. This is the unit of history. | The Commit button; each entry in the Graph and the Timeline |
| Branch | A named line of history. Work on a branch does not affect any other branch until you merge it. Every repository has at least one, often called main. |
The branch name at the bottom left of the window |
Remote (origin) |
The copy of the repository on your Git provider that everyone shares. Your workspace has its own copy; the remote is where they meet. | Branches prefixed origin/ in the branch picker |
| Push | Sending your commits to the remote so your colleagues can get them. | Sync Changes, or Push in the ... menu |
| Pull | Fetching your colleagues' commits from the remote and combining them with yours. | Sync Changes, or Pull in the ... menu |
| Merge | Combining the history of one branch into another. Git does this by itself unless two people changed the same lines. | Branch → Merge... in the ... menu |
| Conflict | Two commits changed the same lines of the same file, and Git needs you to say which version is right. | A file listed as conflicted after a pull or merge, holding both versions between marker lines |
Getting a repository into your workspace
A new workspace is empty. The models you work on come from a repository, and there are two ways to fetch one, both on the welcome page:
- Tutorials & Examples clones a prepared workspace from the public
crossmodel-examplesrepository. Nothing to sign in to; this is how every tutorial starts. - Clone Repository clones any repository by URL, which is how you get your own team's models. Git asks for a username and a personal access token the first time it contacts the provider; Git Provider Authentication explains how to get one and how long CrossModel remembers it.
Either way, choose your workspace folder as the destination and press Close on the
question that follows, exactly as the welcome page section
describes. The models appear in the Model Explorer, and the name of the branch you cloned
appears at the bottom left of the window. From here on you work in the models as usual; Git
only comes into it when you want to record or share what you have done.
The Source Control view
Open it with the third icon in the left bar, or with Ctrl+Shift+G. As soon as you save a
change to any model, it appears here:
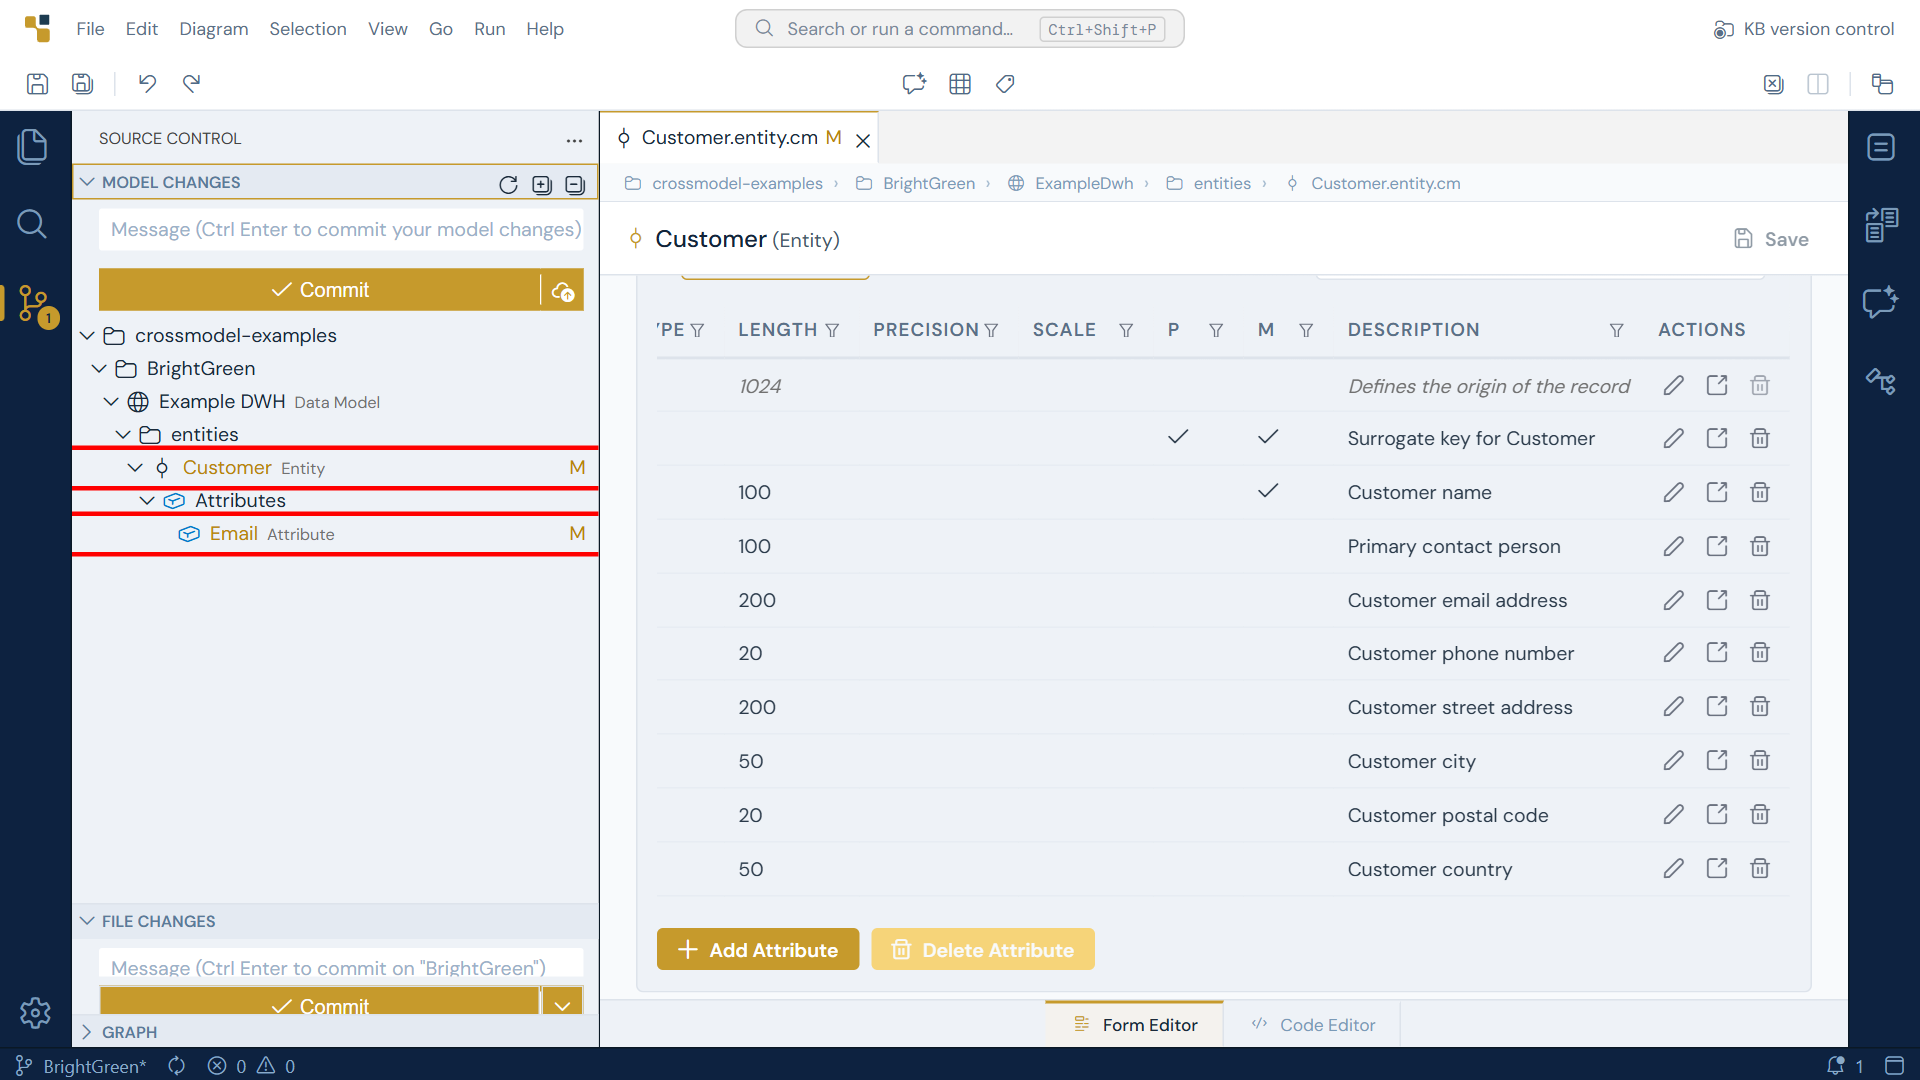
The view has three sections, from top to bottom. The first two are two ways of looking at the same repository, each with its own way of committing:
- Model Changes. Only your models, the way you modeled them: each changed entity,
relationship, mapping or diagram under its data model and folder, as in the
Model Explorer, with an
M,AorDbeside it. Expand an object to see the attributes you changed inside it; Expand All in the section header opens the whole list at once. Anything that is not a model file - a code generation template, a generated script, a README - is not listed here, however much it changed. Above the list are the message box and the Commit button: a commit here takes all your model changes at once, with no staging to think about. - File Changes. Every changed file in the repository, model or not, with Git's own tools: staging files one by one, committing and pushing as separate steps, and the ... menu for pull, push, stash, branches and merging. It starts collapsed; click its header to open it.
- Graph. The history of the repository, collapsed until you open it.
Which of the two to use depends on what you changed and how much of Git you want to see:
| You want to | Use |
|---|---|
| Record the modeling you did, in one step, without thinking about files | Model Changes |
| See exactly which attributes changed in an entity | Model Changes |
| Commit a template, a generated script or any other file that is not a model | File Changes |
| Commit only some of your changes, stash work for later, or commit now and push later | File Changes |
| Pull, push, switch branches or merge | The ... menu in File Changes |
Both work on the same repository, so a change committed in one disappears from the other. The split is the one the Explorer makes: the Model Explorer shows model objects, the File Explorer every file.
The badge on the left bar icon counts the changed files, and the branch name at the bottom left
gains a * while there are any.
Seeing what you changed
Right-click an object in Model Changes and choose Open Changes, and CrossModel opens its file as a comparison with the last committed version: a line as it was in red, the line as it is now in green, and everything unchanged in between. Given a wide enough editor the two versions sit side by side instead, old on the left and new on the right.
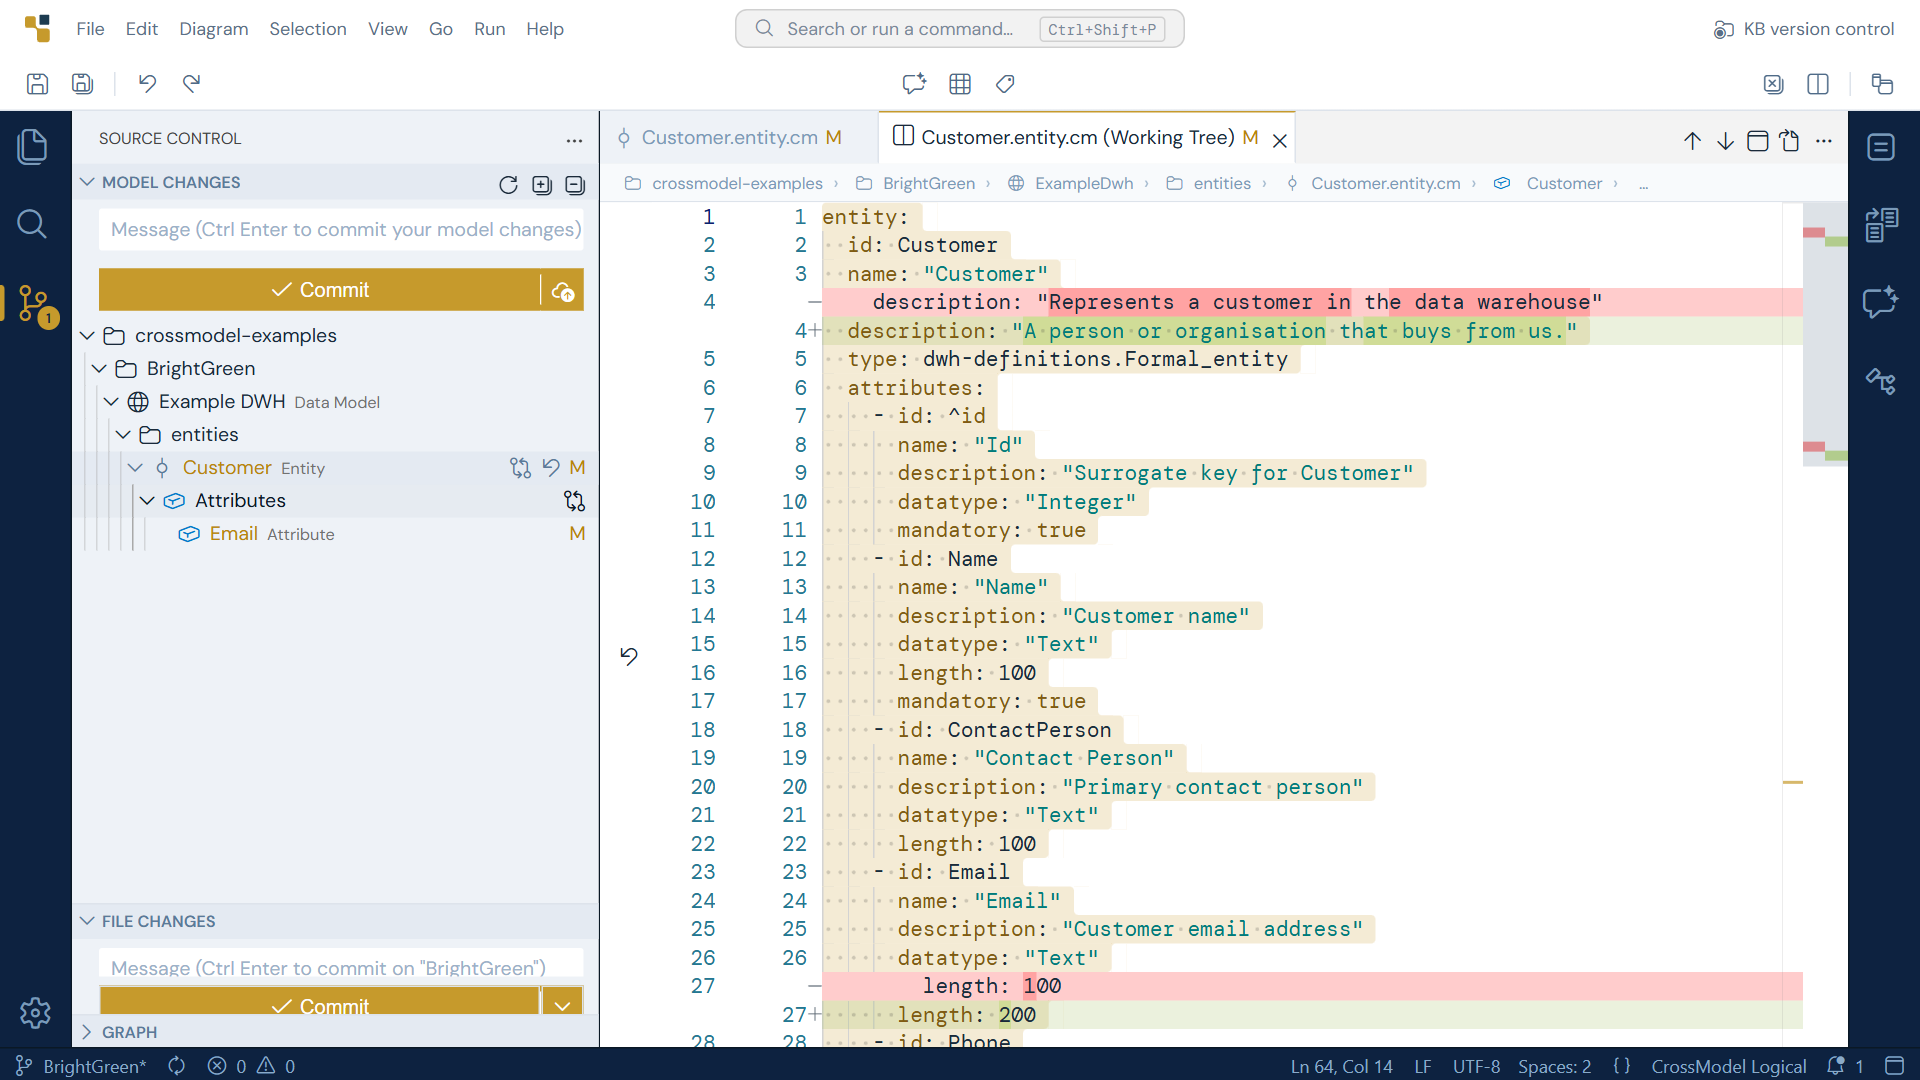
This is the model as text, which you otherwise never need to look at. It is worth a glance here, because a comparison is the most exact answer to "what did I actually change?" that exists. An entity is a few dozen lines, one per attribute and property, so a changed description or a new attribute stands out immediately.
The first save of an older file re-indents all of it
Since v1.21.0 CrossModel writes model files with two spaces per level, where files saved by earlier versions used four. An older file keeps its layout until you change it; the first save that changes it writes the whole file in the new layout. The comparison above ignores indentation, so it still shows only the lines you changed, but the commit holds every line of that file, and a comparison on GitHub or Azure DevOps shows them all. It happens once per file. If you would rather keep that noise out of a real change, commit the re-indented files on their own first, with a message that says so.
If the change was a mistake, Discard Changes in the same menu puts the object back the way it was at the last commit. It works on a folder or a whole data model too. There is no undo for a discard, which is why it first lists the files it will restore and asks whether you are sure.
Recording your work: commit
A commit is a deliberate act, and it is worth being deliberate about. The decision that matters is what to say.
Type a message in the box at the top of Model Changes. One line is enough, and the useful
message says what changed in the model and, where it is not obvious, why:
Add Credit Limit to Customer, Split Address out of Customer for the CRM import. Six months
later, this is the line your colleague reads to decide whether your commit is the one that
introduced the attribute they are looking for.
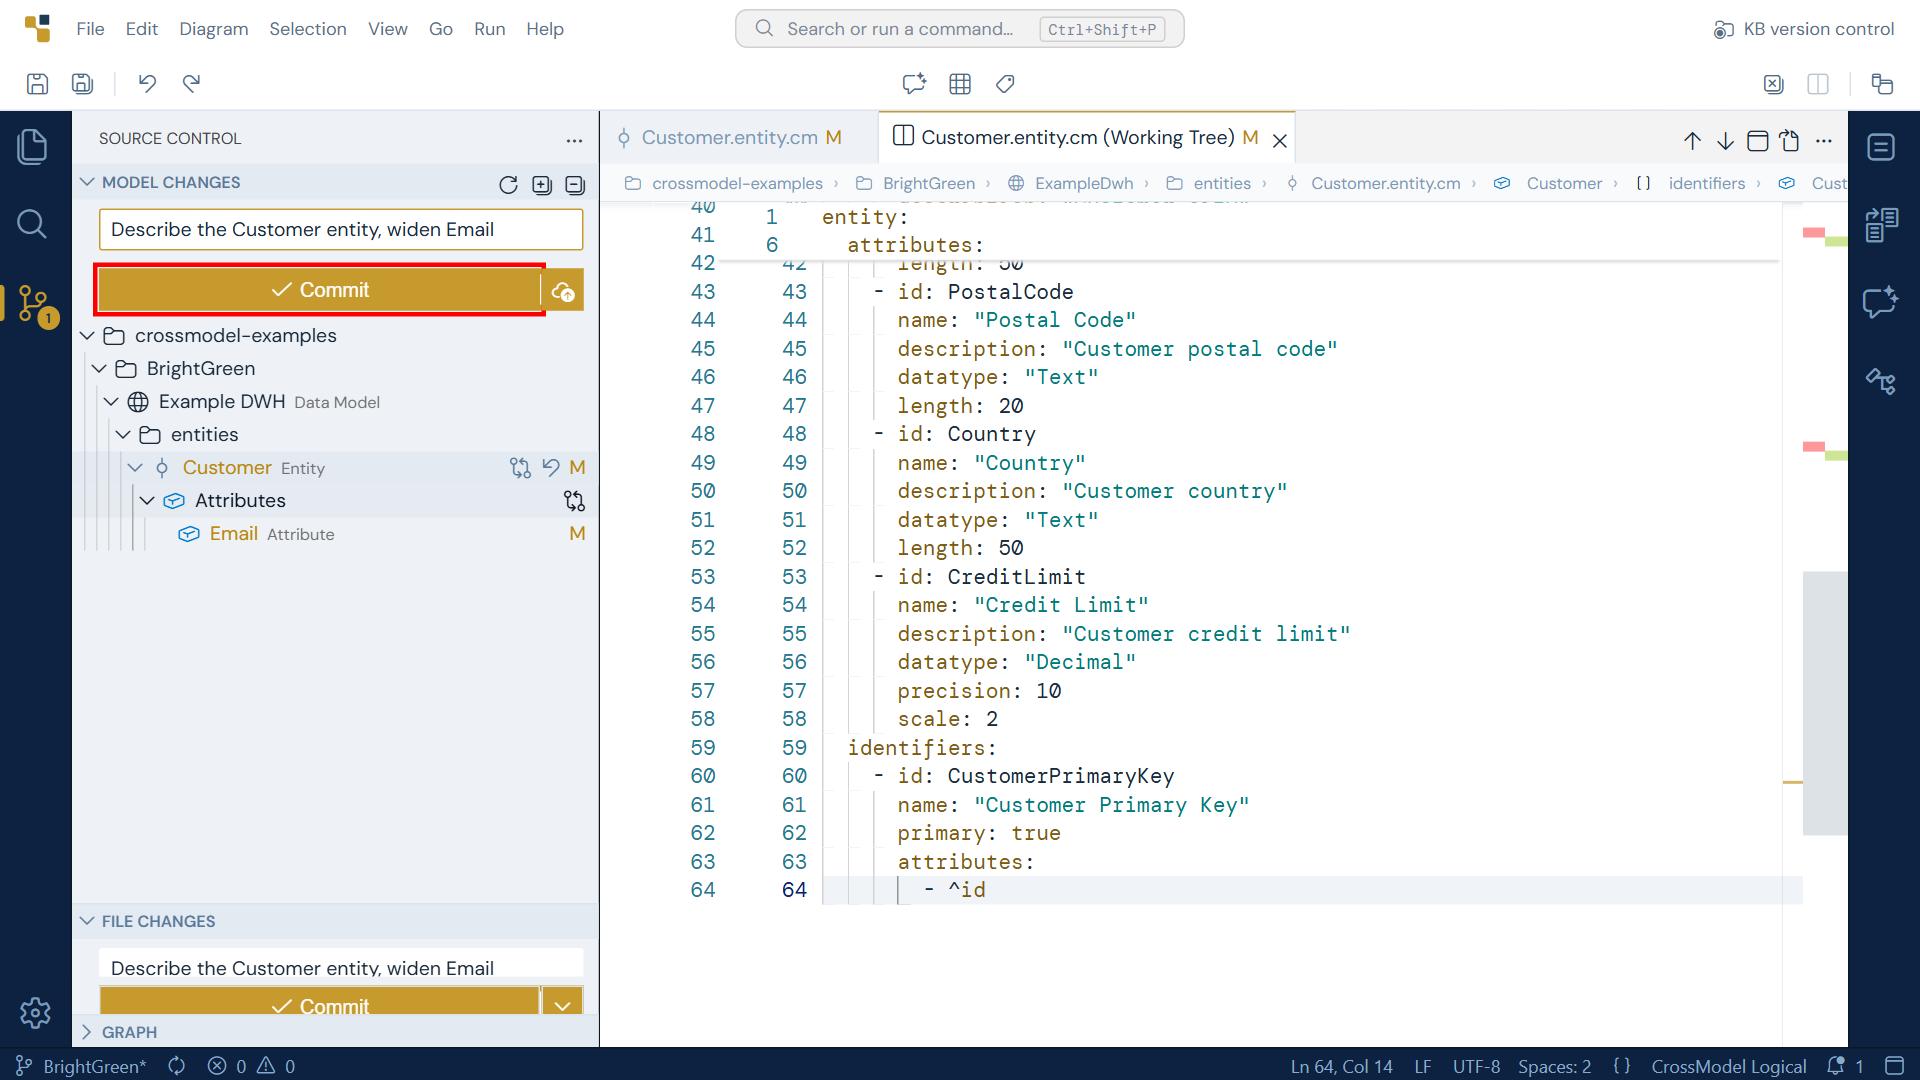
Press Commit, or Ctrl+Enter in the message box. Every model change in the list is
staged and recorded in one step, the list empties, and the message box clears for the next one.
Commit & Push, the button beside it, does the same and pushes straight away: one click from
your modeling to your colleagues. That is the simple way, and for most modeling work it is all
you need.
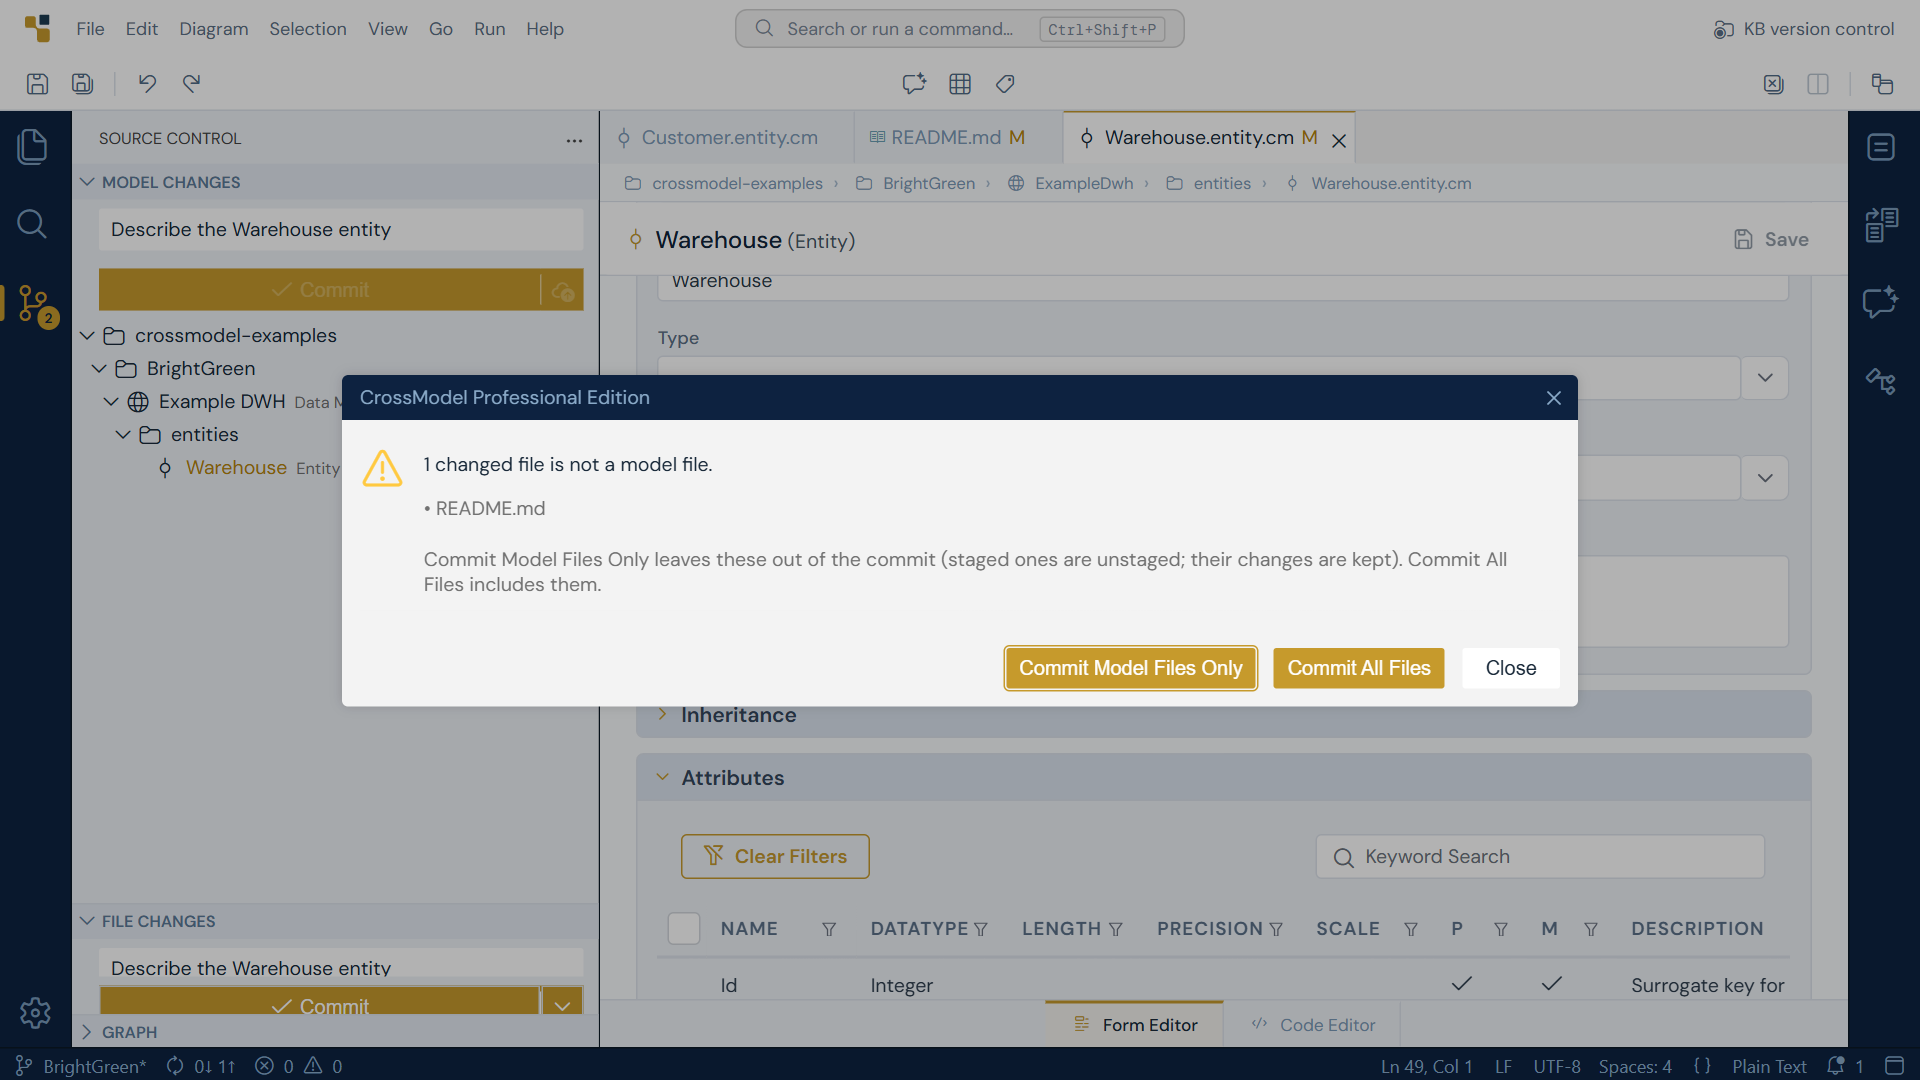
A commit from Model Changes records your model files. If other files in the repository have changed as well, a README or a generated script, CrossModel does not take them along silently. It lists them and asks: Commit Model Files Only leaves them out, with their changes kept for later, and Commit All Files includes them.
A commit is local. It is safe in your workspace's copy of the repository, but nobody else can see it until you push.
More control: File Changes
When you want Git's finer steps, open File Changes: it lists every changed file, templates and other non-model files included, and leaves each step to you.
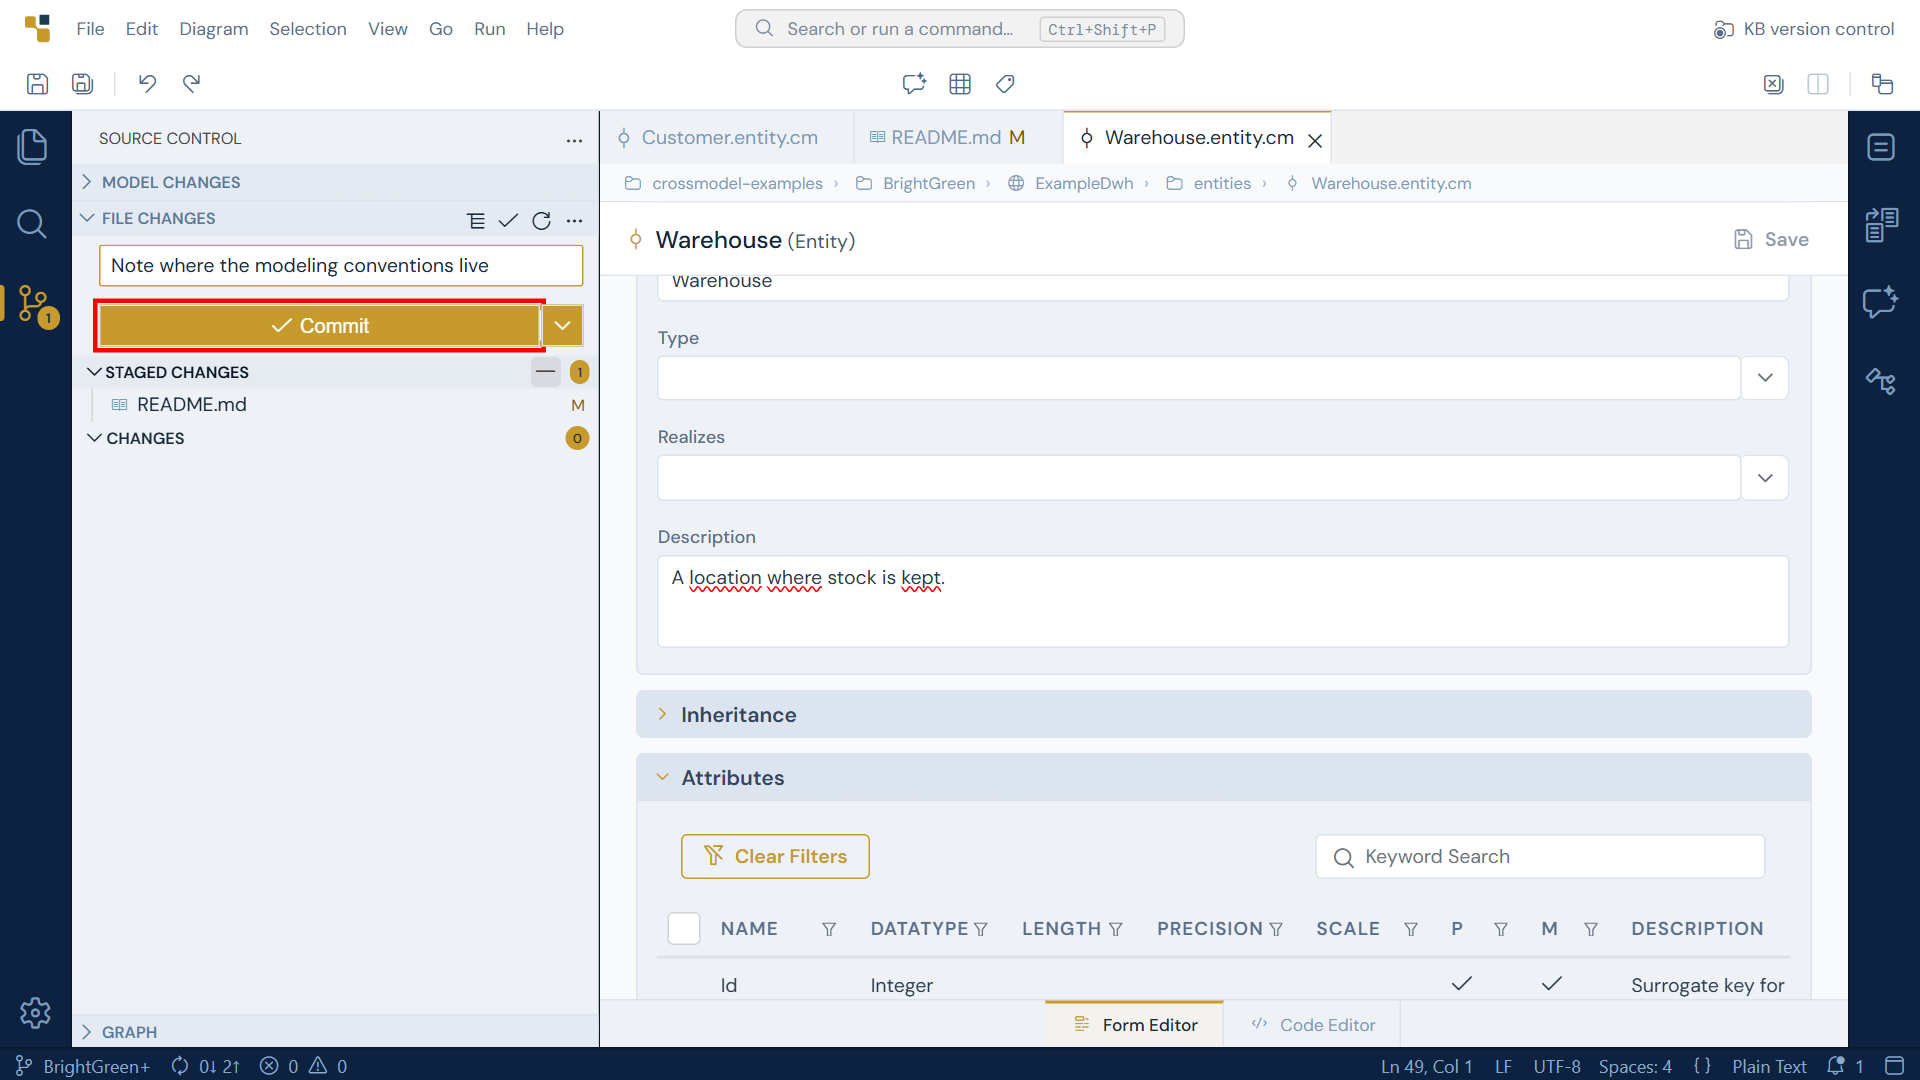
When you want only some of your changes in a commit, Press the + on each file you want to record and it moves to Staged Changes; anything left under Changes stays in your workspace, untouched, for a later commit. Type the message and press Commit in that section. It records exactly what is staged, and works for any file, model or not. Nothing is pushed: you can make several commits and push them together when you are ready.
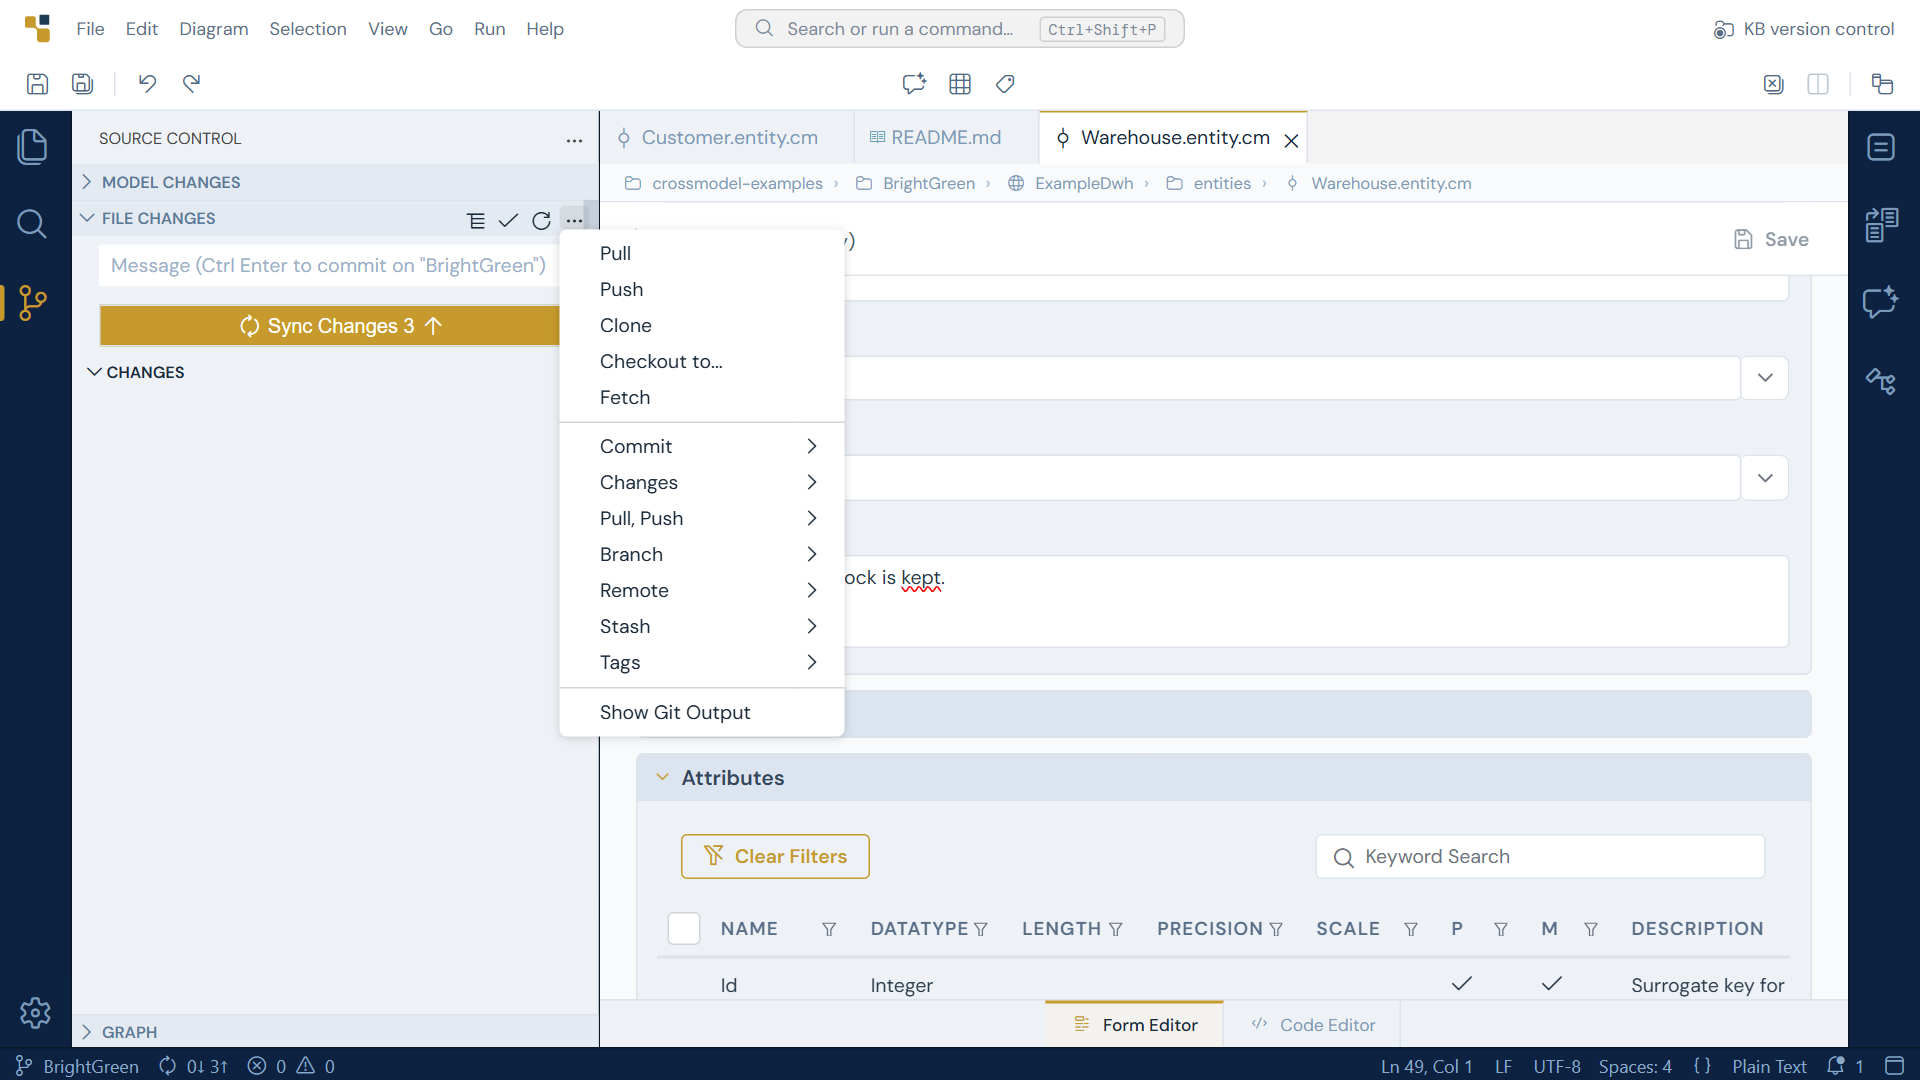
The ... in the File Changes header is the menu for everything else, and it is the only place you will need to go for pull, push, stash, branches and merging. Stash puts your uncommitted changes aside, so you can pull or switch branch with a clean workspace and take them back afterwards:
Sharing your work: push and pull
After a commit, the button in File Changes becomes Sync Changes, with a count of the
commits waiting to go out. The same numbers sit at the bottom left, beside the branch name: 0↓ 1↑
means nothing to fetch and one commit to send.
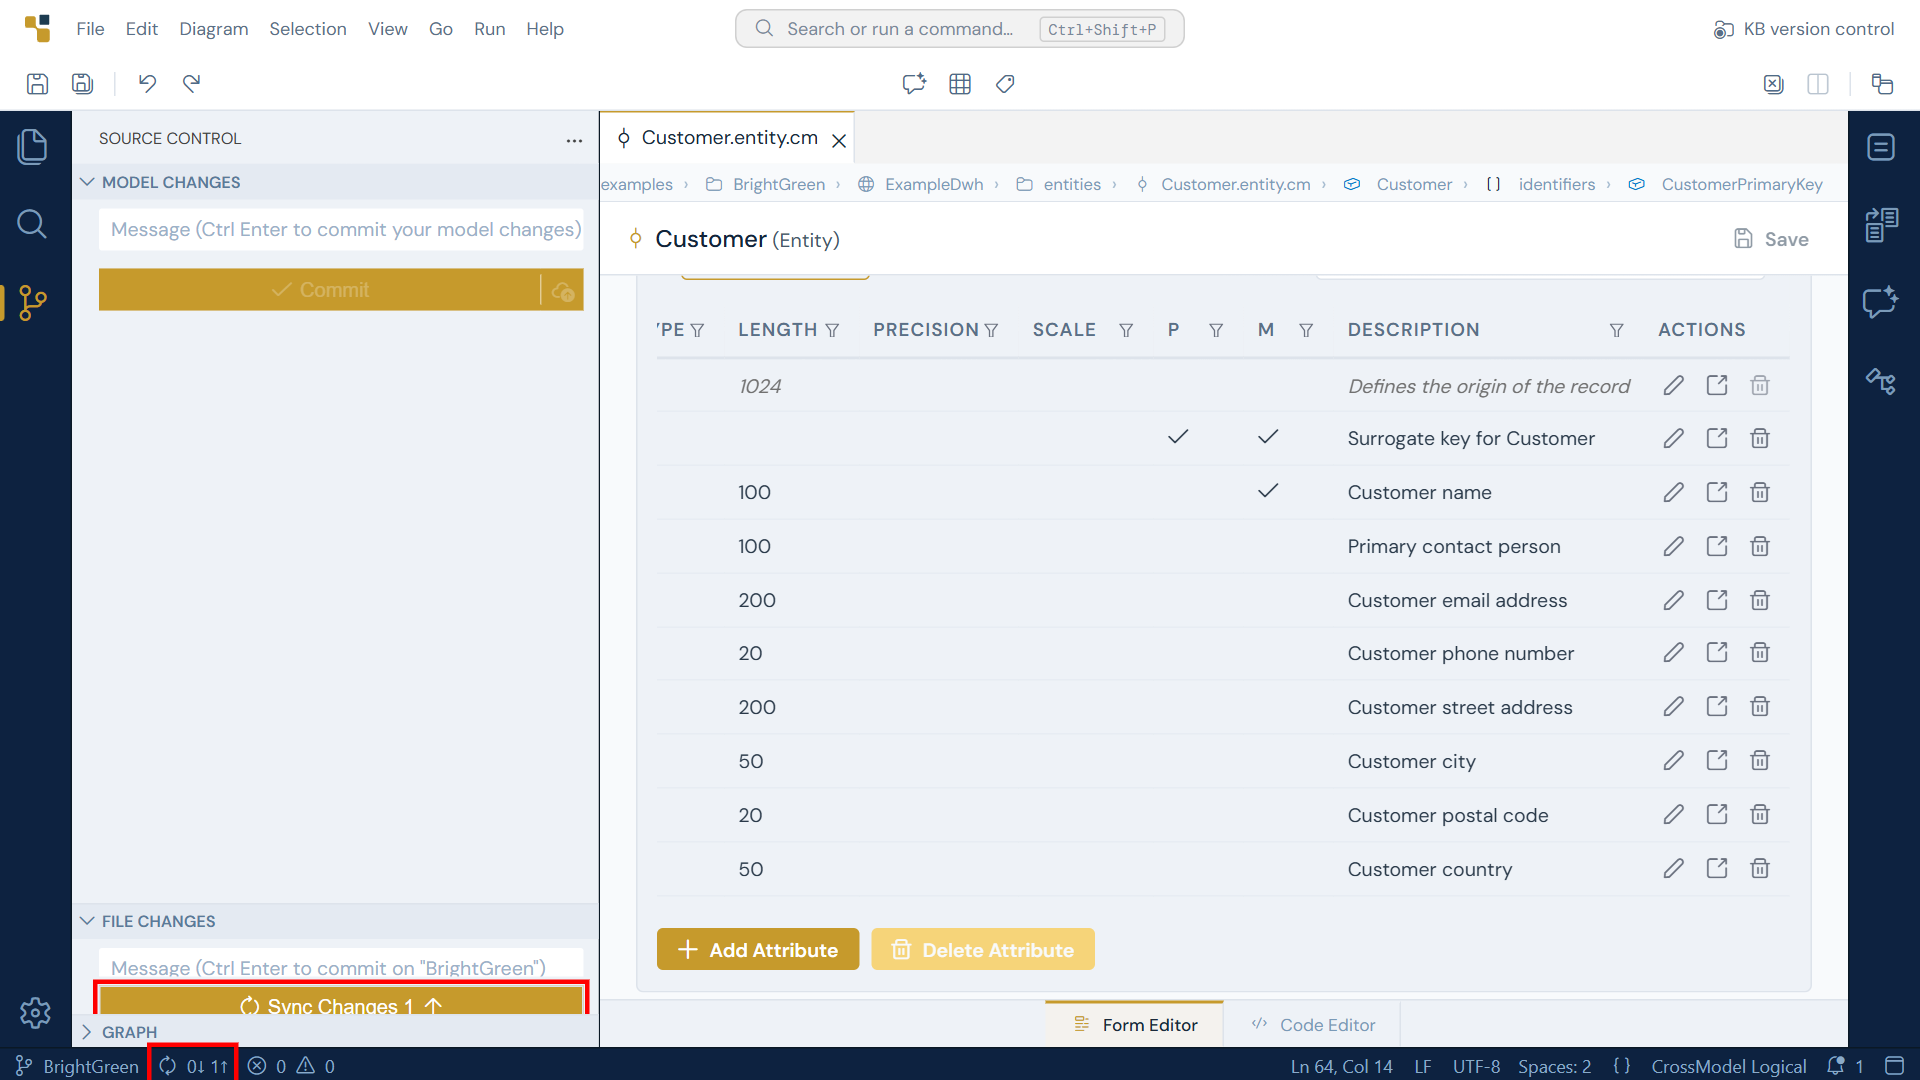
Sync Changes pulls first and pushes second: it fetches whatever your colleagues have pushed since you last looked, combines it with your commits, and sends the result. That order is deliberate, because the remote will refuse a push that would overwrite commits you have not seen. If you would rather do one or the other, Pull and Push are the first two entries in the ... menu.
The first time a session contacts the remote, Git asks who you are:
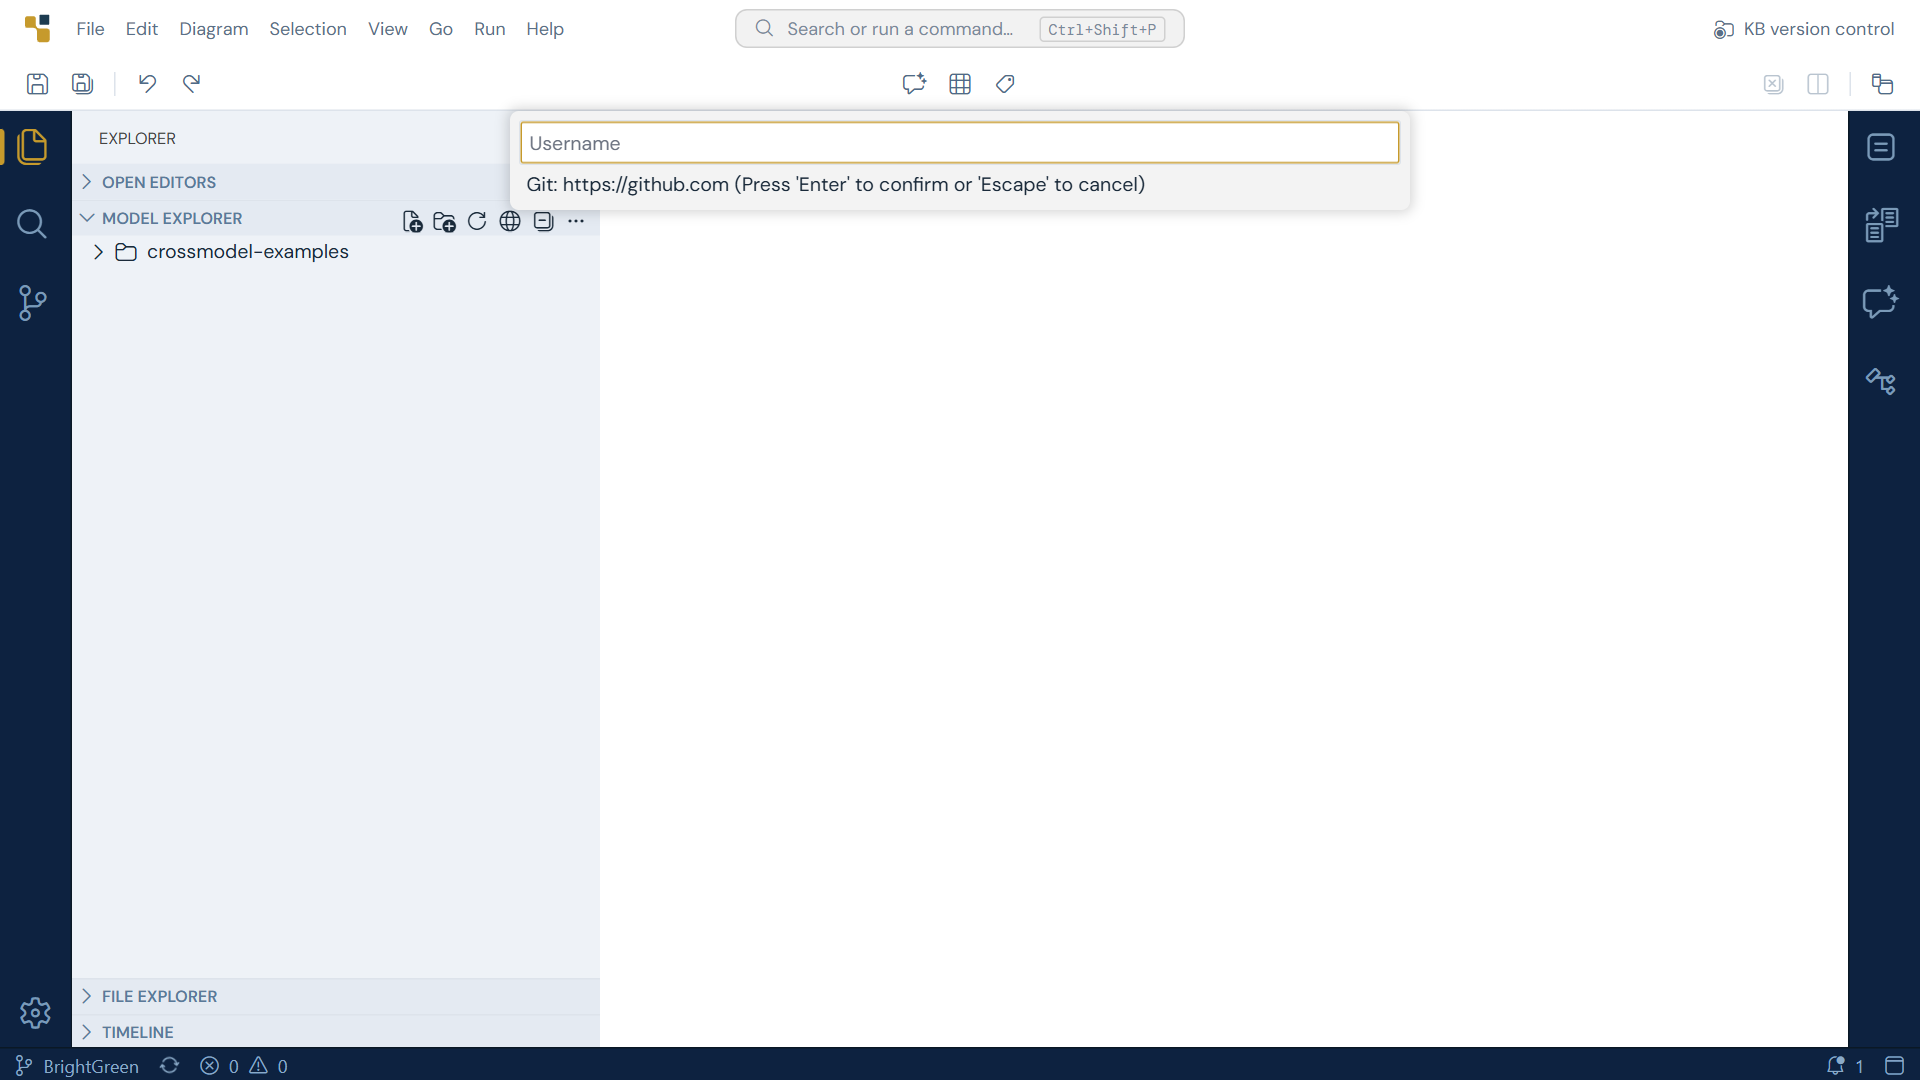
Enter your provider username, then your personal access token as the password (not your account password). Git Provider Authentication covers how to create one, and how to stop CrossModel asking again after an hour. Your name and email on the commits themselves need no setup: CrossModel takes them from your account at the start of each session.
A routine that avoids most trouble
Pull when you sit down, commit as you go, push when you get up. Pulling first means you are changing the current version of the model rather than last week's. Pushing at the end of the day means your work is on the remote, where it survives anything that happens to your workspace, and where your colleagues pull it in tomorrow morning.
Working on a branch
Everything so far happens on one branch, usually main, and for a small team that makes small
changes it is all you need. A branch earns its place when a piece of work should stay out of
the shared model until it is finished: a redesign that takes a week, a proposal that may be
rejected, or a change you want a colleague to review before it becomes the truth.
Click the branch name at the bottom left and the picker opens:
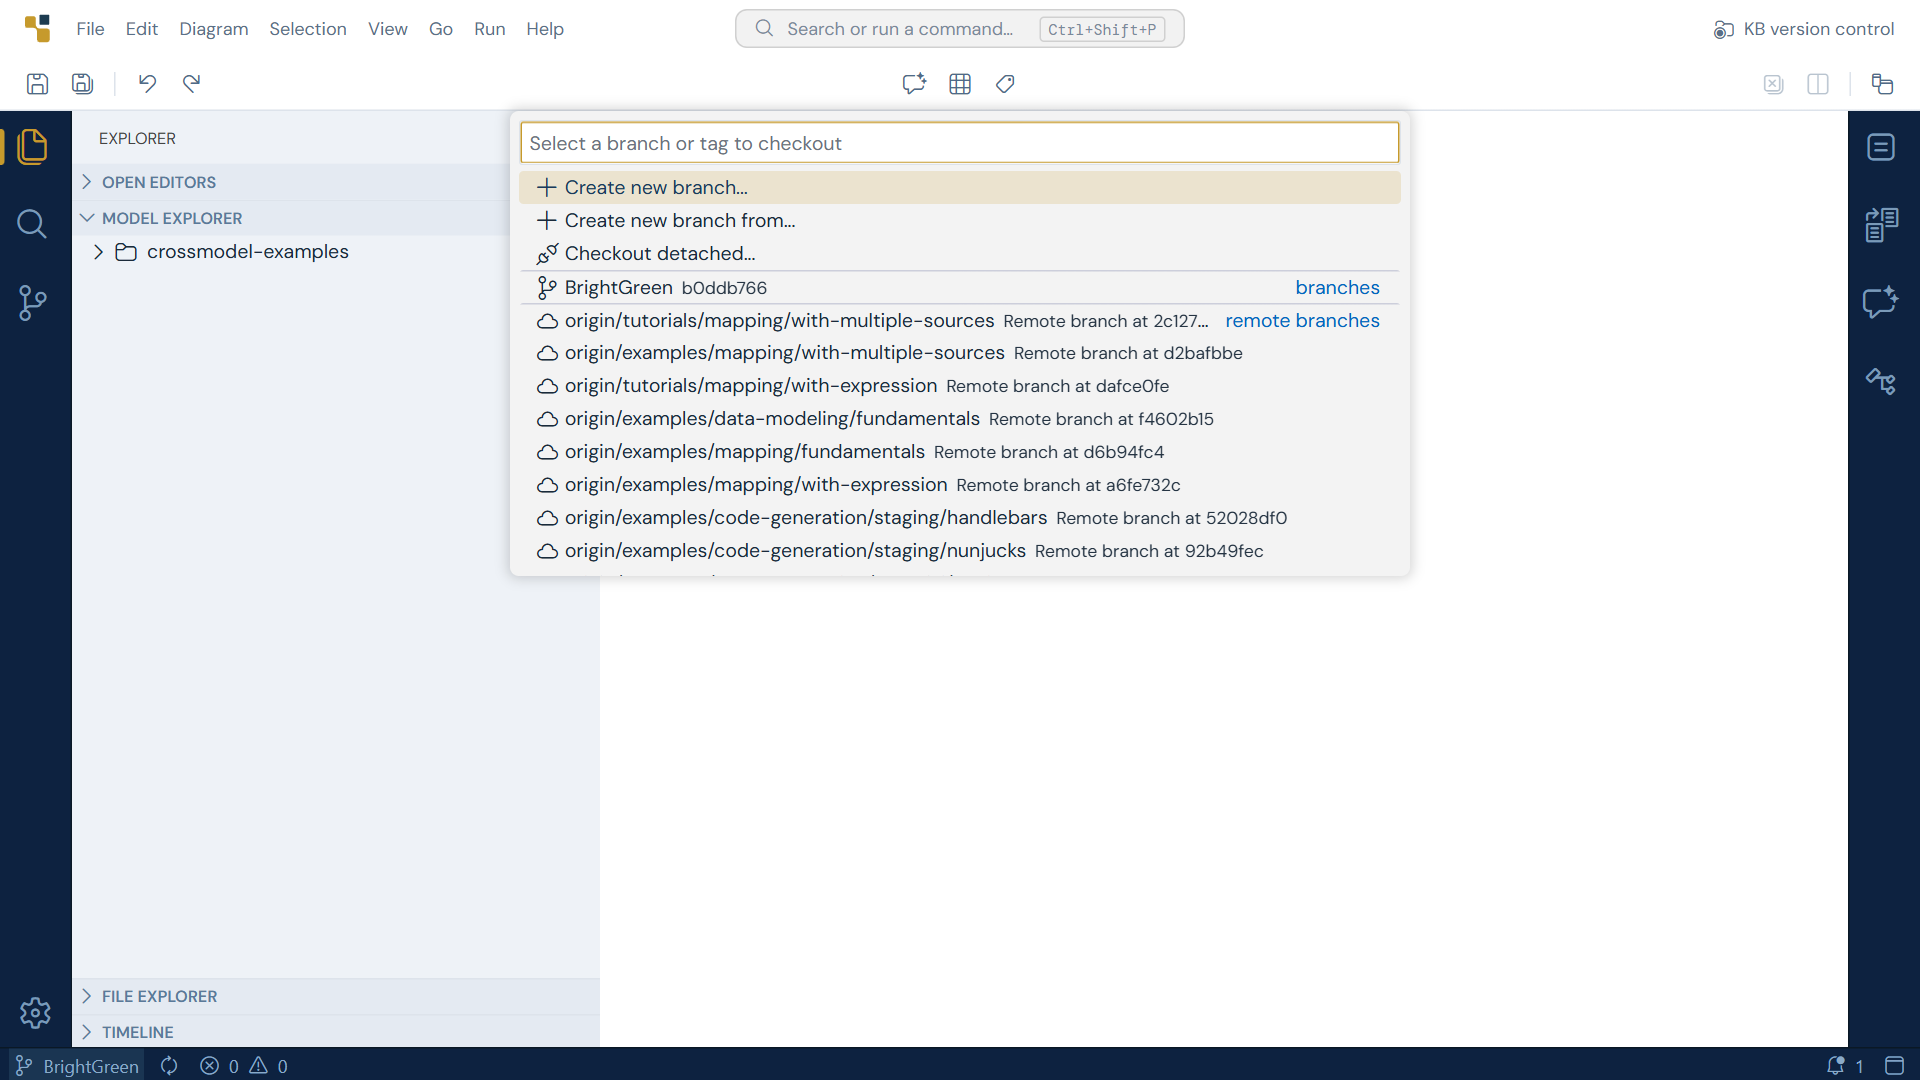
- Create new branch... asks for a name and switches you to it. Name it for the work, not
for yourself:
credit-limit,customer-address-split. - Choosing an existing branch, local or
origin/..., switches to it. The Model Explorer changes with it: you are looking at that branch's version of every model.
Commit on the branch as usual. Pushing a new branch for the first time publishes it to the
remote, where a colleague can switch to it and look at your work before it goes anywhere near
main.
When the work is done, switch back to main, pull, and choose Branch → Merge... from the
... menu, picking your branch. Git carries your commits over, and unless two people
changed the same lines, that is the whole procedure.
Looking back: the Graph and the Timeline
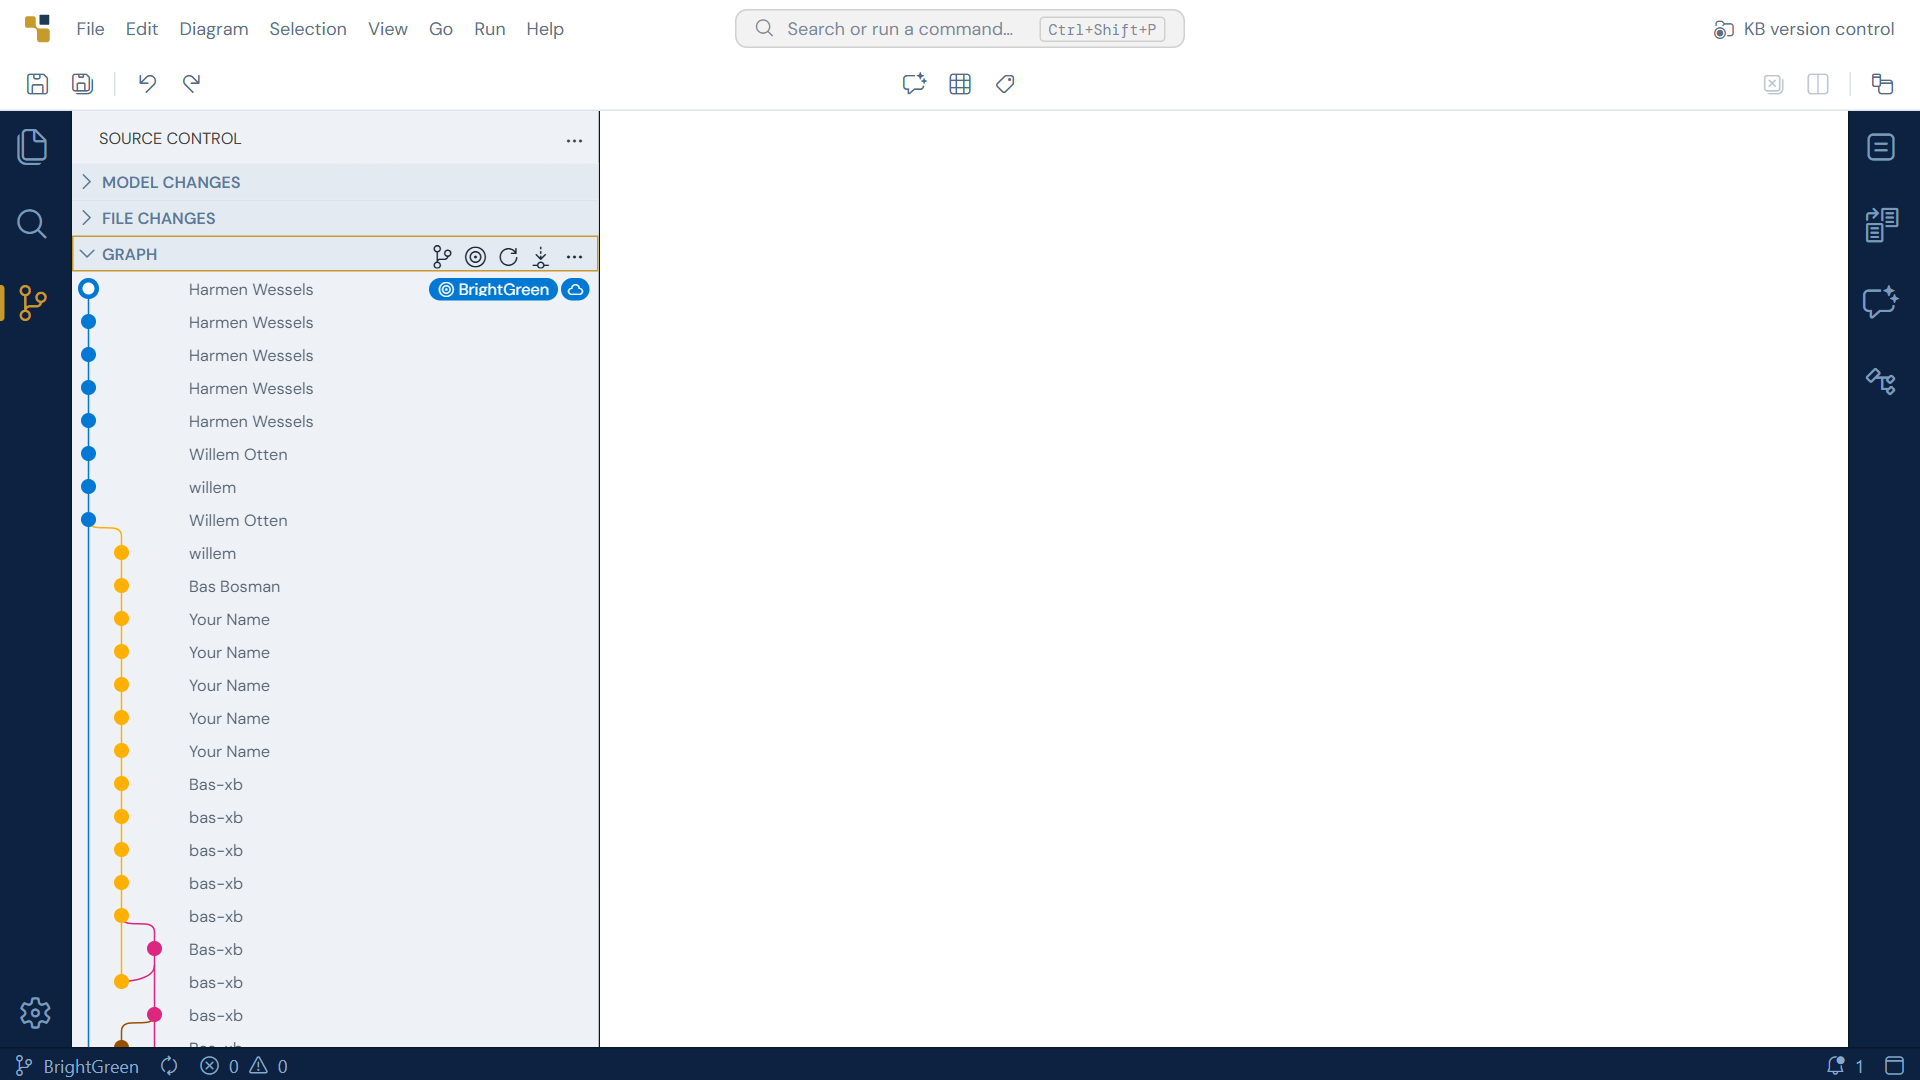
The Graph at the bottom of the Source Control view is the repository's history, newest at the top. Each row is a commit; the labels show where each branch currently stands, and which commit the remote knows about. Hover a row for the author, the time, the message and the number of files changed; click it to see which files.
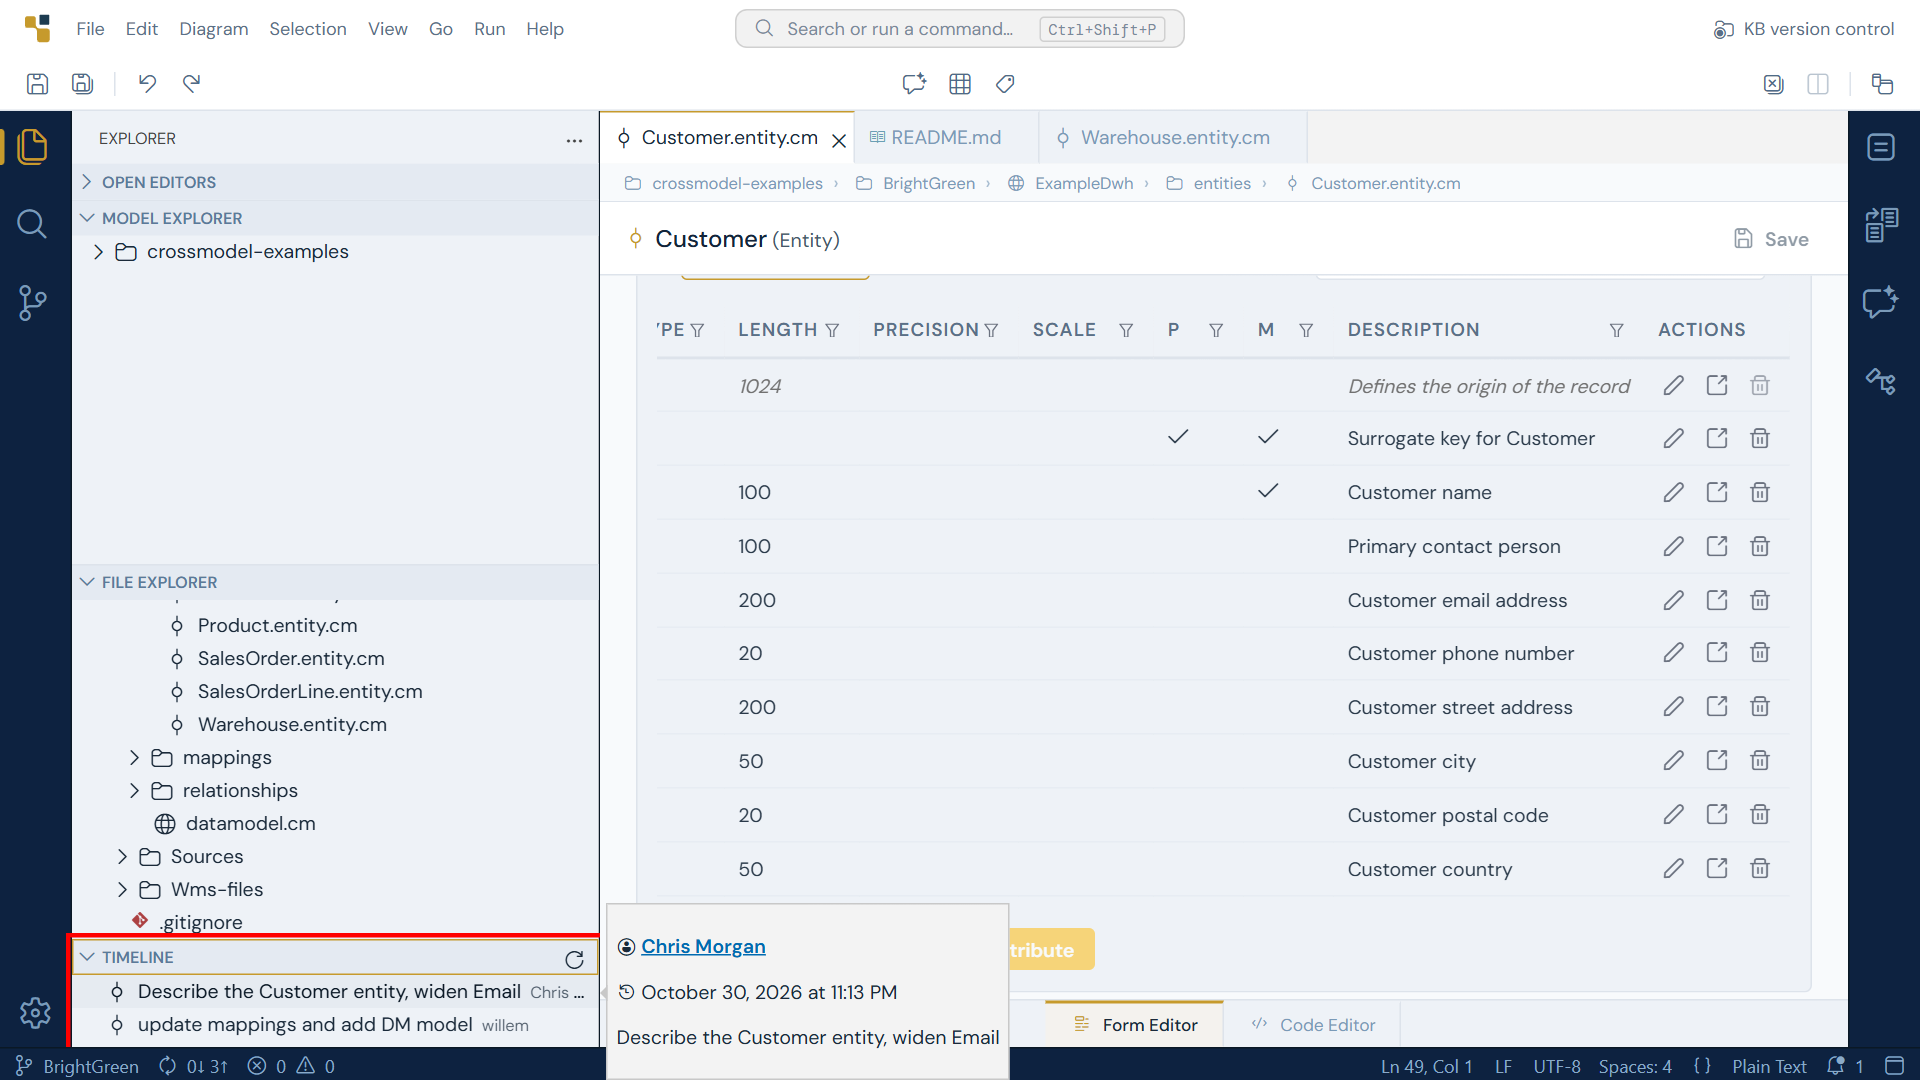
For a single model, the Timeline at the bottom of the Explorer answers the narrower question. Select an entity and it lists every commit that touched that file; click one to see what changed in it.
When two people change the same thing
Git combines work automatically as long as the changes do not overlap. Two people editing different entities, or even different attributes of the same entity, merge without anyone noticing. A conflict is the remaining case: the same lines of the same file were changed on both sides, such as two people writing a different description for the same entity, and Git will not guess which one is right.
It can happen on a pull as easily as on a merge. Either way, Git stops. The file appears under
a Merge Changes section in the Source Control view with a ! beside it, the branch name at
the bottom left gains a ! too, and the message box is already filled in with a merge message
such as Merge branch 'describe-products' into BrightGreen. Nothing is committed until you
have resolved the file.
Open the file from Merge Changes and switch to its Code Editor tab. (The Form Editor cannot show a model in this state; it may show a red banner saying the file contains errors and is read-only until they are fixed in the Code Editor, which is exactly right.) Git has written both versions into the file, one above the other, between marker lines, and a Resolve in Merge Editor button waits at the bottom right:
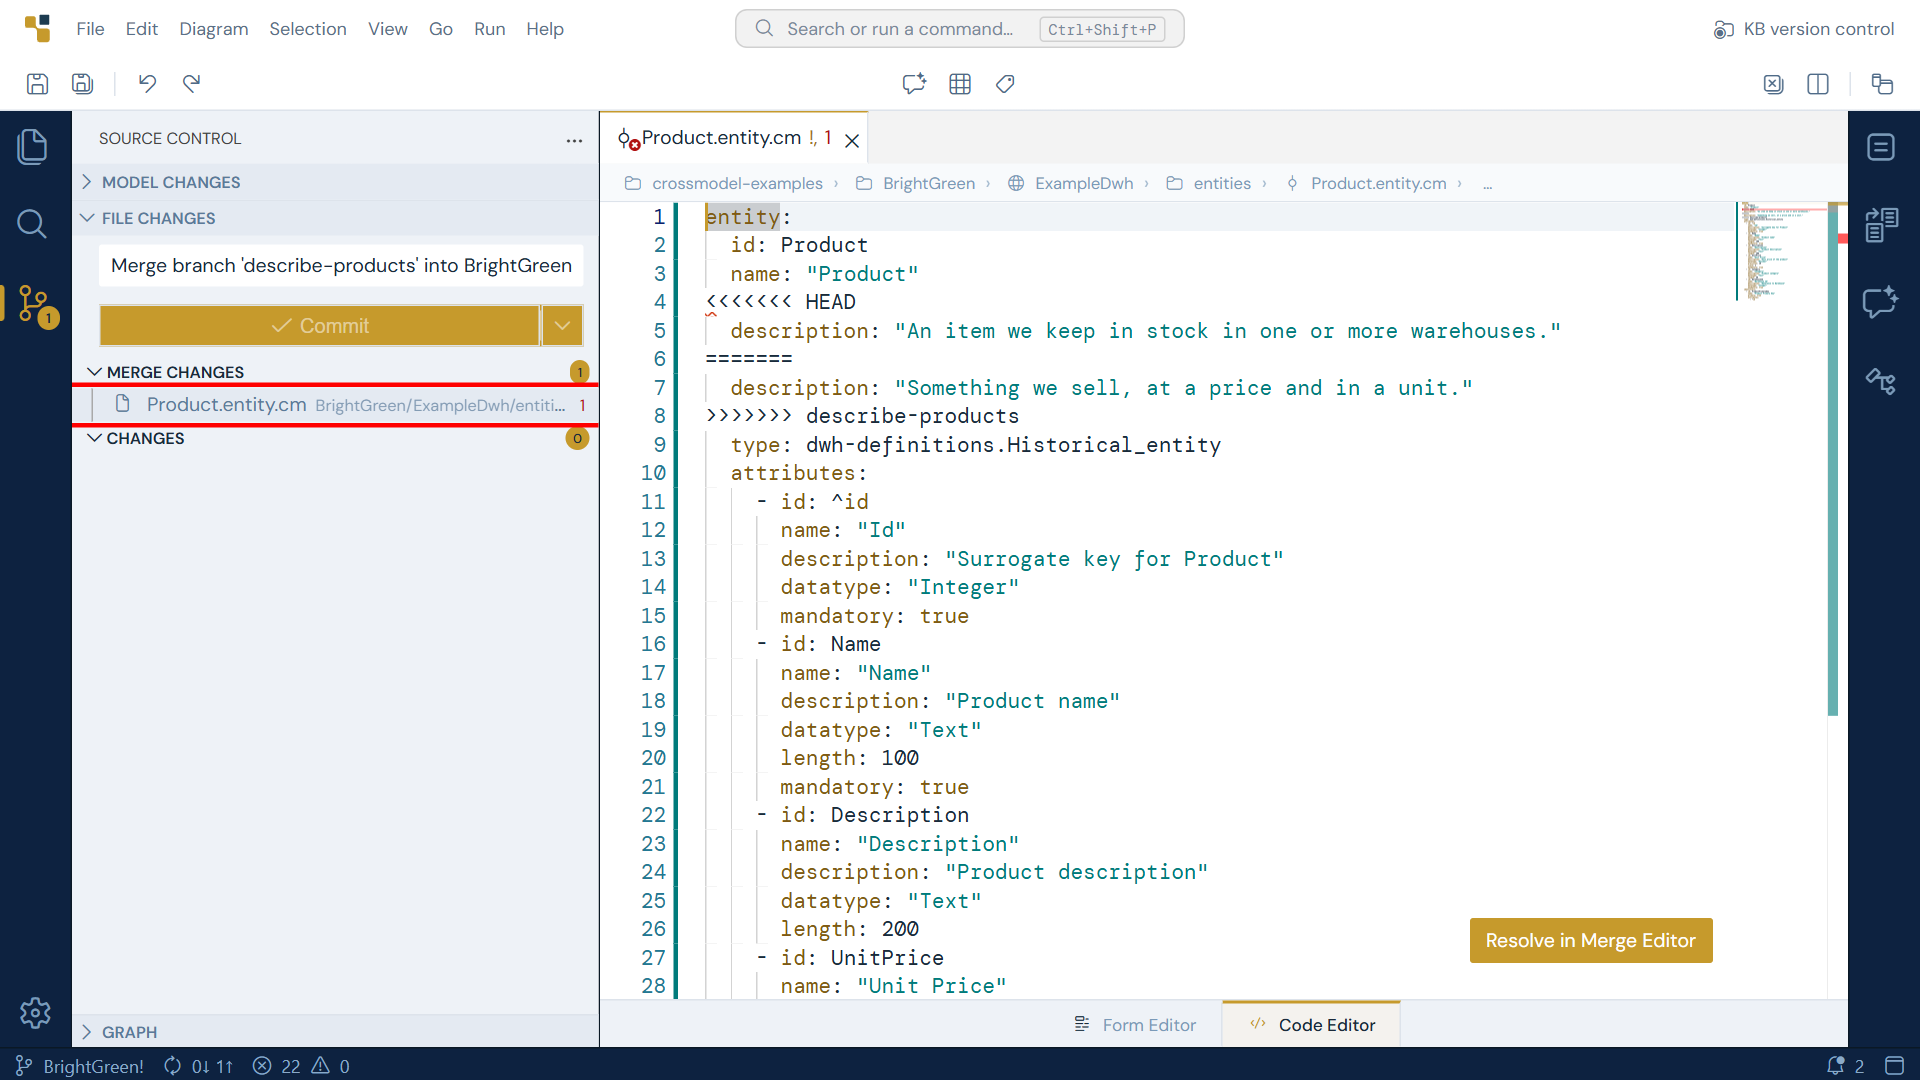
The block under <<<<<<< HEAD is yours, the version on the branch you are on. The block
above >>>>>>> describe-products is theirs, the version being merged in. You could edit
the text here, but the merge editor is the easier way:
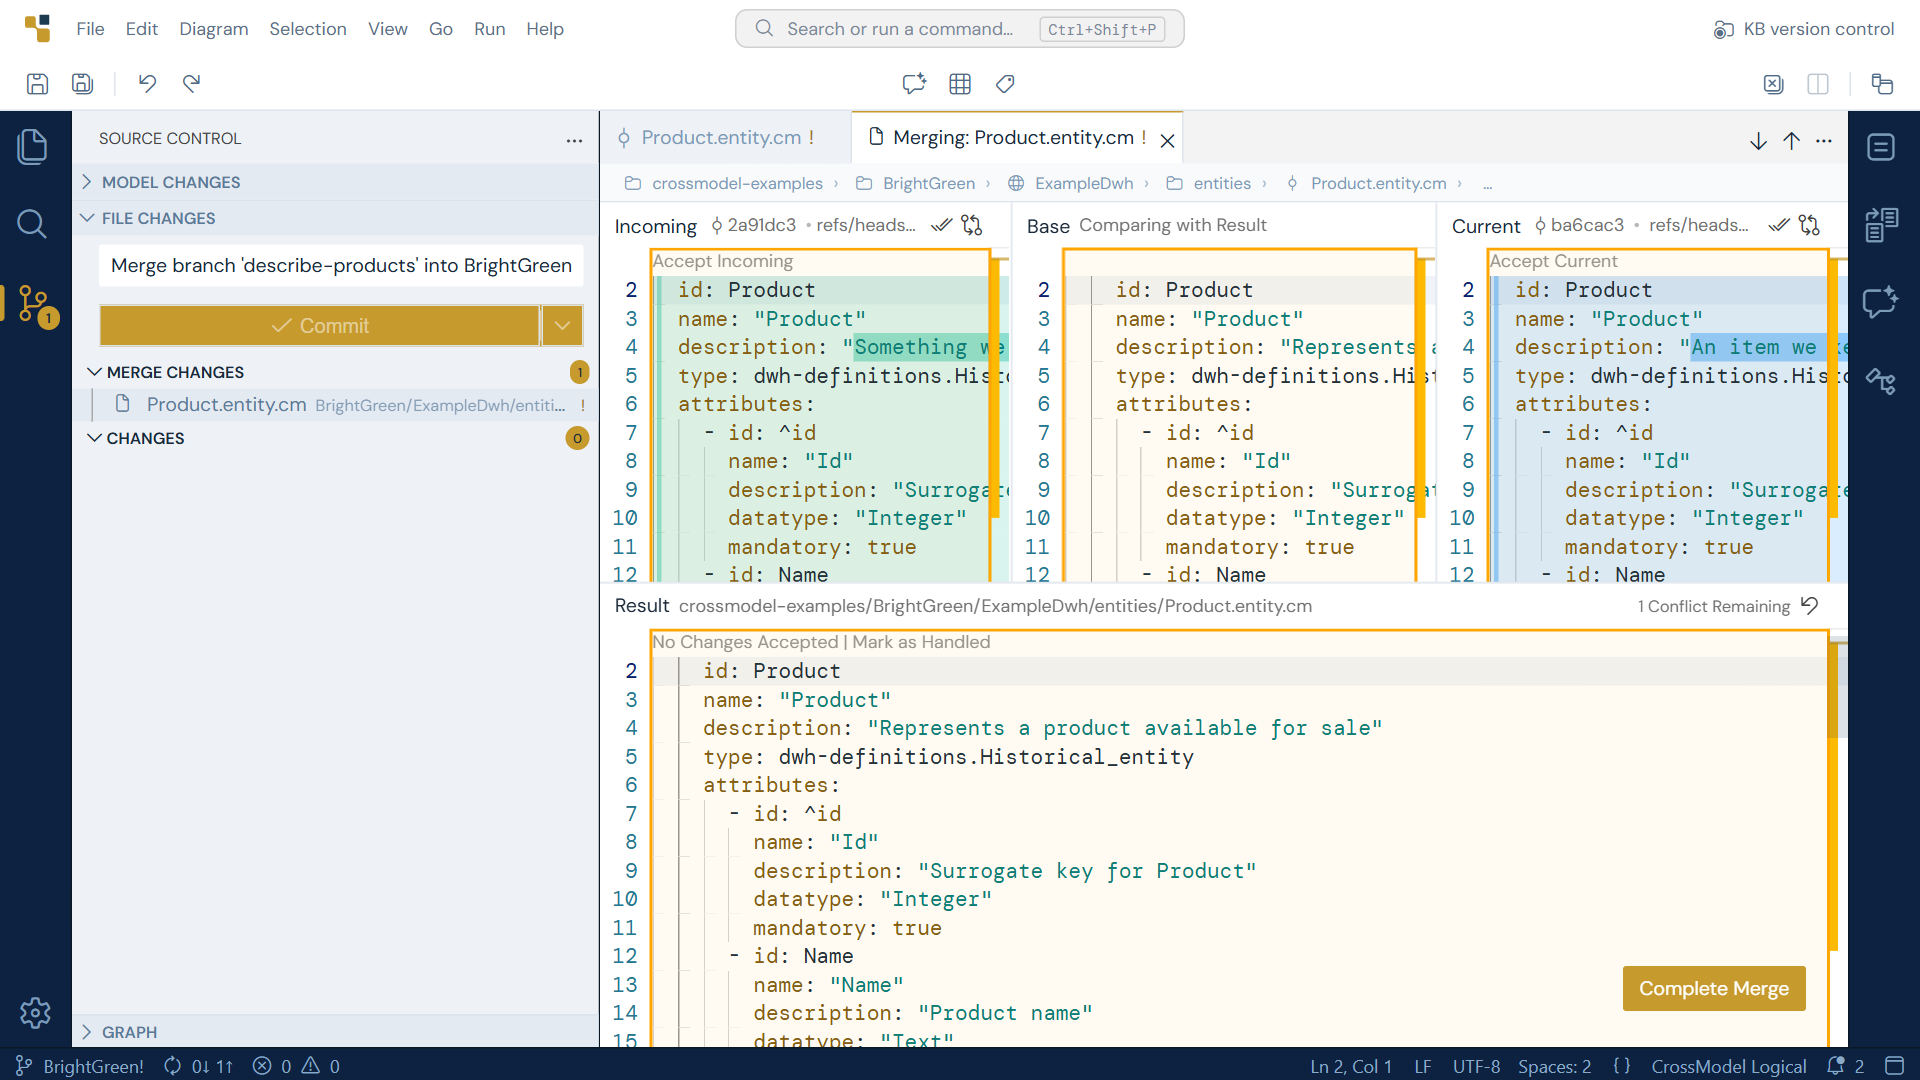
- The three panes at the top are Incoming (their version), Base (what both of you started from) and Current (your version), so you can see not only the two answers but what the line said before either of you touched it.
- The Result at the bottom is the file you are building. It starts from your version and counts the conflicts still open. Press Accept Incoming above their line to take it instead, or type the wording you want straight into the Result.
- When the count reads 0 Conflicts Remaining, press Complete Merge. Back in the Source Control view, stage the file with + if it is not already staged, and press Commit with the pre-filled message. That commit completes the merge.
Until the file is resolved it holds both versions and the markers, so CrossModel cannot read it as a model: the entity drops out of the Model Explorer and the Problems panel reports errors. Both come back the moment the resolved file is saved. Open the file from the Source Control view rather than the Model Explorer while it is in that state.
Conflicts are unpleasant but rare, and the routine above keeps them rare: pull before you start, commit small pieces, push when you are done. The longer two people work on the same model without syncing, the more likely they are to have touched the same lines.
Related articles
- Git Provider Authentication - personal access tokens, how long they are remembered, and your commit identity.
- Using CrossModel Workspaces - what deleting a workspace does, and why the repository on the remote is your safety net.
- The Model Explorer - the files Git tracks, seen as the models they are.